
Hello World,
It has been some time since our last post. As we are reaching the end of the year, we have to work a lot in order to meet deadlines and close currently running projects. Based on the comments received lately, this post (or series of posts) will be once again tackle the xRDP installation process on Ubuntu 17.10 latest release. Part I will describe how to perform a standard installation of xRDP on Ubuntu 17.10. In this previous post, the installation process has been already explained. However, based on the feedback and comments received lately, xRDP software solution is behaving a little bit differently between the Ubuntu 17.10 Beta 2 version and the Ubuntu 17.10 Final Release.
In this post, we will perform a manual installation of xRDP and move steps by steps. So, let’s move on and see what’s happening here !
xRDP installation on Ubuntu 17.10
Assumptions
For this post, we have make some assumptions.
- The Ubuntu 17.10 final release will be used
- At time of writing, all available updates were installed on the Ubuntu machine
- No alternative Desktop will be used. Default Gnome desktop will be the default desktop accessible via the xrdp session
- We are using the standard xrdp package available within the Ubuntu repository for Ubuntu 17.10
- Ubuntu machine has been installed as virtual machine using Virtualbox software
- Default session used is Wayland (it’s supported in Virtualbox)
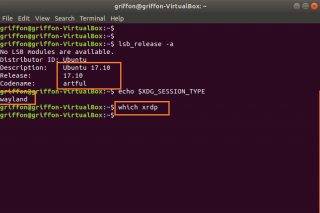
The following screenshot shows the current version of Ubuntu we are using and shows that we are indeed running a Wayland session…The screenshot also shows you that no xRDP software is installed yet.
Click on picture for better resolution
Installing xRDP software
As mentioned earlier, the installation process is quite straight forward nowadays. Indeed, you simply need to install the xRDP package available from the Official Ubuntu Repository. We will simply use the standard apt-get install command to install the xrdp software on our system. So, from the a terminal console, we will simply need to issue the standard apt-get install command as provided below.
sudo apt-get install -y xrdp
You might be prompted for a password. Provide it. You might be asked for confirmation to proceed with the installation. Please confirm and wait for completion
Click on picture for better resolution
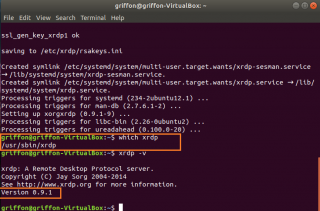
At this stage, the xRDP software is installed and the xrdp service are created and started automatically. As you can see on the screenshot, the xRDP version used by Ubuntu is 0.9.1. which provides drives redirection and clipboard support.
Click on picture for better resolution
However, before you can perform your first remote session, you need to perform some additional configuration changes on your system in order to make xRDP works.
Configuring Ubuntu to support xRDP
Step 1 – Configure Access Console
If you do not perform any configuration changes on your system, the xRDP solution will not work. If you try to perform a remote session, you will access the xRDP login page and you will be able to pass your credentials. However, after that, you will simply see the ugly green xrdp background which will end up after a while with a popup message stating that an error occurred. To be able to perform a remote session, we have to relax the security applied on Ubuntu 17.10 and allow console access not only to root but to anybody.
The easy way to perform this change is to execute the following command in a Terminal console
sudo sed -i 's/allowed_users=console/allowed_users=anybody/' /etc/X11/Xwrapper.config
Click on picture for better resolution
This command simply edit the file located at /etc/X11/Xwrapper.config and replace the line allowed_users=console with the line allowed_users=anybody.
Step 2 – Configure Polkit File
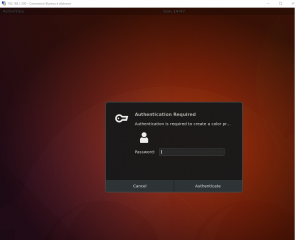
Just after login into your Ubuntu system through xRDP, you might see the following popup asking for some authentication as shown in the screenshot below
Click on picture for better resolution
You will need to cancel multiple time this popup before accessing your desktop interface. To avoid this prompt, we will need to change the polkit configuration. Using admin privileges, create a file called 02-allow-colord.conf under the following directory /etc/polkit-1/localauthority.conf.d/
The file should contains the following instructions and you should not be prompted anymore with such authentication request while remoting into your system
polkit.addRule(function(action, subject) {
 if ((action.id == "org.freedesktop.color-manager.create-device" ||
 action.id == "org.freedesktop.color-manager.create-profile" ||
 action.id == "org.freedesktop.color-manager.delete-device" ||
 action.id == "org.freedesktop.color-manager.delete-profile" ||
 action.id == "org.freedesktop.color-manager.modify-device" ||
 action.id == "org.freedesktop.color-manager.modify-profile") &&
 subject.isInGroup("{group}")) {
 return polkit.Result.YES;
 }
 });
Step 3 – Configure Dock in xRDP
This step will ensure that the Ubuntu Dock is visible when performing a remote connection to your Ubuntu system. In the previous post,we discovered that with no additional configuration the Ubuntu Dock was not visible in the remote session (show screenshot below).
Click on picture for better resolution
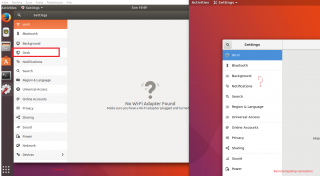
Next logical step would be to check that the Extension is on also in the remote session. To check the the Ubuntu dock is enabled, open the System Settings page. In the console session, you can see the extension node. In the remote Session, you will not see it….
Click on picture for better resolution
To fix this small issue (before even performing your first remote connection), you have to install the Gnome Tweak tool on the Ubuntu machine before trying to perform the first remote session. To perform the installation, you should open a Terminal Console and type the following command
sudo apt-get install gnome-tweak-tool -y
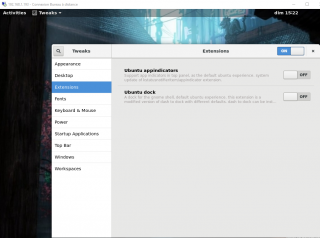
After installing the Tweak tool, you can go back to your remote session. The Dock would still be missing. If you open the System Settings applet, you will still see that the Extensions node is missing. To enable the Dock, you have to use the freshly installed Tweak Tool. Open the Tweak tool applet and this time, you should see the Extensions node. Click on it, you will see that the Ubuntu Dock and the Ubuntu Apps indicators are not enabled.
Click on picture for better resolution
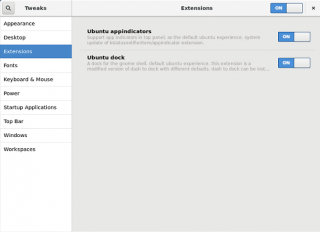
Simply enable them in order to get access to the Dock bar within the remote session
Click on picture for better resolution
Test your configuration
To Test your configuration, you need to perform the following steps
- step 1 – Logout from the Ubuntu machine
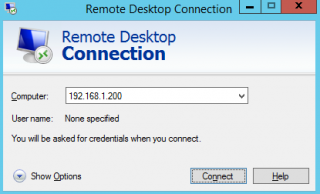
- step 2 – Start your favorite remote desktop client and provide the ip address or hostname of your ubuntu machine
Click on Picture for Better Resolution
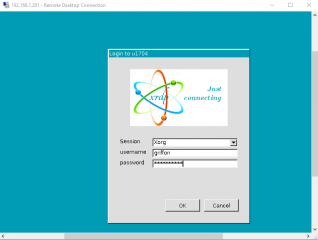
- step 3 – At this stage, you should see the xRDP login page. Provide your credentials
Click on picture for better resolution
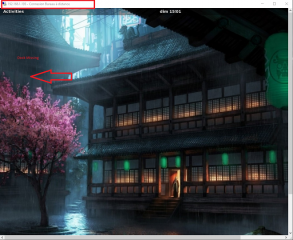
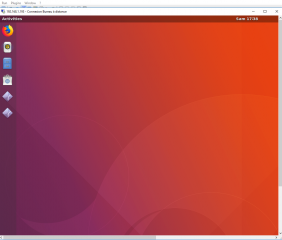
- step 4 – At this stage, you should see your standard Ubuntu Gnome Desktop with the Dock visible….
Click on picture for better resolution
Things to Keep in Mind….
A single user can access console and remote session
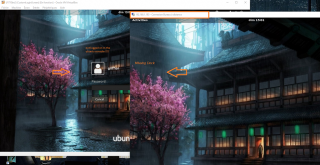
This is the most annoying one. In the past, the same user could be locally logged on on the system and still perform a remote connection to the same machine. Nowadays, this does not seems to be the case anymore. If the user is connected through remote desktop session, and if the same user tries to connect to the console, the login process will loop. If the user is logged into the console, the remote session will only show a black screen. So this point is still not fixed…..
Click on picture for better resolution
Update Theme
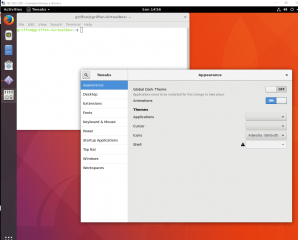
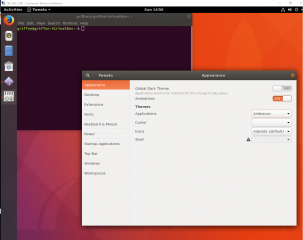
A final minor issue people might want to fix is the default Ubuntu theme to be used. Within the remote desktop session, the Ubuntu theme is not applied by default or it’s kind of mangled as seen in the screenshot below
Click on picture for better resolution
As you can see, in the Gnome Tweak > Appearance, under the Themes section, the applications field is empty. Changing this value to Ambiance will set the standard look to your remote session.
Click on picture for better resolution
Logout Capabilities
So far, we have not encountered issues with logging off and login on back into the remote session with this specific Ubuntu version while fully patched. Before a recent patch, we have noticed that when a user was logging off from the remote session and trying to get back in, only a black screen would be visible. The only option to restore the capability is to perform a reboot a the machine. Again, we have not encountered this issue with the recent updates installed on the system.
Final Notes
This conclude the part I of this series related to xRDP installation. As demonstrated, the xRDP solution still works when running Ubuntu 17.10 with the new gnome desktop environment and the new Ubuntu dock. Ubuntu Gnome 17.10 is using Wayland as default Display server. Wayland display server does not support officially remote session. So, how xRDP can still work ? xRDP is working because it use the xorgxrdp backend component which is still using X11 environment. So the session within your remote connection is basically a simple X11 session. This post has shown also that the installation process has not changed dramatically. The only changes (that have been only described in our previous posts) are the change in the Xwrapper.config file and the installation of the Tweak tool needed to make the Ubuntu Dock visible in the remote session .
In the next post, we will see if we can automate a little bit the installation so we can speed up this process….
Till next time
See ya


Thanks for the great post and for your continued work on XRDP on Ubuntu.
I have Ubuntu 17.10 up and running and everything worked find after following your description, however after patching Ubuntu (with apt-get), my keyboard mapping now does not work through XRDP. I have a Norwegian Keyboard in a English version of Ubuntu. It worked fine after the first install, but not after the update.
Any idea how I can fix this ?
Many thanks
Ian
@Ian,
Actually, you should be able to update your keyboard layout within the remote Desktop session by using the Keyboard layout applet… You should see either a toggle that would allow you to switch from one language to another or you simply add the keyboard layout that you need to use and you should be able to have it within your remote session
Hope this help
Till next time
The weird thing was, that the keyboard layout applet was showing the correct keyboard, but the wrong characters were being displayed when using applications.
After a reboot, it seems to have resolved itself, so I am hopeful it was just a passing issue.
Thanks
Ian
I have followed your instructions to the point where I need to edit /etc/X11/Xwrapper.config.
The main issue that I am having with getting past that is that Xwrapper.config does not exist in the path.
Any idea what I should do here?
@johannes;
I do not know::: this is a standard X11 file… If it’s not there, no clue…
Try to get a copy of the file and copy/paste in the correct location and see if this would work
Hope this help
Till next time
See ya
Very nice Guide,
I uses a diffrent setup (kvm ubuntu 17.10 server + gnome-session)
but I get a working xrdp desktop using your guide
but I also get side effect on the polkit.service:
when I uses the /etc/polkit-1/localauthority.conf.d/02-allow-colord.conf file.
polkit crash (segfault in libpolkit-backend-1.so.0.0.0) each time it is called by an application requiring privileges (package manager, configuration manager, …) an fails in different ways
fist I thought this could be related to this line :
subject.isInGroup(“{group}”)
as “group” is not an existing group
and changed the group to xrdp, but no changes.
When I remove the 02-allow-colord.conf file and reload polkit.service , the system work fine. (but I get the annoying popup.
Do you have any suggestion to fix this issue with the polkit rule ?
@Aalaesar;
About the subject.isInGroup(“{group}”) section, the group is indeed just a placeholder. I will update the script and ensure that the placeholder is replaced by a proper group name. I would try to use the most standard group available in Linux which is users)
Give it a try and provide feedback if possible
Till next time
See ya
Hello
I have a question about reconnect a session.
I am able to get the xrdp running on my Win 10 laptop, it works slow, but fine
If disconnect and re-start the rdp session, I can placd my crendtials, but the log-in screen stucks and does not display the gnome desk. The log-in field are inactive.
So re-connect is impossible
I’m on a fresh install of 17.10 and it works fine following your directions, but I am running into the issue you document that it works once after a system reboot. Subsequent attempts authenticate and then give me a black screen. Any ideas? xrdp is 0.9.1 right out of the Ubuntu repositories.
@Gerd,
We have noticed this situation as well… so far we have not looked into the issue because we are overloaded with work and little time to blog
In the coming posts about xrdp and Ubuntu 18.04, we will check for this point and possibly mention it as a possible detected issue
Thank you for your visit and your feedback
Till next time
See ya
@Jay,
Not sure to understand the question fully. If my understanding is correct, as long as the same user is login into either xrdp session or locally on the machine, the xrdp solution should be working between reboots and between sessions. If a user is locally logged on the machine, the same user trying to access the xrdp session will indeed get a black screen or disconnected from the machine. So far, we have not looked into a possible solution to that
is this answering your question ?
Till next time
See ya
Hello and thank you very much for the tutorial. Everything is working on my Ubuntu 17.10, except the keyboard 🙂 I can type only when I enter my credentials and when logon the keyboard is not working for me. Any ideas how to fix that? I tried to connect from Windows Remote Desktop and Android Remote Desktop app – same thing, keyboard stop working after i enter my password and login. Thanks in advance
@Rado,
No clue so far and we are not sure we understand the problem. are you telling that once you logged into the remote session, you cannot use the keyboard anymore (typing does not show anything on the screen ?)
if this is the case, we have never seen that. on the other hand, in the past, to have support for Android devices, xrdp needed to be compiled from source using specific switches….
So, the only thing we could suggest here. restart your ubuntu machine and try only from windows machine and see if keyboard is working.
Then, do the same from android and check if indeed android could be the problem
Again, just an idea because never had such issue
till next time
see ya
@Griffon,
Yes, that’s exactly the issue. When I login (doesn’t matter if i connect from Windows or Android) i cannot use the keyboard. When I start typing I can see that the cursor start to flicker more quickly, but not a single character is displayed on the screen. Very strange issue indeed.
I tried several restarts etc, but nothing happens. One thing that I can think of now is that i have Teamviewer daemon started on my Ubuntu 17.10, not sure if this could be an issue, but will test it without it now.
Thanks for the fast reply. I will update if I have success on this.
Ok, just an update, the issue appears after i start Chrome and this popup appears, i enter my password and keyboard stop working:
https://www.dropbox.com/s/apqvk4l5c2t5kak/keyring.png?dl=0
Any ideas? Is it Chrome related or Ubuntu? Thanks
So I followed this to the letter, and after an apt-get upgrade which installed a new kernel image, I now only get the famous empty blue screen after login.
There’s nothing really helpful in /var/log/xrdp.log or /var/log/xrdp-sesman.log to help me understand this.
What would’ve changed in the latest updates of 17.10 that causes XRDP to break? I should note I’m also using nvidia-drivers as we need CUDA capability on this machine.
@John,
we have tested this on Ubuntu 17.10 with dist-upgrade in a virtual machine and it works…So it might be the nvidia drivers that cause some issues….This is a known statement when talking about xrdp and nvidia drivers…The first thing I would try is to add in the /etc/xrdp/sesman.ini file the following lines in the [Xorg] section (at the bottom of the section)
param=-layout
param=X11 Server
and see if you can already go a step further…. Then I’m assuming that there might be a need to check the xorg.conf for the nvidia drivers
We are not using nvidia drivers so will be difficult for us to troubleshoot
Hope this help
Till next time
See ya
I got this error
reemo@rhjenkins:~$ sudo sed -i ‘s/allowed_users=console/allowed_users=anybody/’ /etc/X11/Xwrapper.config
sed: can’t read /etc/X11/Xwrapper.config: No such file or directory
@Hjob;
This means that your distribution does not have the /etc/X11/Xwrapper.config file… so, first thing is to check if it’s there yes or no (maybe a typo)… if not there, have you tried to connect, is this working ?
if not there and not working, we assume that you would need to create the file and populate it accordingly
till next time
See ya