!! Important Note !!
This post applies only up to xrdp package version 0.6.x.
Any new recent xrdp package (i.e. 0.9.x), an updated post with detailed configuration details can be found at How to secure Xrdp Connection using SSH Tunnels on Ubuntu 20.04
Hello World,
Again, we are back on our favourite topic (I should say your favourite topic) : xrdp. Recently, I have received some comments about the xrdp software solution and the security level. As long as you use the xrdp solution on your internal network, there is not much security issues.
However, some other people would like to increase the security level of the xrdp solution. A standard way to have more secure connection in Linux world is to use ssh protocol and create tunnels between client and hosts. In some of the comments we have received some users have tried (and suceeded) to configure a xrdp over ssh solution.
This post will quickly explain how to perform such configuration. So, if you need to have a more secure solution, this post might be for you.
Let’s go
Step 1 – Installing the SSH server on Ubuntu
To create ssh tunnels, we need to have the correct package installed on the Ubuntu machine. In this post, we assume that you have installed Ubuntu 14.10 and you have already configured your XRDP server solution. At this stage, if you want to enforce security and use ssh protocol, you will first need to install the openssh server on ubuntu.
To to this, you will perform the following actions
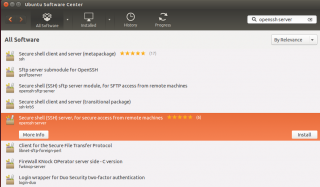
1. Open the Ubuntu Center, in the search box, type openssh server and press enter. in the ubuntu Software center, select the openssh-server.
Click on picture for better resolution
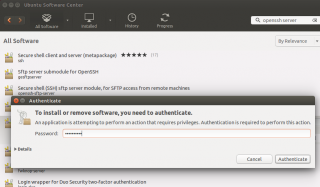
2. Click on the install button and you will get prompted for credentials. Provide you credentials and Press OK
Click on picture for better resolution
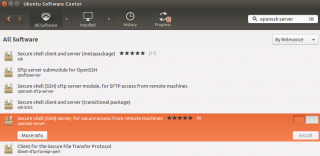
3. Wait for installation to complete
Click on picture for better resolution
When installation completes, you are ready to go. You can perform additional configuration in order to secure your ssh server. This is not the scope of this post. We just want to demonstrate how to xrdp over ssh. After installing the openssh-server package we have a up and running ssh server ready to be used.
PS: If people have best practices for configuring ssh, please let us know and we will publish them including the credits
We can move to the next section
Step 2 – installing and configuring xrdp
This step should already been performed. However, if you start from scratch, you will need to install and configure xrdp on your server as well. We will not explain how to perform this operation in this post but ucky you, you can find a full explanation on how to perform the install & configuration using the following link
After you have performed your xrdp installation, it’s time to test your connection. Using the remote desktop client, you should be able to connect and reconnect to your Ubuntu machine. If everything is ok, it’s time to move to the next step….
Step 3 – Configure your Client for SSH Connections
Get a ssh client (i.e putty.exe)
In this post, we assume that you want to have remote access to your ubuntu machine from a Windows 7/8 computer. You will need to install a ssh client first. We are using the putty.exe client. You will need to download it and install it (if you go for the msi package). You can find putty at this location
Configuring putty for xrdp connections
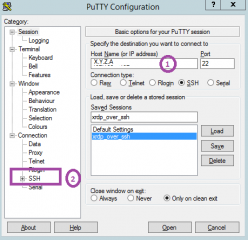
When putty is installed, open it. You will see in the putty client that you have to provide information about the machine you want to connect to (number 1 on the screenshot). So, in this field, provide hostname/ip address of the ubuntu machine you want to connect to.
Click on picture for better resolution
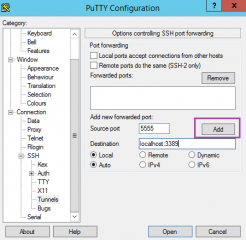
Then in the left menu, expand the SSH node and go to Tunnels.
In the Tunnel page, you will have to provide
- a source port (we have used 5555 but you can use any port available on your windows system)
- a destination (we have used the syntax localhost:3389 where the port 3389 is the default xrdp port )
Click on picture for better resolution
You have to click on the Add button. At the end, you should see something like the screenshot below
Click on picture for better resolution
Note :
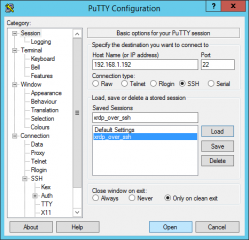
If you go back to the session node (on the left menu), you can save the session settings. I would recommend this so you do not have to perform this setup each time
Click on picture for better resolution
Step 4 – Test your xrdp over ssh connection
At this stage, everything should be configured properly and you can try to connect to your server using xrdp over a SSH tunnel. So, before connecting to xrdp, you first need to create the ssh tunnel. To do this, you will open your putty client, load the saved configuration session (in my screenshot above it’s called xrdp_over_ssh) and click open in putty client.
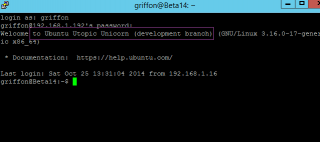
A terminal box will be displayed and you will be prompted for a username and a password
Click on picture for better resolution
If everything is ok, you should get the greetings of the system. You can check that you are indeed connected to an Ubuntu 14.10 machine.
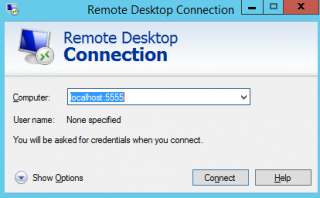
You have just created you tunnel. Now, it’s time to perform a remote desktop connection. So, you will open your remote desktop client and you will type the following : localhost:5555
Click on picture for better resolution
Yes, you read it correclty. You will perform a remote desktop connection (request) to your host on the port 5555 and the ssh client will forward your request to the xrdp server on port 3389. This is what the configuration we have performed will do. If everything goes well, you will be presented with the xrdp login box. You can now enter your credentials and you will have a secure ssh connection to your xrdp server.
Enforce SSH connection over Xrdp
The setup above allows you to create ssh secure connection to your xrdp server and access the remote desktop over the ssh tunnel. The configuration above does not enforce the usage of ssh. In other words, if you try to connect directly to your xrdp server, you will have no problem to access the xrdp login box and access your remote desktop session. This situation might be ok for your. We can imagine that when you are connected on your internal network, you do not want to use ssh tunnels but when your are outside, you would have the possibility to perform a ssh connection first which is more secure obviously.
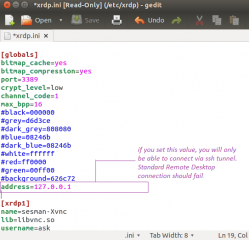
If you want to enforce the ssh connection, you will need to modify the /etc/xrdp/xrdp.ini file on the Ubuntu machine. In the [Global] section, we will add at the end of the section, the following line
address=127.0.0.1
Click on picture for better resolution
You need to restart the xrdp service by issuing the following command
-
sudo service xrdp restart
What you are actually saying when using this option is that no remote connection can be performed on the Ubuntu machine (for xrdp). If you try to perform a direct connection to your xrdp server from your windows system, this should fail because you are not authorized to connect to it.
If you perform the ssh connection first and then try the xrdp connection, you should go through and you should have access to your remote desktop session. This is because we have basically started the xrdp from the localhost machine given that we are connected through ssh first.
Final Notes
And Voila! We are done. If you have followed this post, you should be able to perform a secure connection over ssh to your xrdp server. The configuration steps are not that complicated. As long as your xrdp server works accordingly, you can add an additional level of security using ssh tunnels
I hope you enjoyed this post
Till next time
See ya
Nice! If you want to learn about SSH local and remote tunneling on Ubuntu you can take a look at SSH local and remote tunneling on Ubuntu (video tutorial).
Excellent, simple and nice! Thnx!
Worked all fine, thanks a lot!
no problem…happy to see that this post is useful
thank for the visit and positive feedback
Till next time
See ya
I added line “ip=127.0.0.1” to “global” section of /etc/init/xrdp.ini
Then rebooted the system, however, I still can create a XRDP connection without explicitely using the tunnel, as in:
mstsc 10.248.8.201
Linux is OEL6.
What did I miss?
@Aj,
just a first guess….you have typed ip=127.0.0.1 but the correct value should be address = 127.0.0.1
Please confirm that you have set the correct value in your xrdp.ini file
Restart the service
And you should be good to go
Till next time
See ya
Griffon, excellent article! This knowledge is *huge* for me. However, I need some help. I have set the “address=127.0.0.1” line in my xrdp.ini file, saved, and restarted, and no matter what, even when not SSH tunneling, I can connect. I don’t understand it. Why is that? Why is it letting me in?
I am using Windows 8.1’s built-in Remote Desktop Connection to connect to a Raspberry Pi running the xrdp server. I can get in without tunneling. When using my Xubuntu laptop running Remmina I can also get in without tunneling. No idea why.
Here is my complete xrdp.ini file. It used to contain a bunch more but I have deleted all connection entries but the first one, since none of them worked anyway, and they seemed to be extraneous:
/etc/xrdp/xrdp.ini
[globals]
bitmap_cache=yes
bitmap_compression=yes
port=3389
crypt_level=high
channel_code=1
address=127.0.0.1
[xrdp1]
name=sesman-Xvnc
lib=libvnc.so
username=ask
password=ask
ip=127.0.0.1
port=-1
Thanks!
Gabriel Staples
www.ElectricRCAircraftGuy.com@Gabriel,
I will need to check this…It’s a long time I haven’t use this setup…if you can wait a few days, i will try to setup a test lab and see if I can get it working as described. I will then come back to you with I hope correct info
Thank you for the positive comments and feedback
Till next time
See ya
@Gabriel Staples,
we have double checked and for us it works, adding the address=127.0.0.1 in the xrdp file, restarting… and done. IF we try to connect directly (with no tunnelling), we CANNOT initiate an RDP Connection. If I use SSH, then I can create a tunnel….
So I do not know what the problem could be for you. .Apparently, you can still access the port 3389 through other ip which is unexpected..
You could try to play with the Firewall and configure you system to block access from ip other that 127.0.0.1 to access through port 3389
Hope this help
Till next time
See ya
Hi,
I just followed your tutorial and everything works fine, even the connection to localhost:5555 over SSH, but as soon as I add address=127.0.0.1 to xrdp.ini I can’t connect anymore because Remote desktop shows an error message: An internal error has occurred.
You know how to fix this?
Thank you very much!
@Mat St,
have you created/configured the ssh tunnel accordingly ? which ssh client are you using ? can you explain a little bit more your setup so we can have an idea of what’s happening ?
waiting for some feedback
Till next time
See ya
Hi
Thanks for this clear explanation.
I have another use case : secure browsing without ‘SOCKS’ way.
–> the aim is to launch a browser on the SERVER_A and access DMZ web applications
–> this should be done through an SSH tunnel established from a user workstation
Tricky solution I try to find …
Thanks in advance for ideas
Regards
Aygit
what is Xrdp and SSH?
I’m having the same problem as Mat st.
As soon as I add address=127.0.0.1 to xrdp.ini I can’t connect anymore because Remote desktop shows an error message: An internal error has occurred.
I have checked XRDP is launched on ::1:3389
I’m creating the tunnel with PuTTY as it is said in the tutorial. It works fine without the “address” line, but then it also accepts connections not using the SSH tunnel
@Gonzalo,
The post is a little bit outdated and applied to previous version of xrdp. Parameters and usage has changed with newer version of xRDP.
If you can wait a few days, it would be cool so it offers us the possibility to update this post and provide the steps needed to be performed when using a more recent xrdp/Ubuntu version
If really urgent, let us know and we will provide a quick explanation on how to proceed…
Till next time
See ya