Hello World,
Again, we are back on deployment topics and techniques. In part I, we have seen how to perform a standard installation of MDT 2013. We have then completed the installation process by installing the ADK 8.1 components. We didn’t perform any configuration yet.
In this post, we want to demonstrate how you can setup a standalone MDT configuration while using WDS role (actually we will only install a small part of the role). By adding the WDS part, we will basically add the PXE and TFTP features to our server.
When this configuration part will be performed and completed, we should be able to deploy OS using MDT 2013 in a stand alone configuration.
Let’s do this !
Note :
In this post, we assume that you are using Windows 2008 R2 computer. We will explain in another post how to configure a standalone MDT 2013 Configuration on Windows 2012 R2 at a later stage.
Create your Deployment Share
Because we just wanna demonstrate the addition of WDS, we will perform only a limited set of configuration on the MDT 2013. To ease the process and avoid errors, we will create the deployment share before installing the WDS component.
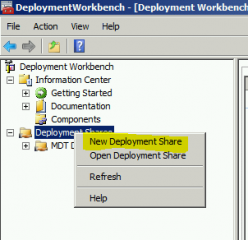
To create your deployment share, open the Deployment WorkBench, go the the deployment shares node;
Right-click on it and select New Deployment Share
Click on Picture for better Resolution
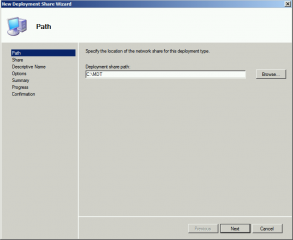
In the Path Page, specify where you want to create your MDT folder. Keep track of this as it will be used for the WDS configuration tweaks. Press Next
Click on Picture for better Resolution
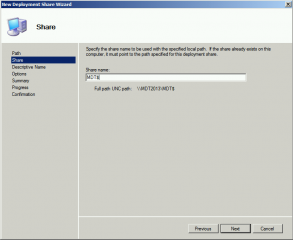
In the Share Page, provide a share name and Press Next
Click on Picture for better Resolution
In Description Page, accept default and Press Next
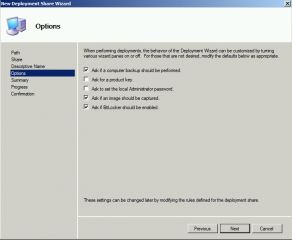
In Options Page, Select your options and Press Next
Click on Picture for better Resolution
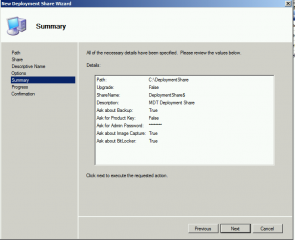
In Summary Page, review your settings and Press Next
Click on Picture for better Resolution
In Progress Page, wait for the operation to complete and press Next
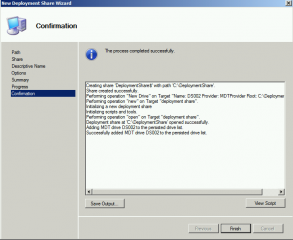
In Confirmation Page, Press Finish
Click on Picture for better Resolution
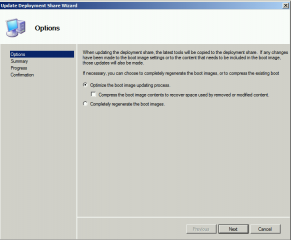
At this stage, we will also generate the iso and wim file needed to boot into WINPE mode. To create these files; you simply need to open the Deployment Workbench, go the the deployment shares node; right-click on it and select Update Deployment Share. The Wizard starts
In the Options page, accept default and Press Next
Click on Picture for better Resolution
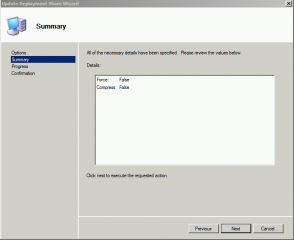
In the Summary Page, Press Next
Click on Picture for better Resolution
In Progress Page, wait for the operation to complete and press Next
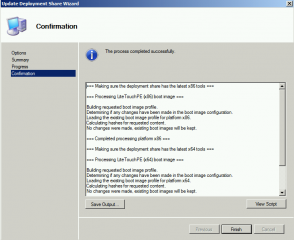
In Confirmation Page, Press Finish
Click on Picture for better Resolution
Because we want to still perform a custom installation of WDS and not to use the default structure provided by the WDS installation process, we will need to populate our %DeploymentShare%>\Boot with some additional files.
So, It’s time to move to the next section
Populate the Tftp Folder structure
If you go to your Deployment share (in my scenario, it’s located at c:\MDT), you can see a folder structure created by MDT wizard. If you go to the <%Deployment Share%>\Boot, you should see something like this.
Click on Picture for better Resolution
In this folder, we need to copy some files needed for the tftp boot process to work as expected. We need to find out the following files :
- Boot.sdi
- BootMgr.exe
- pxeboot.n12
- BCD
Where do you get this files ? Some of the files can be extracted from the LiteTouch_PE_xx.wim files that have been generated when you have updated the deployment share. Another File will be simply copied over from the MDT deployment share. Finally, the BCD file need to be generated in order to reflect our custom setup. Let’s go
Obtain the bootmgr.exe and pxeboot.n12 files
To extract the files, you will need to perform the following actions
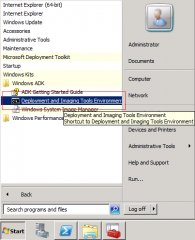
Step 1 – Click on the start menu>Windows ADK>Deployment and Imaging Tools Env
Click on Picture for better Resolution
Step 2 – In the command prompt that just opened, create an empty folder where to mount the wim file. In my case, have issued the following command
mkdir c:\Mount
Step 3 – It’s time to mount the wim image by issuing the following command (adapt the command to your environment)
Dism /mount-Wim /WimFile:c:\MDT\boot\LiteTouchPE_X64.wim /mountDir:C:\Mount /index:1
Click on picture for better Resolution
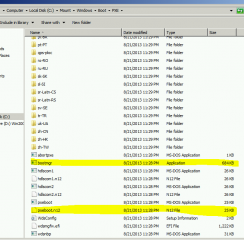
Step 4 – Browse to the folder where you have mounted the wim file (in my case c:\mount) and go to the folder ..\windows\Boot\PXE. As shown in the screenshot, select the bootmgr.exe file and the pxeboot.n12 file and copy them into the <%DeploymentShare%>\Boot (in my case c:\MDT\boot)
Click on Picture for better Resolution
Obtain the boot.sdi file
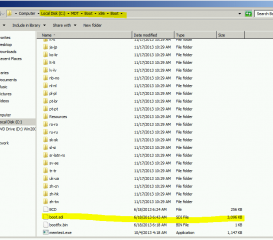
We still need to get the boot.sdi file. This file is already present on your MDT Server. If you browse to your <%DeploymentShare%>\Boot\x86\boot, you will find the boot.sdi. Copy this file into your <%DeploymentShare%>\Boot folder
Click on Picture for better Resolution
Generate the BCD File
To generate the bcd file, we have created this small batch file. You have to adapt the batch file to reflect your environment. The only change you should perform is the location of the bcd file. The file should be located under <%DepmoymentShare%>\Boot
REM ————————————————————————–
REM Creates BCD (boot configuration data) for MDT 2013 combined with WDS
REM —————————————————————————
REM CHANGE AS REQUIRED
REM ——————-
set BCD-File=C:\MDT\Boot\bcd
del %BCD-File%
Bcdedit /createstore %BCD-File%
Bcdedit /store %BCD-File% /create {ramdiskoptions}
Bcdedit /store %BCD-File% /set {ramdiskoptions} ramdisksdidevice boot
Bcdedit /store %BCD-File% /set {ramdiskoptions} ramdisksdipath \boot\boot.sdi
for /f “tokens=1-3” %%a in (‘Bcdedit /store %BCD-File% /create /d “WinPE x86” /application osloader’) do set guid1=%%c
Bcdedit /store %BCD-File% /set %guid1% systemroot \Windows
Bcdedit /store %BCD-File% /set %guid1% detecthal Yes
Bcdedit /store %BCD-File% /set %guid1% winpe Yes
Bcdedit /store %BCD-File% /set %guid1% osdevice ramdisk=[boot]\boot\LiteTouchPE_x86.wim,{ramdiskoptions}
Bcdedit /store %BCD-File% /set %guid1% device ramdisk=[boot]\boot\LiteTouchPE_x86.wim,{ramdiskoptions}
for /f “tokens=1-3” %%a in (‘Bcdedit /store %BCD-File% /create /d “WinPE x64” /application osloader’) do set guid2=%%c
Bcdedit /store %BCD-File% /set %guid2% systemroot \Windows
Bcdedit /store %BCD-File% /set %guid2% detecthal Yes
Bcdedit /store %BCD-File% /set %guid2% winpe Yes
Bcdedit /store %BCD-File% /set %guid2% osdevice ramdisk=[boot]\boot\LiteTouchPE_x64.wim,{ramdiskoptions}
Bcdedit /store %BCD-File% /set %guid2% device ramdisk=[boot]\boot\LiteTouchPE_x64.wim,{ramdiskoptions}
Bcdedit /store %BCD-File% /create {bootmgr} /d “WinPE x86”
Bcdedit /store %BCD-File% /set {bootmgr} timeout 30
Bcdedit /store %BCD-File% /set {bootmgr} displayorder %guid2% %guid1%
Bcdedit /store %BCD-File% /enum all
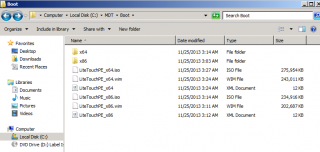
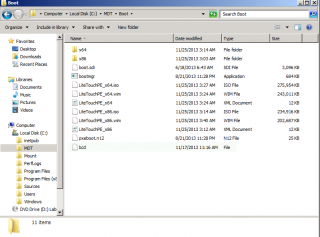
At this stage, you <%DeploymentShare%>\Boot folder should look like the following screenshot
Click on Picture for better Resolution
Install DNS,DHCP,WDS-Transport Roles on the MDT 2013 Server
Now; we are ready to configure additional roles and services on Windows 2008 R2 in order to make it work as a PXE/TFTP server in a standalone configuration for MDT 2013.
We will first install the Windows 2008 R2 roles that you are needed to meet our requirements. We will be installing from the Powershell command line the following Roles :
- DNS Server
- DHCP Server
- WDS Server (only the WDS Transport Role component)
To perform the installation, Open your Powershell Console and issue the following command
import-module ServerManager
Add-WindowsFeature DNS,DHCP,WDS-TRansport -includeAllSubfeature
This is it for this step. Note how easy it was while using the powershell cmdlet…
Configure the DHCP service for MDT 2013 Server
We will need to configure some options on our DHCP server. Some options might not be required but we still use them. To configure the DHCP, we are using a small batch file that will create the scope and specify some other options. So, from a command prompt, run the following batch file (and modify it accordingly in order to reflect your infrastructure).
@echo off
Rem Basic batch file to quickly configure DHCP SCopes and Options
Rem Created by Griffon
Rem
REM *****************************************************************************
REM * MODIFY THIS SECTION AS REQUIRED
REM *
REM * BEFORE RUNNING THE SCRIPT, INSTALL DHCP SERVICE IF NOT ALREADY DONE !!
REM *
REM * ***************************************************************************
SET DHCPSCOPENAME=PXE
SET DHCPSCOPEDESC=”DHCP SCOPE PXE CLIENTS”
SET DHCPIPSCOPE=192.168.1.0
SET DHCPIPSUbnet=255.255.255.0
SET DHCPSCOPERANGE=192.168.1.200 192.168.1.250
SET TFTPIP=192.168.1.10
SET PXEBOOTFILENAME=pxeboot.n12netsh dhcp server add scope %DHCPIPSCOPE% %DHCPIPSUbnet% %DHCPSCOPENAME% %DHCPSCOPEDESC%
netsh dhcp server scope %DHCPIPSCOPE% add iprange %DHCPSCOPERANGE%
netsh dhcp server scope %DHCPIPSCOPE% set optionvalue 066 String %TFTPIP%
netsh dhcp server scope %DHCPIPSCOPE% set optionvalue 067 String %PXEBOOTFILENAME%
net stop DHCP
net start DHCP
netsh dhcp server scope %DHCPIPSCOPE% set optionvalue 043 Binary 010400000000ff
netsh dhcp server add optiondef 60 PXEClient String 0 Comment=PXE Support
netsh dhcp server set optionvalue 60 String PXEClientecho.
echo.echo – CONFIGURATION COMPLETED !!
echo.
echo.pause
Configure WDS service on the MDT 2013 Server
Why did we install the WDS Transport Role ? In Windows 2008 R2, the WDS transport component will provide the TFTP/PXE capabilities that MDT 2013 needs in order to deploy Operating Systems. In order to have this TFTP/PXE functionalities, we will need to modify some the registry keys.
We will show you how you can perform the change through the Powershell console. Open your Powershell console and copy/past the following code.
#Create WDS PRovider
New-ItemProperty “HKLM:\SYSTEM\CurrentControlSet\Services\WDSServer\Providers\WDSPXE” -Name “ProviderOrders” -Value “WDSSIPR” -PropertyType “MultiString” #Allow DHCP
set-ItemProperty “HKLM:\SYSTEM\CurrentControlSet\Services\WDSServer\Providers\WDSPXE” -Name “UseDhcpPorts” -Value 0 #DEFINE TFTP ROOT – Specify the Path of the Deployment Share you have created above
New-ItemProperty “HKLM:\SYSTEM\CurrentControlSet\Services\WDSServer\Providers\WDSTFTP” -Name “RootFolder” -Value <%Your Deployment Share Path%> -PropertyType “String”
Note : You will need to change the red part with your own value
Tell WDS where to find the boot winpe images
You will need to perform a final step in order to have your system configured properly. You have to tell WDS where to find the bootable images you will be using. To perform this configuration, simply perform the following actions
- Step 1 – On the WDS/DHCP/DNS Server, open the file C:\Windows\system32\wdssipr.dll.conf.ini
- Step 2 – Locate this section (which should be empty in your configuration file)
X64BootImage=boot\LiteTouchPE_x64.wim
- Step 3 – Save the file and you should be good to go
Start WDS Service and configure it for automatic startup
It’s time to start the WDS Transport component. To do that, you will issue the following command in a command prompt (or Powershell Console)
WDSUTIL /Set-TransportServer /ObtainIPv4From:DHCP
WDSUTIL /Start-TransportServer
As a final step, we have configured the WDS Service to start automatically by issuing the following command
Set-Service -Name WDSServer -StartupType Automatic
Final Notes
And Voila ! We have successfully setup a MDT 2013 server in a standalone configuration using the WDS-Transport component. It’s time for you to test this configuration and see if this is working. I like the fact that I can have a standalone configuration of MDT 2013 using only Microsoft Technologies…
I might publish a script (or the structure of script) that would automate this setup and configuration steps.
The good news is that with Windows 2012 R2, you can have a standalone WDS configuration which make it easier to combine the role with MDT 2013. Finally, Microsoft listen to some of us and is providing a nice standalone deployment solution.
Till next time
See ya

Hi,
I have a 4 different hardware and one of my hardware have 2 hard disk. I want to create 3 partition in that system. C drive will be 100 GB , D drive will remaining full space and for E drive it should take full 2 hard disk.
can u pls help me..
Thank X
Hello,. This will become a step in your task sequences (see this screenshot http://bjtechnews.files.wordpress.com/2012/06/6-16-2012-8-28-50-pm.png)
You can either try to use diskpart and included it as a script. If you google a bit, you will see the syntax and how to use it as a script diskpart /s
The othe option is to use the task sequence related to format disk inside the MDT interface (see this screenshot http://www.niallbrady.com/wp-content/uploads/2012/08/Partition-Disk-0-UEFI.png)
I’m currently abroad and cannot test/describe the process.
Hope this help
Till next time
See ya
Thanks a lot, very useful
Ah…. good
I see that this post is still helping people
Till next time
See ya
Hi there is an typo in your dism command.
You say :
Dism /mount-Wim /Wim-File:c:\MDT\boot\LiteTouchPE_X64.wim /mountDir:C:\Mount /index:1
And it needs to be:
Dism /mount-Wim /WimFile:c:\MDT\boot\LiteTouchPE_X64.wim /mountDir:C:\Mount /index:1
To make it clear Wim-File needs to be WimFile
You are right…
This is a ugly typo…..
I have fix it
Thank you for the feedback…..
Till next time
See ya
Hello Griffon,
How to reset or undo dhcp configuration which were created with batch file after I ran it. I entered a DHCPIPSCOPE value of 192.168.25.3 (were I installed MDT and also the DHCP and TFTP server). It should be 192.168.25.0, isn’t it ?
Thanks for your help,
Regards.
Hello again,
Error Output on running dhcp batch file:
Unable to determine DHCP Server version for the Server 192.168.25.3. Server may not function properly. (4x)
The DHCP client service is stopping..
= was stopped successfully
= is starting
= was started successfully
Unable to determine the DHCP Server version for the Server 127.0.0.1. Server many not function properly. (3x)
Thanks for you time,
Regards
Never mind, the service was disabled.
Regards
Where is next step? I mean how to deploy and starting working with it ?
The quickest way
Delete the scope in DHCP and re-create it manually or via the batch file.
check the service
ok; I see that you have found that service is disabled 🙂
Hello,
Please note that this post is specifically targeting Windows 2008 R2. If you have Windows 2012 R2,check this post (http://c-nergy.be/blog/?p=4557).
At this stage, you have to configure your MDT if you have installed it already, import os file and try to boot the target computer from PXE and see if you can connect to DHCP Server and start the deployment….
IF you have no idea of what I’m talking have a look on this MDT Serie – http://c-nergy.be/blog/?p=1970
Till next time
See ya
Hello Griffon,
I did follow through some parts of MDT 2012 beta 2 Series, import OS and task sequence creation. So I manage to boot Lan Adapter, which was enabled on BIOS Setup. I had this output:
PXE-E53: No boot filename received.
PXE-M0F: Exiting Intel PXE ROM.
Thanks for your attentioness,
Cheers
Hello Mikoyan,
Message is quite clear…. you do not have a boot file configured apparently on the network or TFTP or MDT server….
Provide me a drawing of what you are trying to do…..
+ tell me what you already have installed
Till next time
See ya
Hello Griffon,
Well, I follow ‘populate tftp folder structure’ in this 4525 article. I reviewed right now and I have the 4 files in x:\mdt\Boot.
I follow all 4496 and 4525 articles to entirety.
Tried to boot the lan adapter in this client computer because I want to fresh install a new OS (win7) in it.
The MDT, TFTP, DHCP, DNS are all the same server machine. Plus I have a DHCP on different subnet on the adsl router with is, in the structure, on “top” of the switch, which is distributing the network “below” to the workstations and servers.
Hello Mikoyan,
So, let’s to this step by step
When you boot in pxe mode, you get ip address for the MDT/TFTP/DHCP/DNS Server, right ?
If yes, and you get cannot find boot file (your error message)
Check that you have the boot.sdi file located under your MDT SHARE\Boot Folder
Then check that the bcd file you have created contains your settings…. (you have to specify your path in the batch file provided..)
Check that option 060 in DHCP is set accordingly
Check that the WDS SErvice is started as well
Hope this Help
Till next time
See ya
Hello Griffon,
Yeah, I believe I set ip for Server right, in DHCP scope batch file.
https://userscloud.com/yv6o1rs5o7hn/bcd_output_creation.bat
https://userscloud.com/m0ow279853jr/dhcp_scope_creation.bat
boot.sdi is present in mdt MDT Share/Boot folder.
only thing I did in BCD as you said is change the folder to correspond my environment.
C:\Users\user>netsh dhcp server show optionvalue
DHCP Standard Options :
General Option Values:
OptionId : 60
Option Value:
Number of Option Elements = 1
Option Element Type = STRING
Option Element Value = PXEClient
Command completed successfully.
Is there other way to check dhcp ? I entered optiondev as well, but don’t know how to mess with it.
WDS Service is started.
Thanks for your help.
Regards
Hello,
I could not access your file because I think they are available only for 24 hours…
I will send you an email and we can take this discussion offline…
but if you have the error file not found….This means that yes DHCP is working but the file you are trying to boot from via pxe is not found.
The needed file is not placed in the correct location or you are connecting to the wrong dhcp server….
Till next time
See ya
Hello Griffon,
The link isn’t dead, you have to click on BLUE download smaller button. I think my dhcp scope ip address is wrong. It can’t be “.0”. If my adsl router ip lan is “.1”; its dhcp ip range is “.2” to “.55”. (1)Therefore I have to set my Server Role DHCP Feature DHCP Scope to “.56” or any forward ?
DCHP ip range of Server Role might be “.57” to “.67”.
Or (2) I have to obey with IP Subnetting rule? Something like adsl router subnet mask (LAN interface configuration page) 255.255.255.192 and other same subnet mask, but for Server Role DCHP feature. Or no, both should be 255.255.255.0 as it is at the moment.
*Did not receive your email.
Thanks for your help,
Cheers
Hello Griffon,
I have left you some comments on other posts regarding OSDComputername. my question or problem is with computer naming. i would like to use the last portion of ip address as computer name but if i use last or right 3 char then it takes the dot (.) if the ip address is less than 100. do you have any idea how i can i point to last portion of ip address only and not to pick the dot in case of less than 100?
Looking forward for your quick response.
Hello Ahmad,
I would use a split function in powershell (or vbscript) in order to create an array and get the last value of the array.
In Powershell, you would create something like this
#IP Addressese – We want the last octect…
$StrIP0=”192.168.1.25″
$strIP1=”192.168.1.152″
# Using split function, we will obtain last octet using this syntax
$StrIP0.split(“.”)[-1] # ->this will return last octet of first ip address (which would be 25)
$StrIP1.split(“.”)[-1] # ->this will return last octect of second ip address (which would be 152)
Using this syntax, you should be able to retrieve the last octet and used it as OSDcomputerName value
Till next time
See ya
Hi Griffon,
Thanks for the reply.
do you have any sample or anywhere within your page that i could download it?
Ahmad
Hello Ahmad,
Sorry for the delay in the answers but I’m really overloaded by work and projects lately….
You can find a screenshot of script in this post http://c-nergy.be/blog/?p=3933
Again, this is base for you to work…As we do not know the full picture, we provide hints
Hope this help
Till next time
See ya
The BCD .bat file seems to give me an issue, when i execute it. cannot open the store. please help
Hello There
Sorry for the delay in answers but we are currently travelling a lot for work
did you modify the bat accordingly
Have you set the path based on your infrastructure ??
set BCD-File=C:\MDT\Boot\bcd
del %BCD-File%
share screenshots of the errors so we can better investigate
till next time
See ya
Griffon, Hey Im wondering if you have any advice for mt BCD error. Following your batch above, and editing for the path changes on my end yet I still get the error here: https://support.microsoft.com/en-us/kb/2004518
I have generated both the x86 and x64 boot WIMs, using LiteTouch. Everything else in my setup matches the BCD creation script. Any clue what I’m doing wrong?
Hello Ben,
It’s seems that the bcd file is not correct. Are you sure you have specified the proper path when creating the bcd file….
My guess is that something went wrong when the bcd file was created or the bcd file is not located at the correct location
Hope this help
Till next time
See ya
Hey Griffon.
When I run the batch file to create a bcd file, it stops with this..
1-3ö was unexpected at this time.
I cant get the script to work.. what i am i doing wrong..
br.
Torben
Hello Torben
If you simply copy/paste the script from the blog, you will have formatting issues.
So, please copy/paste the script into notepad, review for formatting issue
and run again
Hope this help
Till next time