Hello World,
If you follow me, you know I’m kind of busy lately. I’m currently working on a Migration project. We are consolidating multiple forests into one single forest single domain. We are using Microsoft built-in tools such ADMT and everything works fine. However, I encountered a small issue while migrating the Print Server. I thought that would be interesting to write a post on it.
The Scenario
The Issue
The Print server is a Windows 2008 server (not R2) and it’s running the 32-bit version of the Operating System. During the migration of one of the forest, the customer decided to upgrade also the workstation OS version. We moved from a Windows XP and Windows vista 32-bit to the Windows 7 x64 bit version. We did deployed Windows 7 images and the Print server was migrated to the consolidated forest. While validating the print server migration, we hit a show stopper. The Printers were deployed through GPO’s and while trying to print a test page, we noticed that the printers were not available on the client. We validated that the GPO was applied correctly but still not printers devices available on the client.
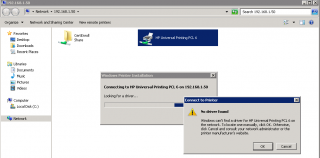
As troubleshooting process, we tried to manually connect the printers to windows 7 workstations. We accessed the print server through UNC Path and we could see the print device available. We right-clicked the device, select the connect option and we ended up with the warning message “Not Driver Found”. But wait this was working fine in the past….
Click on Picture for better Resolution
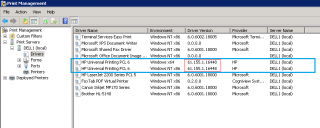
Time to check the drivers available on the Print server
The Solution
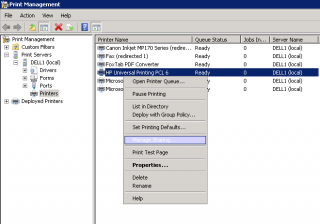
On the print server, we have opened the Print Management Console, went to the Printers Node and right-clicked on the problematic printer(s). Select the Manage Sharing option.
Click on Picture for better Resolution
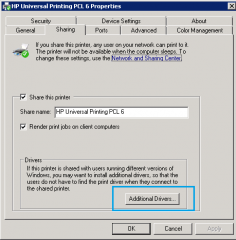
We will end up directly in the Sharing Tab of the printer properties page. Click on the Button “Additional Drivers”.
Click on Picture for better Resolution
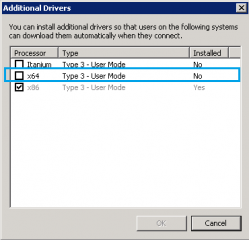
The additional Drivers page is displayed and we can see that indeed a driver is missing….the 64-bit version !
Click on Picture for better Resolution
To fix the issue, we simply need to install the 64-bit version of the drivers. Now, the question some people might have is how do you install 64-bit drivers on a 32-bit Operating System… Please keep reading 🙂
Installing the 64-bit Drivers on 32-Bit Print Server
The process is really easy once you know how to perform this operation. However, 2 commons errors are made by people with few knowledge of Print services.
- The first one is to download the 64-bit drivers package from the Manufacturer and then try to run the setup.exe. As expected, you will receive a popup message stating that the package (64-bit drivers) you have downloaded cannot be installed on a 32-bit computer
- The other common mistake is to try to install different version of the drivers. Quite often, print drivers are not up to date on the print server. So, you will end up with a situation where the 32-bit drivers has a build number N and the 64-bit drivers (newly downloaded) will have the build number N+3. Because the build number are different, while trying to install the 64-bit drivers, you will end up with the exact same message as in the beginning. “No Driver Found”. It’s seems that the Print server needs to have the exact build number of the drivers in order to perform a successful installation.
Now, the question some people might have is how do you install 64-bit drivers on the 32-bit Drivers… Easy. You simply perform the following steps :
- Step 1 – Download the latest drivers 32-bit and 64-bit drivers for your printer devices
- Step 2 – If needed, update the 32-bit drivers to the latest (same build version as 64-bit to be installed) version.
- Open the Print Management
- Browse to the printers that needs to be updated.
- Right-click on the Printers and select properties
- Click on the Advanced Tab
- Click then in the New Driver to install the new printer driver
- Step 3 – Install the 64-bit drivers.
- Open the Print Management
Click on Picture for better Resolution
-
- Browse to the Printers that needs to have the 64-bit version installed
- Right-click on the Printers and Select Manage Sharing
Click on Picture for better Resolution
-
- In the dialog box, Click on the Additional drivers button
Click on Picture for better Resolution
-
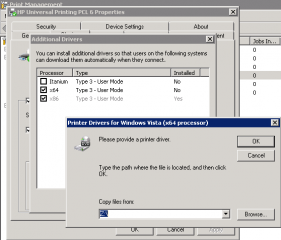
- In the Additional Drivers button, tick the x64 check box
- The Drivers for Printers dialog box will be displayed. Specify location for the Print drivers and Press OK
Click on Picture for better Resolution
-
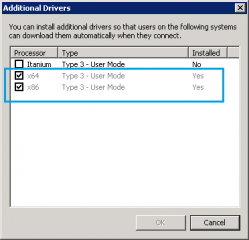
- Once it’s done, you should see that both x86 and x64 bit check boxes are selected and you can see that the drivers is marked as installed (installed flag is set to yes !)
Click on Picture for better Resolution
We are done ! You just have successfully installed 64-bit printer drivers on your old 32-bit server. The process is relatively simply but you have to know the process. Plus, keep in mind that the drivers build number should be identical in order to successfully perform the installation.
Click on Picture for better Resolution
Final Notes
That’s is for this short and easy post ! I hope that this post can be useful to some people, especially for those who are not dealing quite often with Print Servers. This post has shown how easy it is to install and update drivers through the Print Management Console. This post has also showed you the importance of having the correct and identical drivers version when trying to install the x64 bit version. We hit this issue during our migration. The 32-bit print drivers were updated and we had downloaded the latest 64-bit drivers..As explained, the install of the x64-bit version failed untill we updated the drivers (32/64-bit) to use exactly the same build number
Till next time
See ya
Some useful info can be found here http://technet.microsoft.com/en-us/library/cc732946.aspx
