Hello World,
In this post, I have mentioned that was possible to resize the VHD Disk size using the VHDResizer. The tool is quite straightforward and allows you to perform one of the following operations :
-
Increase the Size of your VHD Disk
-
Shrink the size of your VHD Disk
-
Convert a Fixed Disk to Dynamic or the other way around
If you google, you will find plenty of information about how to use it. I’ll briefly explain how to use it.
HowTo use VHDResizer
- First, you need to download the utility from here
- Extract the content from zip file and double-click on vhdresizer.exe (really easy)
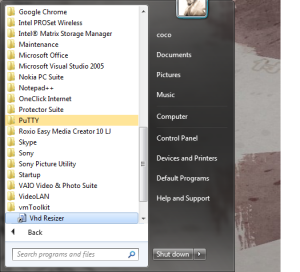
- From start menu, browse to your programs and launch the vhdresizer tool
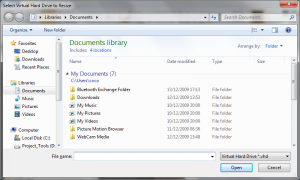
4. You will be presented with this window. You can either browse and select the VHD file you want to modify or press cancel
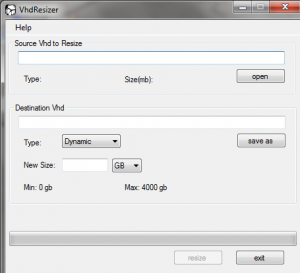
5. The VHDResizer Utility is started. As you can see, it’s quite straightforward.
-
-
Specify source vhd file,
-
create a new destination vhd file,
-
specify the type of disks (Dynamic or fixed)
-
specify the new size of your disk
-
When you are ready press resize
NOTES
If you shrink the size of the disk, you do not have to perform any post-actions. However, if you decide to increase the size of the disk, you will see that in disk manager console, the partition size has changed. You will need to extend the disk within your operating system.
You have multiple options to perform this operation. You can use of the following method
-
Reboot your machine and use GParted (This might be time consuming !!)
-
If you have Windows 7 or windows 2008 R2, simply attach the vhd and using the disk manager console, extend the volume as required (fast)
-
If your virtual machine is a windows 7 or Windows 2008 R2, start your VM and use the Disk manager console to extend the volume (fast)
-
If your virtual machine is a windows XP or Windows 2003, you can use the EXTPART.EXE utility to extend on the fly the size of your partition or you can boot in WINPE mode and using DiskPart.exe utility you can increase the size of your partition (Fast)
That’s it for this post. In other posts, I’ll show you how you can use all the above techniques to increase the size of your VM partiton
till then
See ya


Hello,
In reading you instructions it seems very simple to do. However, I want make sure I have the right of it. So, my question is the following:
I performed a Disk2vhd on a Windows 2003 SP2 server C:partition only. That partition size was only 73GB. The server is up and running as a virtual machine without any issues. However, I did notice in the disk management that there is 73GB of unallocated space for Disk 0 (Basic). When I inspect the disk, it reports that I’m using 73GB and my maximum size is 149GB. Thereby, if I read this correctly my VHD can utilize the full 149GB.
So, I guess my question is, do I really need to run the VHDResizer? Why can’t I just use Dell’s ExtPart and extend the partition to utilize the full size of the partition?
Thank you in advance for responding to my question.
Hello there,
The short answer to your question is : No, you do not need to use the VHDresizer.
If you had P2V a computer with a partition larger than 127 GB and wanted to run it inside Microsoft virtual PC 2004/2007 and later, you wouldn’t be able to because there is/was a limitation in the size of the vhd disk. In this scenario, you could use VHD resizer to fix your problem.
If you have a vhd disk larger than 127 GB, I’m assuming that you are using another virtualization product… probably Hyper-V. Hyper-V supports vhd size up to 2 TB. In your situation, there is no need to resize the vhd disk given that the virtual machine is running. If you need to extend the partition size, you can indeed use the Dell utility expart to perform this operation. Finally, If you need to expand the size of the disk (and you are using Hyper-v), you can perform this operation through the MMC console and again, you wouldn’t need VHDresizer utility.
Hope this answer your question — See ya