Hello World,
In this previous post, we introduced the authentication realms, a new feature of PVE 2.0. In previous version of PVE, a user was authenticated against the local server. Now, with version 2.0, you have to possiblity to choose between differents authentication realms (from Local Server to Active Directory domains).
In this post, we will focus a little bit more on the new role-based model. In the past, such model didn’t really exists and administration of the Proxmox VE was mainly performed using a single account (Root). Since version 2.0, things have changed and the Proxmox VE team has added a role-based model where granular permissions can be assigned.
In this post, we will quickly provide an overview of this new feature…..
Let’s go !
Understanding the PVE Role-based model
One of the most wanted feature with Proxmox VE was the ability to delegate control to other users. Proxmox VE 2.0 offers this capability by implementing a role-based administration model where granular permissions can be granted to different users.
The Role-based model of Proxmox VE is basically a combination of the following elements :
- Users
- Groups
- Permissions
- Roles
- Authentication
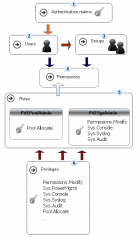
The following illustration tries to summarize the role-based administration model and how to implemented it.
Click on picture for better resolution
If you look at the illustration, you will see that in order to implement a delegation model, you will first need
- to define the authentication realm or realms to be used within your infrastructure.
- then, you will start creating users within your Proxmox VE infrastructure
- it’s highly recommend to organize your users into groups. Users sharing the same set of rights should be grouped together and should be member of the appropriate group. By using groups, you simplify the management of your PVE infrastructure. When granting permissions, you should be using the groups instead of users. To grant/revoke permissions, you will simply need to add/remove users to the appropriate group. This will save you huge hours of works.
- finally, after creating your users and groups, it’s time to assign permissions within your infrastructure. When you assing permissions, you will need to specify which role you want to grant to the user. You will also need to specify at which level you want to grant these rights.
- (5) Priveleges and,
- (6) Roles
Click on picture for better resolution
- Priveleges and Roles are pre-defined. In other words, you cannot change or modify these elements. You will need to use these predefined roles in order to create your role-based delegation model.
- Worth mentionning also is the permission inheritance model. You might need to remember that when you assign permissions to individual users, these ones will always overwrite permissions granted via groups. You might need to know also that permissions granted at higher level will always overwrites inherited permissions.
A (simple) practical Approach
So far, we have presented the theory behind the new Role-Based Administration model within PVE. In this section, we will quickly see how Proxmox Team has implemented that in practice.
If you open you web interface, click on the datacenter node, you can see that for each of the elements mentioned above an equivalent tab exists within the administrative console.
Click Picture for Better Resolution
In the next step, we will simply image a scenario where you need to delegate control to other people. In this scenario, we want to delegate the following actions to different group of people.
- We will create a group that can fully manage the PVE infrastructure. We will call this group PVEAdmins
- We will create a group that will be allowed to manage only virtual machines. We will call this group VMAdmins
- Finally, we would to have a group that would be able to manage datastores. We will call this group StoreAdmins
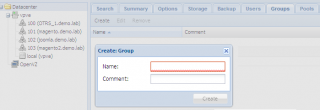
We will first create the groups and then create the users because as you will see later this makes the process a little bit easier. In order to create the groups, you will need to click on Datacenter node, go to the tab groups. In this tab, click on the button Create and the following popup box will be displayed
Click Picture for Better Resolution
You perform the same action for each group you need to create. In our scenario, you will end up with 3 groups within your web Interface.
Click on picture for better resolution
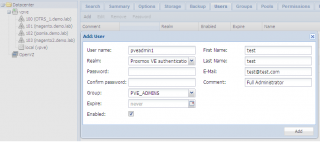
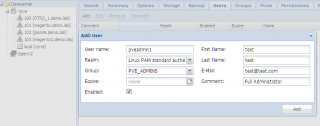
Now, It’s time to create the users. In this scenario, we will be using the built-in authentication realm (i.e. Linux PAM and Proxmox VE). In order to create the users, you will need to click on Datacenter node, go to the tab users. In this tab, click on the button Create and the following popup box will be displayed
If you choose the PVE Authenticatio realm, you will see a screen similar to the following where you have the ability to provide user’s credentials. You can also make this user member of one or multiple groups within this dialog box.
Click Picture for Better Resolution
If you choose the Linux PAM authentication realm, you will see a screen similar to the following. In this dialog box, you can make the user member of one or multiple groups. However, there is no field for password. You cannot set credentials when you create one if Linux PAM authentication is selected.
Click Picture for Better Resolution
When trying to set the password for the user you just have created, you will get the following error message.
Click Picture for Better Resolution
The message simply state that the local sam of Proxmox VE does not have this user account registered. You will need to create it on your system by issuing the following command from a shell useradd <%useraccount%>. When the user account is created on the local system, you will be able to perform the appropriate actions from the Web Interface.
Finally, the most important part is to assign permissions to these groups. Proxmox has a granular permission model. The following screenshot provides you an overview of the object on which you can assign permissions. You have quite a few (and we didn’t expand them all)
Click Picture for Better Resolution
You can really assign permissions at multiple levels. The permissions tab at the datacenter level provides you a high level view of delegation model implemented within your infrastructure. You can grant rights to user to manage one or multiple virtual machines, or datastore. You can also specify that a user can manage group memberships… You have really a great flexibility.
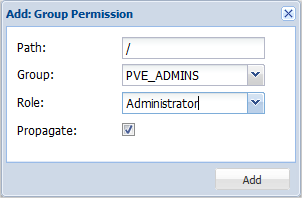
If we go back to our simple scenario, we want to grant full administrative rights to the Group PVEAdmins, we will simply go to the datacenter level, click on the permission tab. In this tab, we click on the Add > Groups and provide the required information in the dialog box
Click Picture for Better Resolution
You can do the same for the remaining groups. Here, as you can see, we have not done anything fancy. We simply granted appropriate rights to groups on a higher level. Now, if you want to delegate a specific group administration right on one or multiple virtual machines, you can click on the virtual machine (in the tree node). In the right-pane, you will see the permissions tab again and from there you can specifically grant the rights on this specific virtual machine.
To simplify delegation model, PVE introduce also the notion of Pools. A pool allows to group together Virtual machines and Data stores. You can grant rights at pools level as well allowing designated users to fully manage these objects.
You can go even deeper in the delegation process. You could grant right to a user to add/remove users from one specific group. This is cool but it become complex….
Final Notes
So far, I have to say that I didn’t really implement a complex delegation model. Writing this post make me realized how granular the access can be granted within the Proxmox VE infrastructure. As you can see, the mechanism behind the role-based administration model is not too complex but you will need to spend a lot of time in the planning and design.
I’ll probably come back on this topic and I’ll try to provide some good practice when implementing a robust and efficient delegation model.
Till Next Time
See ya





Hi,
Nice tutorial once more. Please would you mind replacing the “useradmin ” by “useradd ” ?
C U
Hello there,
You are absolutely right. I’ve corrected the typo.
Thank you for the comment
Till next time
See ya