Hello World,
Today, we will again speak about Ubuntu and more specifically about Landscape software solution. Landscape software solution is not new and exists for some time now. However, we never installed or worked with the product so far.
In this post, we will provide a quick overview of Ubuntu Landscape software solution. We will see what Ubuntu Landcape can do, what the price and how to install it and self hosted it within our lab infrastructure.
Let’s try to do this….
Overview
What’s Landscape ?
Ubuntu Landscape is system management tool provided by Canonical that can be used to manage your Ubuntu Infrastructure. Landscape can help organization in simplify operation and maintenance of large number of Ubuntu machines. Landscape solution is a web based software interface and offers
- inventory management
- automation
- security hardening
- compliance management,
- reporting
- software distribution
- patching
Ubuntu landscape could be compared to SCCM or MECM solution in Microsoft World or could be compared to RedHat Satellite solution. They basically provide the same kind of patching, inventory and automation capabilities but for non-Ubuntu machines….
Landscape come in 3 different editions
- Landscape SaaS
- Self hosted
- Managed Saas
So, normally, Landscape would be made available to you through your Ubuntu Pro Subscription (for more info about Ubuntu Pro – check this link) which means that you would need to pay a certain price to benefit from the product. Canonical does offer a free version through the Self-hosted solution. Self-hosted Landscape has a free tier for up to 10 machines for personal use, or evaluation purposes.
Note :
Beyond the free tier, Ubuntu Pro is required for more than 10 machines on self-hosted Landscape
So, now that you know what Ubuntu Landscape refers to, it’s time to try deploying the software and see how it looks like and what it can do for system administrators…
Step by Step Installation
The Installation Method – QuickStart
Since we are evaluating the Landscape software solution, we will be installing the Self-hosted Landscape Edition in our lab. There are multiple ways to install Landscape in your network. You can use one of the following method
- Quick Start
- Juju Deployment
- Manual Deployment
In our case, since we are targeting a self-hosted solution with less than 10 client, we will use the Quick start deployment approach. The Quickstart approach can be used within your infrastructure as long as you do not have more than 500 clients. If you have more than 500, you should consider a manual installation or Juju deployment if available in your infrastructure
Self-hosted landscape Landscape solution is basically relying on 2 parts : a database tier and an application tier. The Quickstart installation process will host both application and database server on the same machine. for larger deployment, you might want to split these roles and install them on different machines.
There are multiple version of the Landscape software solution as you can see in the screenshot below.
Click on Picture for better Resolution
Note that the version 23.03 is not an ubuntu OS version. This is the version of the Landscape software.
In this post, we will deploy Landscape version 23.03 (LTS). Landscape 23.03 LTS can manages all versions of Ubuntu 16.04 LTS (Xenial Xerus) onwards and also support Debian Bullseye Edition. Landscape 23.03 is marked as a LTS Release which means that it will support the next 2 Ubuntu releases i. e.23.10 and 24.04.
Minimum requirements
In order to install Landscape version 23.04 on your machine, you will need to meet a certain number of requirements which are
- You need an internet connection (we are not covering air gap scenario here)
- You need to install landscape on Ubuntu 20.04 or 22.04 LTS. Obviously, we will be using Ubuntu 22.04.
- Min Ram 4 GB – Recommeded 16 GB
- Min Disk Space 20 GB – Recommended 512 GB
- 2 TB of disk space if you plan to mirror Ubuntu Repository
- Static IP Address on your network
- Fully Qualified Domain Name (FQDN)
- DNS Server with Landscape records in it
- SSL certficates (if you want to secure your communication)
- IP address + FQDN with port ssh, http and https
Landscape server will be using the following ports when communicating with clients
- 80/TCP (HTTP)
- 443/TCP (HTTPS)
- 22/TCP (SSH) (optional – mainly for performing maintenance of your landscape server remotely)
You also need to access a certain number of urls on internet. You will need to ensure that your firewall/proxy allows access to the following external resources
- https://usn.ubuntu.com (used to make distinction between security and regular updates)
- http://changelogs.ubuntu.com (used to update hash-id-db files and detect new distribution. If no access, upgrade feature will not work
- https://landscape.canonical.com (used to check for available self-hosted Landscape releases)
Note :
If this external network access is unavailable, Canonical’s professional services include assistance with setting up Landscape in a fully air-gapped environment.
Installing Landscape Software
In this step, we will perform the step by step installation of the Landscape software. We assume that you have your Ubuntu 22.04 machine up to date, connected to internet and ready to perform the installation process. So, let’s move to the real work now….
Step 1 – Configuring your Hostname & FQDN
First of all, we will need to ensure that our Ubuntu 22.04 machine has a properly formatted hostname and FQDN. To configure your machine, use the following code example and run it on your Ubuntu computer.
sudo hostnamectl set-hostname "$FQDN"
Where $FQDN is your FQDN name.
In the screenshot below, you can see that our FQDN is set to landscape.c-nergy.lab
Click on Picture for better Resolution
Step 2 – Install some pre-requisites software
Run the following command in your terminal console
sudo apt update && sudo apt install -y ca-certificates software-properties-common
Click on Picture for better Resolution
Step 3 – Add Landscape PPA
It’s time to add the landscape software repository so we will be able to perform the installation. Landscape PPA are not available by default so you will need to add them….
sudo add-apt-repository -y ppa:landscape/self-hosted-23.03
Click on Picture for better Resolution
Step 3 – Install Landscape
Time to perform the real installation. Again, as a reminder, we will use the quick start deployment method because it is the fastest and easiest way to install and test Landscape for free on a self hosted scenario.
sudo apt update && sudo DEBIAN_FRONTEND=noninteractive apt-get install -y landscape-server-quickstart
Click on Picture for better Resolution
Wait for the installation to complete
Step 4 – Configuring SSL
Based on the documentation, before going through the setup of Landscape, you should be obtaining and configuring your SSL certificates. Based on your setup, you can either try to obtain a certificate from Let’s Encrypt, use the self-signed certificates generated by the setup or you can do like us, using a self signed certificate
If you go for the Let’s Encrypt, simply follow these steps
#Install the certboot utilitysudo snap install certbot --classic#Provide/Define a valid email addresEMAIL="YOUR-EMAIL@ADDRESS.COM"#Request the cert for your server sudo certbot --apache --non-interactive --no-redirect --agree-tos --email $EMAIL --domains $FQDN
Note : If you use Let’s Encrypt, ensure that you have a valid email address and that the domain name is valid. If you do not have this, you might not be able to generate the certificate…
If you want to generate a self signed certificate, you can use the following command line (this is an example !!!)
sudo openssl req -x509 -nodes -days 365 -newkey rsa:2048 -keyout /etc/ssl/private/apache-selfsigned.key -out /etc/ssl/certs/apache-selfsigned.crt
If you want to use the self signed certificates generated by the setup, go to /etc/ssl/certs folders, you should see there some landscape certificates.
Step 5 – Access the Web Interface and create Admin Accounts
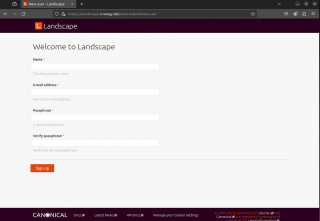
It’s time to fire up your favorite browser and type in the url the name of your server (in our case, we will go to https://landscape.c-nergy.lab). You might get prompted for certificates warning. Accept the risk and you should end up in the following web page. In our example, we have started the Browser from the landscape server (i.e. locally). Time to provide the requested information and to click on signup button
Click on Picture for better Resolution
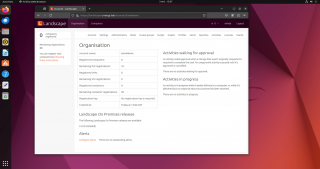
If the registration is successful, you will end up on the main Landscape dashboard… At this stage, you have installed on Landscape server on your network…
Click on Picture for better Resolution
Step 5 – Configuring postfix
The Ubuntu documentation specify the necessary steps to configure postfix server in order to get alerts from Landscape via email. We have skipped this step (at the moment). The documentation is using a smtp relay server on internet which we have no access from our lab. We will see if we can configure the postfix differently and use only internal resources. If you are willing to configure the postfix and alerting feature of landscape, please review the following link : https://ubuntu.com/landscape/docs/quickstart-deployment#heading–configure-postfix-for-email
Install Landscape Client
At this stage, we have no client reporting to the Landscape server. We will need to install a agent on each Ubuntu machine that needs to be managed by Landscape server. To do that, you can perform the following action
Step 1 – Install the Package by issuing the following command
sudo apt update && sudo apt install -y landscape-client
Click on Picture for better Resolution
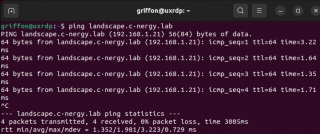
Ensure Name Resolution from your Client
This is probably already in place but you will need to ensure that your Ubuntu clients that will be connecting to Landscape server have proper name resolution in place. Indeed, the client needs to be able to connect to the landscape server. Configuring Name resolution is out of scope of this post and we are expecting that such capability exists on your network already (DNS server, Host files…)
Click on Picture for better Resolution
Ensure SSL Certificate is Trusted on the Client
You will need to ensure that the SSL Certificate you are using is trusted by the landscape client. You can check if you will be able to register an Ubuntu Client to Landscape server by issuing the following command
curl https://<%landscape_server_url %>
So, in our case, we would need to type in a Terminal console, the following command
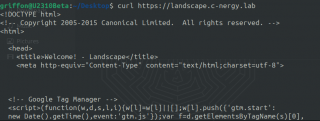
curl https://landscape.c-nergy.lab
If the certificate is not trusted by the client, you will see something like this
Click on Picture for better Resolution
So before trying to register the client to your Landscape server, you will need to ensure that SSL certificate is configured properly and trusted by the Landscape clients. In this demonstration, we will be using the Certificates generated by the setup of the application. You can find the certificate(s) under /etc/ssl/certs on the landscape server. The certificate we are looking for should be called something like landscape_server_ca.crt
img
You will need to copy this certificate on any clients that will need to connect to landscape server. When the file is copied, you will need to copy (you need sudo rigths !!!) the file under the following location
/usr/local/share/ca-certificates
After copying the file there, you will need to update the Certificate Trusted store by issuing the following command
sudo update-ca-certificates
Click on Picture for better Resolution
After performing this operation, you can try again the curl test… This time you should see something like this
Click on Picture for better Resolution
Register the client with the Landscape server
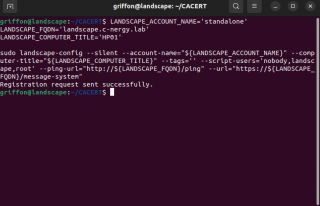
Because we have installed a self-hosted instance of Landscape, we will need to specify specific values when we will try to register a client to the Landscape Server. To simplify the process of registration, we have pre-defined some variable hereafter
LANDSCAPE_ACCOUNT_NAME='standalone'
LANDSCAPE_FQDN='landscape.c-nergy.lab'
LANDSCAPE_COMPUTER_TITLE='HP01'
Note :
Self-hosted Landscape users should set LANDSCAPE_ACCOUNT_NAME as standalone, Landscape SaaS customers should specify their account name and set LANDSCAPE_FQDN as landscape.canonical.com.
So, open your Terminal console, copy/paste the variable you have defined above. Then, copy the code below in order to “attach” your client to the Landscape server.
sudo landscape-config --silent --account-name="${LANDSCAPE_ACCOUNT_NAME}" --computer-title="${LANDSCAPE_COMPUTER_TITLE}" --tags='' --script-users='nobody,landscape,root' --ping-url="http://${LANDSCAPE_FQDN}/ping" --url="https://${LANDSCAPE_FQDN}/message-system"
If everything is configure correctly, you will see the message Registration succesful as shown in the picture below
Click on Picture for better Resolution
Authorize the client within the Landscape web interface
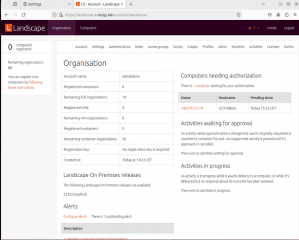
We are almost done. It’s time to go back into the Landscape web interface and authorize/approve the newly registered client. Open your browser and open the web interface Landscape. In the Dashboard, on the right side, you will see information about authorization that needs your attention as shown in the screenshot below
Click on Picture for better Resolution
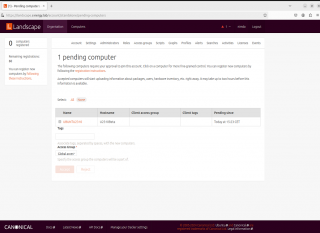
If you click on the hyperlink; you will be redirected to the pending computers page. Select the computer or computers that you need to approve. When done, press on the approve button.
Click on Picture for better Resolution
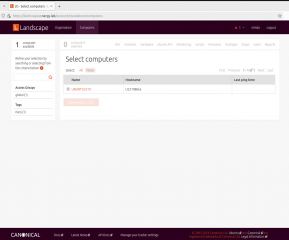
If you click on the computers node in the web interface, you will list all the computers connected to your Landscape server and you can start managing all these computers from a single interface.
Click on Picture for better Resolution
Final Notes
This is it for this post !
This was not as easy as it seems. We struggled a little bit in installing the Landscape software. All in all, the installation process is not difficult. Using the Quickstart approach, the process is really easy. The manual process seems a little bit more challenging and might take a little bit more time. The client registration process was the challenging part. We found out the hard way that SSL certificates needs to be valid and trusted. You will need to Trust the SSL certificates coming from your Landscape server (whatever approach you use Let’s Encrypt, Self Signed Certificates, other)
At this stage, we have just an Landscape instance up and running. In a coming post, we will see how we can use the solution in order to manage Ubuntu machines on the network. The tool seems to offer some interesting functionalities such as deploying scripts and software to multiple computers through the web interface…We will play a little bit with the software and we might come back with our findings….
Stay Tune
Till next time





This is great, but I can’t seem to get a self-signed cert working. Say I want to do example.lab for a self signed cert on here. What are the steps on the landscape server?
@Preston;
Thank you for visiting our blog and providing some feedback. Your request is not detailed enough. Can you explain a little bit more where you have the problem with the Certificates. To try to identify the problem, some questions for you
– have you generated your own certificate already ?
– if yes, have you placed the certificate in the different locations needed by Ubuntu (/etc/ssl/certs/xxxxx and /usr/local/share/ca-certificates/)
– have you updated the firefox Certificate Store (we are assuming that you are using Firefox browser)
– have you used the curl command to check if certificate is valid or not (see the post)
– where do you see the problem. is it when you are locally logged on the Landscape server and you are trying to reach the landscape portal that you have an issue (firefox warning telling you…not secure ?). Is it when you are
logged on the landscape client and you try to make the connection that you have the issue ?
Some additional information for you. If you have set a FQDN on your computer before installing landscape; the landscape wizard setup will generate self signed certificate for your (/etc/ssl/certs/landscape_server_ca.crt, landscape_server_ca.pem, landscape_server.pem). These certificates will be using the FQDN of the machine. To make them trusted,
1. you copy the landscape_server.crt in /usr/local/share/ca-certificate/
2. you issue the command sudo update-ca-certificates
3. you import the certificate in Firefox (see the post https://c-nergy.be/blog/?p=19850 )
Hope this help
Till next time
See ya