Hello World,
In some recent projects/activities, we have been busy with certificates and PKI (Public Key infrastructure). We have been working mainly with Windows Certificate services and certificate templates. We were wondering how easy (or difficult) it would be to install a certificate authority on Linux and more specifically Ubuntu machines. We have been reading some documentations and we have found some good instructions at https://ubuntu.com/server/docs/certificates
So, in this post, we will try to setup our own Certificate Authority based on the Ubuntu guide…Let’s go !
Overview
Active Directory infrastructure is widely used in organizations and enterprises and, when there is a need to generate and distribute certificates, MS Certificates Authority is quite often used. Also, in blogs, when there is a need to have certificates, the Microsoft Certificate services or OpenSSL is usually used as well. It’s also possible to use self-signed certificates but here we wanted to setup a private Certificate authority that could be trusted by endpoint within our network/lab.
A private Certificate Authority would enable you to configure, test, issue and publish certificates that can be used by the different applications that would require encrypted connections. We can give plenty of example such as VMware vCenter, Exchange Server, Skype Server, Web based applications, Ubuntu Landscape….. By setting up our own private CA, we can issue trusted certificates through the organization and we can increase security as well. Self-signed certificates can be used but they are still considered as not secure for production environment.
Step by Step Instructions
Prerequisites
In order to implement our Certificate Authority on Linux, we will need to have the following in place
- a computer running Ubuntu Operating System
- ensure that openssl package is installed… You can check that by issuing the following command (openssl version -a). If the package is not installed, we can install it by issuing the following command : sudo apt-get install openssl
- Name resolution is in place. You can choose your way of performing name resolution. In our lab, we have configured a Microsoft DNS Server
Setting up your Certificate Authority Server
Step 1 – Create proper FQDN for Ubuntu
On the Ubuntu machine that will be hosting the Certificate Authority, we will first ensure that a proper naming convention is used. We want the computer to use FQDN format. To do that, we will first issue the following command
$FQDN="certauth.c-nergy.lab"
sudo hostnamectl set-hostname "$FQDN"
Note : Replace the value of $FQDN with the name you want to use
Step 2 – check Name resolution (/etc/hosts/ or DNS Server)
Ensure that you are using the proper DNS Server and that the DNS server is updated with the FQDN you have just set. If you are not using any DNS Server, you can use the /etc/hosts file and add entries that would map the ip address and the fully qualified domain name.
To ensure that name resolution is set correctly, simply issue a ping command using the FQDN and you should see a reply coming back
Step 3 – Setup your Certification Authority Server
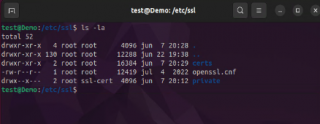
Since we are using Ubuntu Distribution as our Certification Authority server, we can already find some folders hosting ssl configuration in /etc/ssl. If you browse into this folder, you can see the following files and folders
- certs
- private
- openssl.cnf
Click on Picture for better Resolution
We will use this folder as main location for our Ubuntu CA Server. So, in order to setup a Certificate Authority in Ubuntu, we will simply need to create some additional items in the /etc/ssl folder.
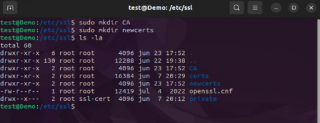
First, through the terminal console, we will create the directories to hold the CA certificate and related files:
sudo mkdir /etc/ssl/CA
sudo mkdir /etc/ssl/newcerts
Click on Picture for better Resolution
To have functional CA, there is a need to create some additional files as well. One file will be used to keep track of the last serial number used by the CA (each certificate must have a unique serial number) and another file to record which certificates have been already issued. Again, from the Terminal console, we will issue the following commands
sudo sh -c "echo '01' > /etc/ssl/CA/serial"
sudo touch /etc/ssl/CA/index.txt
Step 4 – Update the Certificate Authority Configuration file
This file is not strictly needed but it will help you if you have to issue multiple certificates. We will need to update the file
/etc/ssl/openssl.cnf
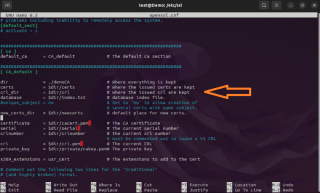
We will need to edit this file with admin rights (i.e. sudo) and we need to locate the section [ CA_default ]. The file will look like this
Click on Picture for better Resolution
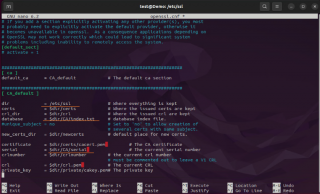
When located the CA_default section, we will need to update the file accordingly and set the correct values based on our setup.
dir             = /etc/ssl              # Where everything is kept
database        = $dir/CA/index.txt     # database index file.
certificate     = $dir/certs/cacert.pem # The CA certificate
serial          = $dir/CA/serial        # The current serial number
private_key     = $dir/private/cakey.pem# The private key
Click on Picture for better Resolution
Creating CA Root certificate
We will generate our root certificate for our Ubuntu Certificate authority using the openssl tool. Openssl tool is a known tool and offer a bunch of options when it comes to generate, manage, convert certificates.
So, let’s create our self-signed root certificate by issuing the following command
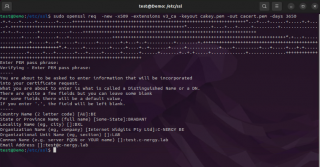
sudo openssl req -new -x509 -extensions v3_ca -keyout cakey.pem -out cacert.pem -days 3650
You will then be asked to enter some details about the certificate. You will prompted for a passphrase (or password). You will need to store this information as this information will be used when you will need to issue certificates.
Provide the requested information and proceed accordingly. The screenshot below give you an overview of the info requested and what you should see when generating your ssl certificates
Click on Picture for better Resolution
Next, to match our configuration, we will need to move these certificates in the proper location. So we will need to ensure that the root certificates are located in the correct folders. Simply, issue the following commands in a terminal console
sudo mv cakey.pem /etc/ssl/private/
sudo mv cacert.pem /etc/ssl/certs/
At this stage, our Ubuntu CA server should be ready for use. It’s time to issue some certificates…
Issuing Certificates from Ubuntu CA Server
Step 1 – Generating a Certificate Signing Request (CSR)
As a first step, you will need to generate a certificate signing request (CSR) and submit this CSR to your Ubuntu CA server. Usually, you will need to generate the CSR on the same server where the certificate will be installed. When you generate your CSR request, a private key will be generated as well. This private key should never leave the server and should be located in a secure location.
To generate your CSR file, you will be using openssl utility which will ask you for a number of information such as
- common name (e.g., www.example.com),
- organization name and,
- location (country, state/province, city/town),
- key type (typically RSA),
- key size (2048-bit minimum).
To generate an csr, we will issue he following command in a Terminal Console
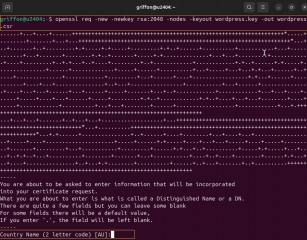
openssl req -new -newkey rsa:2048 -nodes -keyout yourName.key -out yourName.csr
Click on Picture for better Resolution
Fill in the appropriate value when prompted and proceed accordingly.
At this stage, if all is ok, you have generated a basic CSR file that can be provided to the CA Root server which will be used to generate the real certificate that will be encrypting your communications.
Important Notes
The command above will generate a csr without Subject Alternatives Names (SAN). More and More browsers check for SAN values and if no SAN is specified you might get a warning message in the browser telling you that the certificate is not trusted. To overcome this situation, you can always generate a CSR that would include the SAN value. To create such CSR, you can either use a custom .cnf file or provide the needed information from the command line.
#Generate SAN CSR from command line (example)

openssl req -new -newkey rsa:2048 -nodes \
-subj "/C=BE/ST=BRA/L=BXL/O=CNERGY/OU=LAB/CN=zorinos.c-nergy.vlab" \
-keyout test.key -out test.csr -addext 'subjectAltName=DNS:zorinos.c-nergy.vlab'
#Generate SAN CSR from a configuration file (example) You would first create a configuration file containing the information you want to use for generating the CSR as demonstrated in the example file below Copy the content below in a text file and save it as myserver.cnf [req] distinguished_name = req_distinguished_name req_extensions = req_ext prompt = no [req_distinguished_name] C = BE ST = BRA L = BXL O = CYNERGY OU = LAB CN = myserver.c-nergy.vlab [req_ext] subjectAltName = @alt_names [alt_names] DNS.1 = myserver.c-nergy.vlab
To generate the actual CSR File, you would issue the following command
and using the newly created configuration file above

openssl req -new -key myserver.key -out myserver.csr -config myserver.cnf
Finally, if you want to check the content of your CSR file, you can also use the openssl tool. You will issue something like this in order to have access in a readable format of the information stored in he csr file.
openssl req -text -noout -verify -in myserver.csr
Step 2 – Requesting & Generating Certificates
After receiving the CSR File, you can now generate the certificate which will be signed by the Ubuntu CA server. To generate such certificate, on your Certificate Authority Server (CA) you will need to issue the following command
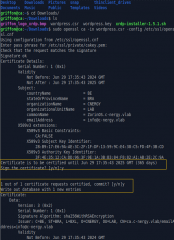
sudo openssl ca -in server.csr -config /etc/ssl/openssl.cnf
After entering the password for the CA key, you will be prompted to sign the certificate, and again to commit the new certificate. At the end of the process, you should then see a somewhat large amount of output related to the certificate creation as shown in the screenshot below
Click on Picture for better Resolution
Important Notes
Again, the command line specified above will generate certificates with no Subject Alternate names (SAN). If you need to generate a SAN certificate, you will need to perform some additional configuration.
Step 1 – uncomment the copy_extensions line in openssl.cnf file
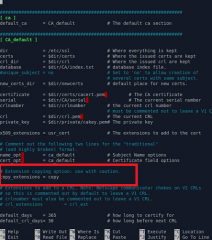
So, open your /etc/ssl/openssl.cnf file (with admin rights – i.e. sudo nano /etc/ssl/openssl.cnf), locate the [CA_Default] section and in this section, locate the text
#copy_extensions = copy
Uncomment this and your save your file.
copy_extensions = copy
The content should look like the screenshot below
Click on Picture for better Resolution
Step 2 – generate the SAN certificates
From a Terminal console, you can issue the following command to generate your SAN certificate
sudo openssl ca -in test.csr -config /etc/ssl/openssl.cnf -extensions v3_req
Whatever methods you are using to generate your certificates, at the end of the process a new certificate file will be located under /etc/ssl/newcerts
Step 3 – Install the Certificate on the target server
From the Certificate Authority (CA) Server, if you have issue your first certificate, you can retrieve it under /etc/ssl/newcerts/01.pem. This certificate can be provided to the requested and the certificate should be copied over on the target server requesting the certificate (on the server where the csr was generated)
Note : All Subsequent certificates will be named 02.pem, 03.pem, etc. You can also decide to rename them with a more descriptive name.
So, on the server needing the certificate, you will copy the 01.pem file you have just generated under the /etc/ssl/certs folder. This the default location for certificates on an Ubuntu machine. Again, here, you can (and should) rename the 01.pem file with a more descriptive name so you know which services/server the certificate is used for.
Step 4 – Configure your application to use SSL.
At this stage, you are ready to use the newly made available certificate and configure your application to use it. A good example would be if you have an Apache web server that needs to be configured with SSL/TLS configuration. Configuring SSL settings on applications is something specific per application and we will not go through this process in this post.
Add your root certificate in the Trusted Root Store
For Linux Machines
The final step is to also distribute and trust the Root Certificate that has been generated on the Certificate server. We will need to copy the file /etc/ssl/certs/cacert.pem available on the CA server to all computers that will use certificates generated by the Certificate Authority. You will need to copy the file in /usr/local/share/ca-certificates on each server configured to use CA Certificates. So, you will basically issue the following command
sudo cp cacert.pem /usr/local/share/ca-certificates/cacert.crt
Note:
It is important that the certificate file has the .crt extension, otherwise it will not be processed. The CA trust store (as generated by update-ca-certificates) is available at the following locations:
- As a single file (PEM bundle) in
/etc/ssl/certs/ca-certificates.crt - As an OpenSSL-compatible certificate directory in
/etc/ssl/certs
So, to add your Certificate Authority root certificates, you will simply need to issue the following command
sudo update-ca-certificates
For Windows Machines
If you are planning to issue certificates to Windows machines, you will also need to import the root ca certificate into the windows Trusted Root location. You can perform this operation manually on each computer or if you are using Active Directory technology, you can use group policies to distribute and trust root certificates to all windows computers.
For Firefox browsers
It seems that Firefox is not using the CA Trusted location used by Ubuntu. This means that even if you have configured properly your certificates and you trust them accordingly, you might still get an error in firefox stating that the certificate is not trusted. At this stage, if you need to trust the certificate in a firefox browser, we can only offer you a manual procedure. You will need to open the settings of the Browser and search for certificates. Click on the View Certificates Button. In the popup box locate the Authorities tab and click on import button to add the root ca into the trusted store location.
Click on Picture for better Resolution
We will need to check if there are any ways to automate this and apply the settings system wide….
Final Notes
This is it for this post !
While the process of generating SSL certificate in Linux/Ubuntu is not that complicated, it’s not that straight forward either. Since we are used to work with Microsoft Certificates services, generating certificates on Linux is definitely not following the same process. You have to know where to copy the files and how to generate them properly based on your requirements (SAN certificates).
Generating certificates on Linux is mainly performed from command line which is quite flexible but this can be daunting for some users. Some GUI interfaces might exists to perform such operations but we didn’t checked or look for that. The command line would provide a standard way of generating these certificates.
The only challenge we are facing is with the Firefox browser. Apparently, this browser is not using the default Trusted Root location and you need to perform some additional actions in order to avoid the warning message even do you know that your certificates are valid.
Till next time
See ya

