Hello World,
In our previous post, we have released our famous xrdp-installer script that would provide support for Ubuntu 22.10 recently released. Ubuntu 22.10 has introduced an important change in terms of Sound Server. Indeed, PulseAudio Sound Server has been replaced by Pipewire. This change has an impact on the xrdp sound redirection feature. Since xrdp sound redirection is built and expecting PulseAudio Sound server, on Ubuntu 22.10, this feature is obviously not available.
I had a lot of request in order to provide a post that would explain how to get PulseAudio back on Ubuntu 22.10 so xrdp sound redirection would be working again. After some quick tests we have been able to bring back PulseAudio and test again the xrdp sound redirection…
So, let’s explain how to do this….
Disable PipeWire & Enabled PulseAudio in Ubuntu 22.10
The following section will explain how to bring back Pulseaudio on Ubuntu 22.10 which will then allow you to get xrdp sound redirection capabilities back into your system.
Disclaimer
Prerequisites and assumptions
The following conditions should be met in order to have the best results while using the script
- We assume that your machine is connected to internet while performing the installation. This is needed as additional packages and software needs to be downloaded and installed on your Ubuntu machine
- This post applies only for Ubuntu 22.10 Release
- These instructions will disable Pipewire from your Ubuntu machine and will not be usable anymore.
- Please Do not try to remove Pipewire package since this can break your ubuntu desktop…..
Disabling PipeWire – Step by Step
Step 1 – Find all Pipewire service in use
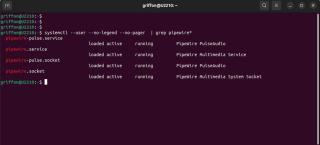
You will first need to find all Pipewire services running on your Ubuntu machine. Indeed, first time we tried, we identified only the Pipewire service but there are actually more services running. So, to find all of them, we have used the following command
systemctl --user --no-legend --no-pager | grep pipewire*
Click on Picture for better Resolution
As you can see, we have basically 4 services that needs to be disabled in order to get rid of Pipewire completely
Step 2 – stop the service
In order to stop all the running pipewire services, we will open a terminal console and issue the following command
systemctl --user stop pipewire.service pipewire.socket pipewire-pulse.service pipewire-pulse.socket
Click on Picture for better Resolution
Step 3 – disable the services
After we have stopped the services, we can disable them by issuing the following command
systemctl --user disable pipewire.service pipewire.socket pipewire-pulse.service pipewire-pulse.socket
Click on Picture for better Resolution
Step 4 – mask the services
Finally, to avoid any mistakes or problems in the future, we can mask these services by issuing the following command
systemctl --user mask pipewire.service pipewire.socket pipewire-pulse.service pipewire-pulse.socket
Click on Picture for better Resolution
Step 5 – reboot the server
To be sure that everything works accordingly, it’s recommended to reboot the machine.
Step 6 – Check that no sound server available
After the machine has rebooted, we will ensure that no more Sound Server is available on your machine by running the following command
pactl info
Click on Picture for better Resolution
Enabling Pulseaudio – Step by Step
Step 1 – install PulseAudio
Since the PulseAudio software has been removed from Ubuntu 22.10, you will first need to install it back on your system by issuing the following command
sudo apt-get install pulseaudio
Click on Picture for better Resolution
Step 2 – Enable PulseAudio
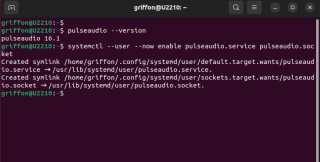
After installing the Pulseaudio package, it’s time to enable it so it can start when user logs in. To do that, you will need to issue the following command
systemctl --user enable pulseaudio.service pulseaudio.socket
Click on Picture for better Resolution
Step 3- reboot
We recommend to reboot the computer in order to be sure that the configuration is applying correctly. After the reboot, you
Step 4 – Check That PulseAudio is back
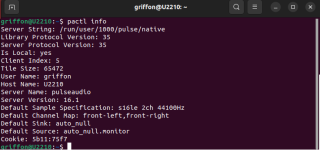
After the machine has rebooted, you can check that Pulseaudio Sound server is back on your system and it’s running. You can do that by issuing the following command
pactl info
Click on Picture for better Resolution
To enable sound redirection xRDP, download our famous xrdp-installer script and perform the installation including sound redirection option. So, to summarize, you will need to execute the following code in a Terminal Console
cd ~/Downloads
wget https://www.c-nergy.be/downloads/xRDP/xrdp-installer-1.4.4.sh
unzip xrdp-installer-1.4.4.zip
chmod +x xrdp-installer-1.4.4.sh
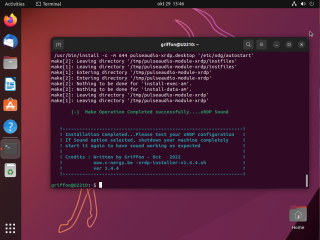
./xrdp-installer-1.4.4.sh -l -s
When the script completes, you should see the message informing you that installation for the sound redirection has completed successfully. You can now logoff from your ubuntu machine and perform the remote connection
Click on Picture for better Resolution
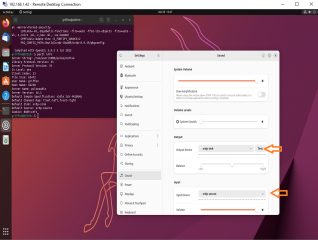
If everything went fine, you will get sound redirection working on your Ubuntu 22.10 system.
Click on Picture for better Resolution
Rollback your configuration
If you need to get your original configuration back, you can easily perform a rollback by following the following steps. You open a Terminal Console and you get execute the following commands
#Stop Pulse Audio service
systemctl --user stop pulseaudio.service pulseaudio.socket

#Disable Pulse Audio service
systemctl --user disable pulseaudio.service pulseaudio.socket
#Mask Pulse Audio service
systemctl --user mask pulseaudio.service pulseaudio.socket

#UnMask PipeWire service
systemctl --user mask pipewire.service pipewire.socket pipewire-pulse.service pipewire-pulse.socket

#Enable Pipewire service back again
systemctl --user enable pipewire.service pipewire.socket pipewire-pulse.service pipewire-pulse.socket

#Start the service again
systemctl --user start pipewire.service pipewire.socket pipewire-pulse.service pipewire-pulse.socket
Reboot the computer and when the computer restarts, login and ensure that you have Pipewire Sound server running by executing the following command
pactl info
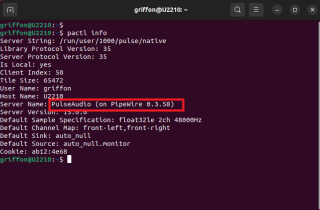
The output should be something like this (Pipewire on PulseAudio)
Click on Picture for better Resolution
Final Notes
Voila ! This is it for this post…
As you can see, it’s not too difficult to get back, on your Ubuntu 22.10, Pulseaudio sound server. The Pulseaudio Sound server is needed if you want to get xrdp sound redirection capability. xrdp sound redirection modules are expecting Pulseaudio Server in order to work as expected. As far as I know, it’s not possible to have sound redirection working (using xrdp package) when running Pipewire even if documentation and some readers have mentioned the pipewire-pulse components that suppose to be a Pulseaudio replacements
If time permits, we will look to see if the existing xrdp sound redirection modules could be loaded against the Pipewire Sound server. We do not know if this is possible and we are expecting that the team behind the xrdp package would start providing some information about supporting Pipewire server..
Till next time
See ya



Pipewire-pulse may be a solution
https://docs.pipewire.org/page_man_pipewire_pulse_1.html
Brian
@Brian,
As mentioned in the post, we are looking into it but so far…this does not seems to work… The pipewire-pulse is installed already on ubuntu 22.10 but the xrdp modules are not getting loaded…
We still need to look into this one but we hope that xrdp team will come up with something
Till next time
See ya
I have tried this script on the is version 22.04 and every went well. Sound was working on the machine. Now I have tried it already 2 times on 22.10 with the min configuration and every goes also well without errors but I do not get xrdp setting in de sound display (dummy stays). So no sound !
What can in do? Restarts and reinstall does not help.
Kind regards,
PS : I am not an IT expert but wound like to work on ubuntu.
Dear,
After 1 hour and reboot sound ok?
thanks for the script
@Lieven
Thank you for visiting our blog and providing feedback. Happy to see that you were able to overcome your issue.
Indeed, as mentioned in the post, it’s really important to reboot the machine after you switch over between pipewire and pulseaudio. After the reboot; it s also important to ensure that the pulseaudio daemon has taken over (via pactl tool)
When all is done, it should be good to go
Till next time
See ya
FYI on some fairly recent updates by NeutrinoLab’s regarding implementation of Pipewire for XRDP:
https://github.com/neutrinolabs/xrdp/discussions/2023
Its not there yet but looks like they are working on it..!
brian
@Brian,
Thank you for sharing your findings with us ! We are aware that the team behind xRDP is looking into this. However, we do not see anything concrete so far…..
We hope that the port from pulseaudio to pipewire will happen and will happen soon 🙂
Till next time
See ya
Hi! Thanks for the script. It works on my Ubuntu 22.10 Desktop Server Setup.
Things I noticed:
1. It install/downloads too many dependencies. Took almost 40mins. to install.
2. I think we also need a rollback/uninstall script to remove all those things in case xrdp will support pipewire in the future.
@Tweaktheboss,
Thank you for visiting our blog and providing some feedback…. Concerning your comments, about dependencies…we are just following the process described by the xrdp software maintainer team. About the rollback/capability and support….actually we have developed a small script utility that tackle these specific topic as well… You might be interested in the following posts
xRDP – Easy install xRDP on Ubuntu 18.04,20.04,22.04,22.10 (Script Version 1.4.6) (install xrdp and support only PulseAudio for sound redirection)
xRDP – Testing Initial Pipewire Sound Rediretion Support in Ubuntu 22.10 (Early Stage) (this post explains how you can already test pipewire support. This process is not coming from xrdp maintainer, it’s a private initiave
Hope this help
Till next time
See ya
Perfect, thanks a lot. I could not have any sound on my TV plugged via HDMI whereas I could have sound onmy LG monitor plugged as well on HDMI.
By following your tutorial, I can now have sound on my TV as well 🙂
@Adam,
Thank you for your feedback and for visiting our blog… Happy to see that our small tip and tricks are still working nicely
Till next time
See ya