Hello World,
We are continuing our journey and investigation about Nextcloud Server.
The software is really a great solution for people with privacy concerns. Nextcloud Server can be installed on premises and can help user to collaborate with each user through a simple web interface. This solution is often seen as a Dropbox alternative. Nextcloud Server can also be seen as an alternative to SharePoint Server.
Nextcloud can be used indeed to store office document to a central server but it’s also possible to edit an share these documents in real time from a simple browser. To provide such capability, Nextcloud is using the Collabora software solution. More specifically, Nextcloud Office is based on the Collabora Online Development Edition (CODE). However, after the initial setup, this functionality is not available out of the box (editing documents), you will need to perform some additional configurations
In this post, we will describe the necessary steps to integrate and configure CODE and Nextcloud office in order to have a fully functional Dropbox or SharePoint server solution. Let’s try this….
Overview
In this post, we will explain how to successfully configure the CODE software on top of Nextcloud server and make it working properly with Nextcloud Office App
Assumptions
In order to successfully implement the proposed solution, we would recommend readers to also follow the instructions provided in the following posts
- Ubuntu – How to install Nextcloud (Ver. 24) on Ubuntu 22.04 – Classic Installation
- Ubuntu – Post-Configuration on Nextcloud (Ver. 24) on Ubuntu 22.04 – Classic Installation
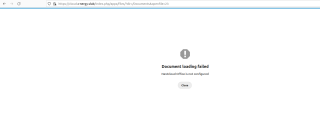
We are assuming that you have successfully deployed a Nextcloud Server. When you will try to edit an Office document within the Browser, you will probably end up with the following message.
Click on picture for better resolution
The message is quite clear : we still need to perform some additional configuration in order to enable Office document editing within the Nextcloud server. So, we will try to perform this additional configuration
The CODE Server will be installed on the same host where the Nextcloud software has been installed.
Step by Step CODE Instructions
Step 1 – Add CODE (Collabora Online Development Edition) Repository for Ubuntu
We need to obtain and install some additional packages on our Ubuntu machine in order to enable the online editing capabilities. Collabora provide Ubuntu support and offer official package repository for Ubuntu. In order to access this repository, we will need to tell our Ubuntu machine that we will be using it. To add a third party repo on Ubuntu, you will need to issue the following command
echo 'deb https://www.collaboraoffice.com/repos/CollaboraOnline/CODE-ubuntu2204 ./' | sudo tee /etc/apt/sources.list.d/collabora.list
Click on picture for better resolution
Step 2 – Importing signing Keys from Collabora
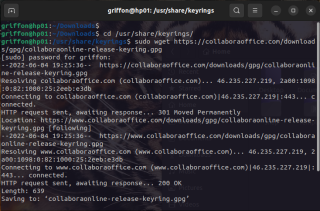
The CODE packages are digitally signed and ensure that package integrity is intact. To import the signing key, you will need to issue the following command
cd /usr/share/keyrings
sudo wget https://collaboraoffice.com/downloads/gpg/collaboraonline-release-keyring.gpg
Click on picture for better resolution
Step 3 – Install Additional software
Because Collabora repository will be using https protocol, we need to ensure that our system has the necessary software and module installed. APT package manager will need the following two pacakges in order to perform secure connections
- apt-transport-https
- ca-certificates
To install these packages, we can use the following command
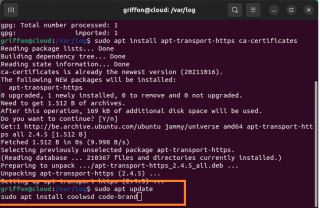
sudo apt install apt-transport-https ca-certificates
Click on picture for better resolution
Step 4 – Install the CODE Package
We are ready to proceed with the CODE Package installation. To perform the installation, we will simply issue the following commands and wait for completion
sudo apt update
sudo apt install coolwsd code-brand
Click on picture for better resolution
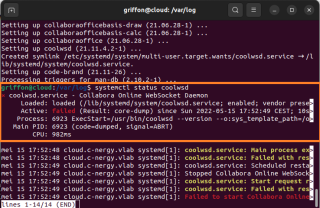
When installation completes, we will need to check that the service is up and running by issuing the following command
sudo systemctl status coolwsd
Click on picture for better resolution
You should end up in the same situation as I was. The service is not starting and there is an error….
Step 5 – Disable TLS for Coolwsd
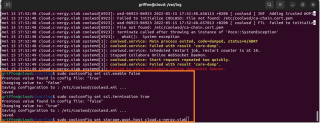
It took us some time to find out what was the problem and what could be a possible solution… We have found the necessary information here and here and after the suggested changes, the service started. To summarize, you will need to change some configuration settings in the /etc/coolwsd/coolwsd.xml file. To perform these changes, it’s easier to use the cli utility provided..
sudo coolconfig set ssl.enable false
sudo coolconfig set ssl.termination true
sudo coolconfig set storage.wopi.host <Your NextCloud FQDN>
Click on picture for better resolution
Additionally, you will need to set some admin password using the following command (keep the user and password in a safe place in case you need it one day…)
sudo coolconfig set-admin-password
Click on picture for better resolution
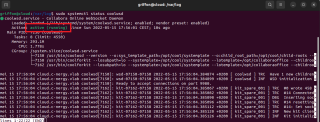
The final steps consist of restarting the coolwsd service and check that the service is now up and running….
sudo systemctl restart coolwsd
systemctl status coolwsd
Click on picture for better resolution
If you are lucky (like me), you should see that your service is indeed up and running……
Step 6 – Configuring Name Resolution
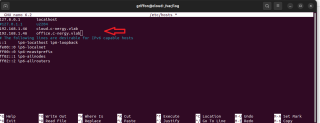
Since we have performed the installation on a single server hosting NextCloud software solution and the CODE package, we will need to configure name resolution accordingly. Since we have not installed a DNS server on this lab infra, we will need to edit the /etc/hosts file and modify it accordingly. We will refer to the CODE server by the name office.c-nergy.vlab. We will add this entry in our /etc/hosts file and your hosts file should look like the following (if you have followed our installation guide)
Click on picture for better resolution
Step 7 – Obtain a certificate for CODE Server
Again, multiple solution exists here. You can try to use the free Let’s Encrypt SSL service to obtain a valid SSL certificate for your CODE Server. In our scenario, since we are not connected to internet, we will use again a self-signed certificate.
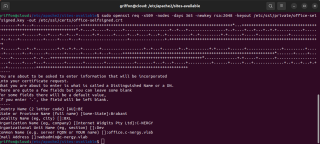
To generate a self-signed certificate, you will need to issue the following command from a Terminal Session
sudo openssl req -x509 -nodes -days 365 -newkey rsa:2048 -keyout /etc/ssl/private/office-selfsigned.key -out /etc/ssl/certs/office-selfsigned.crt
Click on picture for better resolution
Step 8 – Create & Configure Apache Virtual Host for CODE
It’s time to create our Apache virtual host for the CODE (or office) Server. We will create a new file called office.conf under /etc/apache2/sites-available/office.conf by issuing the following command
sudo nano /etc/apache2/sites-available/office.conf
In this file, you will need to copy the following information… Part in red are the ones that you will need to change to reflect your own infrastructure.
<VirtualHost *:443>
ServerName office.c-nergy.vlab
Options -Indexes

ErrorLog "/var/log/apache2/collabora_error"
# Encoded slashes need to be allowed
AllowEncodedSlashes NoDecode

# keep the host
ProxyPreserveHost On

# static html, js, images, etc. served from coolwsd
# loleaflet/browser is the client part of Collabora Online
ProxyPass /loleaflet http://127.0.0.1:9980/loleaflet retry=0
ProxyPassReverse /loleaflet http://127.0.0.1:9980/loleaflet
ProxyPass /browser http://127.0.0.1:9980/browser retry=0
ProxyPassReverse /browser http://127.0.0.1:9980/browser

# WOPI discovery URL
ProxyPass /hosting/discovery http://127.0.0.1:9980/hosting/discovery retry=0
ProxyPassReverse /hosting/discovery http://127.0.0.1:9980/hosting/discovery

# Capabilities
ProxyPass /hosting/capabilities http://127.0.0.1:9980/hosting/capabilities retry=0
ProxyPassReverse /hosting/capabilities http://127.0.0.1:9980/hosting/capabilities

# Main websocket
ProxyPassMatch "/cool/(.*)/ws$" ws://127.0.0.1:9980/cool/$1/ws nocanon

# Admin Console websocket
ProxyPass /cool/adminws ws://127.0.0.1:9980/cool/adminws

# Download as, Fullscreen presentation and Image upload operations
ProxyPass /cool http://127.0.0.1:9980/cool
ProxyPassReverse /cool http://127.0.0.1:9980/cool

SSLEngine on
SSLCertificateFile /etc/ssl/certs/office-selfsigned.crt
SSLCertificateKeyFile /etc/ssl/private/office-selfsigned.key

</VirtualHost>
Step 9 – Apply configuration and restart apache service
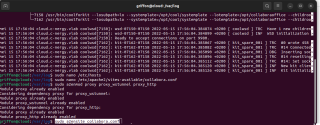
We are almost done. We still need to apply the changes into our apache web server. To do that, we will need to issue the following command
#Enable/accept proxy traffic
sudo a2enmod proxy proxy_wstunnel proxy_http

#Enable the virtual host
sudo a2ensite office.conf

#Restart the service
sudo systemctl restart apache2
Click on picture for better resolution
Step by Step Nextcloud and CODE Integration Configuration
Step 1 – Configure Office settings on Nextcloud Server
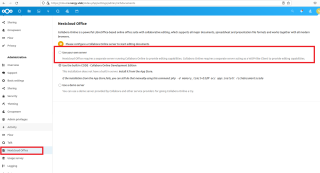
We are reaching almost the final steps to this crazy configuration. At this stage, we have a fully functional Nextcloud server and we have made available the CODE server. It’s time that these two software speaks to each other. This part should be rather easy. You will need to go to the Nextcloud server, Go to Settings > Administration section and select Office in the left menu (see screenshot below)
Click on picture for better resolution
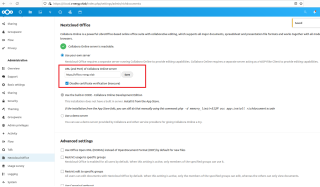
In the Nextcloud office, select the option Use your own server
In the URL input box, type the FQDN of your Collabora Server (in our scenario, we have used the name office.c-nergy.vlab). Since we are using self-signed certificate, please ensure that the checkbox, Disable certificate verification (insecure) is enabled. Save your configuration. If you see a green check, it means that your configuration is correct and the online office edition is enabled on your Nextcloud server
Click on picture for better resolution
Step 2 – Test your configuration
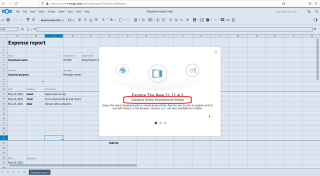
To do that, you will simply go to your Nextcloud server, go to Documents and select one of the Office document that you want to work on…In our example, we will open a spreadsheet. After a few moment, you should see the spreadsheet ready for edition within your browser
Click on picture for better resolution
Final Notes
Voila ! This is it for this post !
We hope the post is not too long and too messy. Nextcloud is not an easy software solution to deploy. You will have to invest a little bit of time to become familiar with the product. On the other hand, once the solution is installed and configured, Nextcloud offers more that centralized, web based storage capabilities. By enabling Apps, you can extend the capabilities of the software and you can basically transform Nextcloud into a real collaboration tool that could be compared to SharePoint Server Solution.
By integrating Collabora CODE solution with Nextcloud server, it’s possible to offer online editing capabilities on Office documents within a simple browser. This combination offers real value to organization and allow users to collaborate online on Office Documents. We are really pleased with such setup and we will probably continue playing around with the software solution and check which others Apps could be installed on top of the Nextcloud server to provide even more collaboration capabilities…..
Stay Tuned
Till next time
See ya
Reference :
- https://docs.nextcloud.com/server/latest/admin_manual/office/example-ubuntu.html
- https://www.collaboraoffice.com/code/linux-packages/
- https://docs.nextcloud.com/server/latest/admin_manual/office/example-ubuntu.html
- https://www.rosehosting.com/blog/how-to-integrate-collabora-online-with-nextcloud-on-ubuntu-20-04/
- https://www.linuxbabe.com/ubuntu/integrate-collabora-onlinenextcloud-without-docker




What a great tutorial. This is something that is really needed to get the CODE server up and running. I tried myself a couple of weeks ago to get it running and gave up because the directions where not all that clear to me. These directions seem a lot more easier. I am going to give it a try on one of my NextCloud servers and see if it will work now.
There is an alternative way that I found to install the CODE server that worked for me. That is using the builtin CODE server app for Nextcloud. If a person is only installing CODE to work with Nextcloud this might be an a lot easier way to get the integration to work. Here is the website for the app
https://apps.nextcloud.com/apps/richdocumentscode
@Michelle,
Thank you for your feedback. Yes indeed, we had the same feeling the first time we tried to install CODE with Nextcloud. It took us some times in researching, testing and writing this post, and we hope that this should be good enough to perform a good installation of Nextcloud (which is really a great solution:)
We are aware of the Builtin CODE server… It’s the one available when running the snap version of nextcloud on Ubuntu. We had some issues installing it (initially). We might publish another post about it and mention that since the package is quite large, the web interface install approach might not be the best
Thank you for all your support and comments
till next time
See ya
I can not get it working. In Nextcloud it says “Document loading failed”
In apache and CODE logs i see several repeats of /hosting/capabilities, also convert-to: Requesting address is allowed.
What could be the issue?
@Miro,
Thank you for visiting our blog and providing some feedback. You do not provide much info about your setup..it will be difficult for us to provide support. Have you followed the tutorial step by step. If yes, we are assuming that the needed services are running, you have disabled the TLS and that within the Nextcloud configuration page, you have a green tick when you have specified the CODE server, right
Can you provide some screenshots about your setup ? Can you take a screenshot of the CODE config within NextCloud page ?
Waiting for your feedback
Till next time
See ya
Hi, I can’t make it work in Nextcloud. When I open a Office doc I get in Collabora logs:
https://pastebin.com/cfLmYMhK
Ubuntu server: 22.04
Latest Nextcloud: 25.0.4
Collabora installed via deb packages (repository like this howto).
Thanks in advance.
@Gustavo,
Thank you for visiting our blog and sharing your experience. We have not tested the integration with the latest NExtCloud version 25.04. looking around on internet, it might be because of incompatible packages.. You might need to download some of the Nextcloud package to previous version in order to make it work.
AT this stage, we do not have time to test and provide detailed debugging information..since we are overloaded by projects…. If some readers have some tips and tricks to provide…This would be great
Till next time
See ya
Great documentation. Worked on Debian 11 with NC 26 so this is still relevant.
Obviously made the required changes to sources list to reflect the OS.
Now trying to figure out how to change the default spellcheck to en_GB from en_US. English USA is only option. Hopefully find a solution soon.
Debian 11
Php8.2
Nextcloud 26
Thank you
@Maxi
Thank you for visiting our blog and sharing your finding and experience… Nice to see that this post is useful…The installation is not that quite straightforward…When time permit, we will try to post more resources about nextcloud
Till next time
See ya