Hello World,
In our previous post (xRDP – xRDP shows only black screen after authentication windows – HowTo Fix !), we have explained that a same user cannot at the same time be connected locally on the Ubuntu machine and perform a remote session. If you try to connect in such scenario, you will end up either viewing a black screen or you will be disconnected after a few seconds.
In this post, we will provide some workarounds that can be used to prevent such situation and allow a user to login via xRDP even if the same user account is already logged on locally on the Ubuntu machine…
Let’s demonstrate this
Overview
xRDP is a software alternative that allow users to perform remote connections against a Linux machine. xRDP, while providing similar functionality as Remote Desktop Services, does not behave exactly the same way as Remote Desktop Server. For example, it’s not possible to connect via xRDP to the console session remotely (as far as we know). The other limitation that’s generating a lot of annoyance and frustration is that a same user account cannot be logged on concurrently locally and remotely on the system.
If a user (let’s call him Jim) is logged on locally on the Ubuntu machine where xRDP software is installed, the same user (Jim) will not be able to acquire a desktop session while performing the xRDP Session. Jim will see only a black screen or will be disconnected after a few seconds. This is the default behavior !
However, there are some workarounds that can be used to prevent the black screen when logged in locally and remotely concurrently using the same user account. We have found so far three workarounds that can be used to prevent the black screen situation. Please note that these are only workarounds which comes with other limitations !!!
Workaround Options
In this section, we will show you three different ways that would allow a user to perform a remote session while already logged locally on the Linux machine. Again, please treat this information as workarounds as some limitations would still apply within your remote session….
Workaround 1 – Start xRDP in Debug mode
The first option is probably the least practical ! You have to manually start the xrdp service manually in debugging mode and only a single user will be able to connect remotely. To run xrdp in debugging mode, you have to perform the following actions
If you have performed a standard xrdp installation (ubuntu xrdp package), use this information
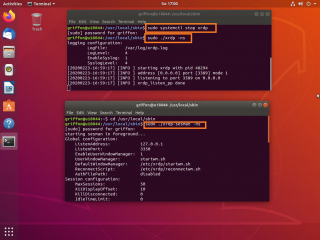
step 1 – stop xrdp service (sudo systemctl stop xrdp)
step 2 – Open a terminal console and issue the following command
               cd /usr/sbin
               sudo ./xrdp -ns
step 3 – Open another terminal console and issue the following command
               cd /usr/sbin
               sudo ./xrdp-sesman -ns
If you have performed a custom xrdp installation (compiled from sources), use this information
step 1 – stop xrdp service (sudo systemctl stop xrdp)
step 2 – Open a terminal console and issue the following command
               cd /usr/local/sbin
               sudo ./xrdp -ns
step 3 – Open another terminal console and issue the following command
               cd /usr/local/sbin
               sudo ./xrdp-sesman -ns
Click on Picture for Better Resolution
Limitations
You have to start the service in a specific way and in debug mode, it seems that only a single user connection will be accepted. This is probably not the best option to use if you want to have local and remote access concurrently from the same user account. Check the other two options as they are easy to implement….
Workaround 2 – using dbus-launch approach
This trick is probably a better approach because it’s simpler to implement. You will simply need to modify your /etc/xrdp/startwm.sh file and appending a one liner that will allow you to basically acquire the desktop while performing your remote connection even if you are already logged on locally. To implement this trick, simply open the /etc/xrdp/startwm.sh with your favorite text editor..
sudo nano /etc/xrdp/startwm.sh
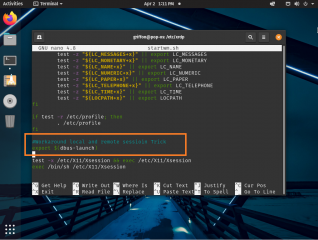
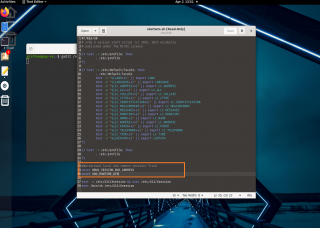
At the end of the file, locate the line test -x /etc/X11/Xsession && exec /etc/X11/Xsession and just above it add the following command
export $(dbus-launch)
Click on Picture for better Resolution
Save the file and restart the xRDP service (i.e. sudo systemctl restart xrdp)
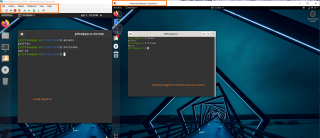
Now, you can give it a try. Stay logged on locally on the machine and initiate your remote session
Click on Picture for better Resolution
As mentioned, you will be able to remote connect to your machine
Limitations
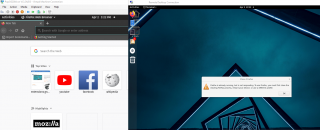
One limitation we have noticed is that some software or program will complain if they are already in use in one of the existing session. For example, if Firefox is open and running on the Ubuntu machine where are logged on locally and you try to start firefox in your remote session, it will not work. You will receive a message stating that firefox is already running
Click on Picture for better Resolution
Another limitation with this method will be present if you are using wayland display server instead of X11 Display server. This trick will not work if you are using Wayland solution.
A final limitation is related to login process. The trick here allows you to launch an additional remote desktop session. However, if you are login first through the remote connection and try to login locally, you should still encounter the infinite loop.
Workaround 3 – unsetting DBUS_SESSION_BUS_ADRESS approach
Credits : https://catch22cats.blogspot.com/2018/05/xrdp-blank-screen-with-ubuntu-1804.html
This trick is similar to the workaround #2. You will also need to edit and modify the /etc/xrdp/startwm.sh file and add some additional commands to be executed when the remote session will be initiated. To implement this trick, simply open the /etc/xrdp/startwm.sh with your favorite text editor..
sudo nano /etc/xrdp/startwm.sh
At the end of the file, locate the line test -x /etc/X11/Xsession && exec /etc/X11/Xsession and just above it add the f
unset DBUS_SESSION_BUS_ADDRESS
unset XDG_RUNTIME_DIR
Click on Picture for better Resolution
Save your file and restart the xrdp service.
Now, you can give it a try. Stay logged on locally on the machine and initiate your remote session
Click on Picture for better Resolution
Limitations
One limitation we have noticed is that some software or program will complain if they are already in use in one of the existing session. For example, if Firefox is open and running on the Ubuntu machine where are logged on locally and you try to start firefox in your remote session, it will not work. You will receive a message stating that firefox is already running
Click on Picture for better Resolution
However, you can always kill the process through the remote session and try to start the firefox process again and this should be working….
A final limitation is related to login process. The trick here allows you to launch an additional remote desktop session. However, if you are login first through the remote connection and try to login locally, you should still encounter the infinite loop.
Final Notes
This is it for this short post !
By default, xRDP will only allow a single session per user account. By default, a same user account cannot be , at the same time, logged on locally on the Linux machine and remotely. If a user tries to remote connect to the machine, a black screen will be presented when remotely connected. To overcome this situation, the recommended way would be to logoff from the machine (local session) and then perform the remote desktop connection. This single connection session is really causing a lot of frustrations and annoyance.
We had to find a way to perform local and remote connections using the same account when using xRDP. After some research, trial and error, we have a finally found some ways and workarounds that can be used which will ensure that same user account will be able to get at the same time a local connection and a remote connection. Use this information at your own risk as we didn’t extensively tested and worked with them. We would strongly recommend you to logoff properly from the local session before trying to perform remote login connections
Till next time
See ya

Another workaround is to ssh into your machine and log your user out remotely:
sudo systemctl restart systemd-logind; sudo systemctl restart display-manager; loginctl terminate-user USERNAME
@Ben,
Thank you for visiting our blog and sharing your findings. This can indeed be a valid workaround as long as the ssh service has been installed and enabled
Thanks for your feedback
Till next time
See ya
Hi Griffon
I have used your blog to successfully set up xrdp on Ubuntu 20.04 and connect to it from a Windows 10 machine.
Everything is working (at last). I have used the workaround 2 for a single user multiple sessions.
Had an issue with user authentication for SMART on hard drives but disabled lm-sensors which seemed to fix that.
However I have one final issue I cannot seem to solve. I would like to be able to log on using a user via RDP to a single session.
I.e. I log on to my Ubuntu machine with user A via RDP open a few programs documents etc. Then log on to the physical machine with user A and have the same desktop come up with all the programs and documents that are open in the remote session.
Is this possible?
Thanks Dave
@Dave;
Thank you for visiting our blog and providing feedback. What you are trying to achieve is not possible with xRDP software and the xorgxrdp software. xRDP will not connect to the “console” session. If you want to take over your session, you would need to use a software like VNC. So, as far as we know, there is no way to connect to the console session via xRDP software
Hope this help
Till next time
See ya
Thanks for the reply. I thought that might be the case.
@DAve,
No worries 🙂
Till next time
See ya
After beating my head against the wall on this issue with Ubuntu-Server 20.04.3 LTS and Xubuntu, I accidentally stumbled across the solution. Despite all the installation steps, the X-session manager is not correctly configured to use a session-based solution. By executing:
sudo update-alternatives –config x-session-manager
then selecting the ‘xfce4-session’ option, I was able to successfully RDP into the server.
Hope this helps someone.
@Keen;
Thank you for visiting our blog and sharing your findings…
till next time
See ya
I propose you a workaround inspired of workaround 2
Create a file /etc/X11/xinit/xinitrc.d/multisession.sh:
export $(dbus-launch)
Tested on Cento8
@Cyril;
Thank you for visiting your blog and providing feedback and suggestions. Indeed, this would be one way to overcome the limitation and automate the process 🙂
We still investigating the workarounds in order to see if there is not other limitations that come with it
Till next time
See ya
Very useful script. I had been trying to get this to work on my own, homebrewed VM as a Virtual Desktop, and your script helped. I also have another VM running Garuda(ArchLinux) and that one seemed to work out of the box, using VNC with little configuration. You might want to check out what they have done.
Thanks!
@Gustavo,
Thank you for visiting our blog and providing feedback… Happy to see that the script is useful and can help you. We are trying to add more and more distributions but this take time and effort
till next time
See ya
Think that the command in Kevi Steele’s comment should be
sudo update-alternatives --config x-session-managerrather than
sudo update-alternatives –config x-session-manager
at least on Linux Mint
H
Urg not sure if I fat fingered that comment, or your comment engine chews things.
That config command should be preceded by two dashes but seems to be rendered by the comment engine as a single dash. If you cut and paste the string in the original comment it returns an error as a command.
I thought I corrected it in the first line of my comment, but testing a cut and paste of my comment, shows a single dash in both command lines. So please either correct my comment if I fat fingered it, or if it is an issue with the rendering drop my comment and see if you can make it so copy and paste will work.
H
@boss & @urg,
indeed there is a formating issue when placing a command…. so the command should be
sudo update-alternatives –-config x-session-managerThank you for letting us know…we will fix the issue in your comments as well
Till next time
See ya
I just followed the above directions with ubuntu 22.04 LTS and neither workaround #2 nor workaround #3 multisession logins work with Ubuntu 22.04 LTS.
@Joseph,
Thank you for visiting our blog and providing some feedback… Indeed, Ubuntu 22.04 has brought some changes and this approach does not seems to work anymore. There was a third approach as well but this is not working either and can break you desktop completely. Remember that we do not recommend such configuration because a lot of side effects exists and can generate more trouble than bring benefit. Best option so far would be to install ssh so you still have a secure remote connection to your machine and you can reset xrdp connections if needed… we will look into this issue at a later stage
Hope this help
Till next time
See ya
@Griffon
No worries and I certainly understand that this is an unsupported configuration at best, even with Ubuntu 20.04 where these approaches were working.
Thank you for confirming my observation and also for your effort in this space, huge appreciation.
Cheers
@Joseph
Thank you for the feedback 🙂 will share our findings when we are ready
Till next time
See ya
Thanks for this; workaround 2 solved the problem for me.
Ben’s suggestion to use SSH to log in and kill the other session also works, but it is not a solution if you have started a compute job in that session and don’t want to kill it.
@Peter,
Thank you for visiting our blog and providing feedback. As a reminder, we do not recommend to use these workarounds as they can introduce some other side effects. The best way is to either be always connected locally or alwasy remotely for the same user account. But choice is up to you 🙂
Till next time
See ya
I think the way a lot of people want to use RDP is to be able to lock their work machine up and then when they get home they want to be able to login to it and continue their session. Not being able to so this via xRDP on Linux is a real detriment I would think.
Option 2 worked for me but I did see the issues with already opened apps like Firefox not wanting to open via the RDP session. Still, a step in the right direction. At least you can access the system instead.
@Scott,
Thank you for visiting our blog and providing some feedback. Indeed xRDP has some known limitation and indeed, you cannot connect to the console session.
As an alternate option, you might want to have a look at the new sharing features of Ubuntu 20.04 using RDP as protocol (you can find more information at http://c-nergy.be/blog/?p=18110)
Again, this feature has also its own limitation. One user needs to be logged on before performing the RDP connection.
till next time
See ya
None of the three methods works for me.
I can provide details of my configuration.
Please could you help me?
Thank you
@Nicholas,
Thank you for visiting our blog and providing feedback. As mentioned in the post; we do not support or encourage to use these workarounds to access the same session locally and remotely when using xRDP Package. You will see that you have downside to this approach. If these techniques are not working, you can try the last one that we have described in the post “xRDP – Allow multiple sessions (local and remote) for the same user – More Option“. This tip is also probably a little bit outdated but we had it working on Ubuntu 21.10. The last tip requires to remove a lot of packages… We Do not recommend using it. Please do a test first in a lab or in on a virtual machine. We have no idea if this is still working or not and implies heavy changes on your system
You might want to use other software if you want to access to the same session (Sharing Desktop via RDP or VNC or any other software available out there )
Till next time
See ya
boot the server into console mode
systemctl set-default multi-user.target
@weberjn,
Thank you for visiting our blog and sharing your findings… We will have a look at your option and see if this could be indeed a good option
Till next time
See ya
Thanks for your sharing. I resolved the problem with your previous tips – exit local access, then rdp can work now.
When I tried the workaround you mentioned here, Did not find the below line in my OpenSuse Leap 15.4, Is any different file to be changed in OpenSuse?
test -x /etc/X11/Xsession
Thanks for any further tips.
@Mike,
Thank you for visiting our blog and sharing your findings… we do not use opensuse so we would not know what’s in the /etc/startwm.sh file… If you share the content of the file, maybe we can provide some guidance.
Please note that we do not recommend to implement these workarounds because you have limitations and side effects. We provided these tips as information and you can decide to use it or not.
There is also a third option that you might want to test but please do note that you will need to remove software from your system and again since we never worked on opensuse; not sure if this would be working or not..
IF you want to give it a try, you can always visit this page xRDP – Allow multiple sessions (local and remote) for the same user – More Option. Use it at your OWN RISK !!!
Hope this help
Till next time
See ya
I was able to set the following in the startwm.sh file
unset DBUS_SESSION_BUS_ADDRESS
unset XDG_RUNTIME_DIR
Though, I was unable to open the chromium browser afterwards? Any ideas?
@Ahmed,
Thank you for sharing your experience. So, we are not recommending to enable multiple users because of some side effects… as described in the post. So, you have 2 sessions opened… Can you check that on none of the session Chrome is running. Usually, if one session has an application running, in the remote session, it’s not really working….
Hope this help
Till next time
See ya
I ran into this issue on ubuntu 23.04 and none of the provided solutions worked. I couldn’t enable multi session and I tried adding the unset commands above the test/exec in `startwm.sh`:
“`
# Added the following line to allow the takeover of an active session
unset DBUS_SESSION_BUS_ADDRESS
unset XDG_RUNTIME_DIR
. $HOME/.profile
“`
I found that there’s a check in the `startwm.sh` which fails the login and terminates with error if a local user is already logged in:
“`
#Check if user already logged in.
if [ -n “$(loginctl session-status $(loginctl show-user $USER | sed -n -e “s/Sessions=//p”) | grep Leader: | grep -E “gdm|sddm|lightdm”)” ];
then
printf “You are locally logged on.\nTo Remote Connect, logout from local session first.” | xmessage -title Warning -buttons Exit -default Exit:1 -center -fg gold -bg black -fn “-*-*-*-r-*–0-250-0-0-p-*-iso8859-1” -file –
exit 1
fi
“`
So my solution was to terminate the local session before this portion of the `startwm.sh` by adding this just above it:
“`
# Terminate any active local x11 sessions
loginctl list-sessions –no-legend | awk ‘{print $1}’ | while read -r session; do
if [ “$(loginctl show-session “$session” -p Type –value)” = “x11” ] && [ “$(loginctl show-session “$session” -p Seat –value)” != “” ]; then
loginctl terminate-session “$session”
fi
done
“`
Hope this helps <3
@JC,
Thank you for the feedback, sharing your findings and visiting our blog…
This can indeed help in “enabling” multiple session for xRDP. However, please do note that we are not really recommending this approach since this tweak can also introduce some other side effects… We have mentioned the tips and people are free to test and use it if it fits their needs
Till next time
See ya
Hello, I have Centos8 and the file you mention in solution number two is not found on my system.
@Luan,
Thank you for visiting our blog and providing feedback. We are not using CentOS and the script has not been designed to run against CentOs Distribution. If I understand your question, the file /etc/xrdp/startwm.sh does not exists. You might need to look in a different location in CentOS. We do not know where the file could be located. A quick search on internet is pointing to these location
1 Looks for $HOME/startwm.sh and runs it if it finds it.
2. If it can’t find $HOME/startwm.sh it calls /usr/libexec/xrdp/startwm-bash.sh. This in turn calls /usr/libexec/xrdp/startwm.sh as a login shell.
Hope this help
Till next time
See ya
hello friends,
I could sudo as the user logged in through xrdp.
@Alex,
Thank you for visiting our blog and sharing your findings…
Till next time
See ya
Hi there, I am trying to do this on my Ubuntu 24.04 laptop but it is not working.
After running your xrdp install script, I noticed that the file /etc/xrdp/startwm.sh is now completely different, probably because it is downloading the file from 0.10.x version, where Ubuntu 24.04 still uses version 0.9.24. The “test” command from startwm.sh is not there to use as reference.
If I revert the xrdp packages to their original config files (purge and reinstall), if I add the lines from Workaround 3 I can’t use remote desktop anymore (black screen and disconnect). If I add the line from Workaround 2, I can still connect to remote, but not with the local account at the same time (no change from original config). If I do Workaround 1, it is the same behavior as Workaround 3.
If I use your xrdp install script to compile 0.10.x from source, connecting to remote works, but not local+remote (the startwm.sh file is different and the “test” line is not present).
Anything else I can try?
Thank you
@Grey,
Thank you for visiting our blog and providing feedback. So, first of all, as indicated in the post; we do not support this configuration because you might have other side effects. If you use xrdp, you have to know that with you can either have a local session or a remote session not both at the same time and that you cannot connect to an existing session…..There are some tricks that allows you to use the same user account but it will be a different session
You can try this “old” post https://c-nergy.be/blog/?p=17371 => use it at your own risk and please test it first on a virtual machine to see if this is still working.. This can break you system and we never test it with ubuntu 24.04.
The xrdp team was working on some workarounds but I think it is still not available and ready to be used..
Hope this help
Till next time
See ya