Hello World ,
Recently, we have been working on a project where Windows 10 desktop were rolling out. These machines were basically replacing the Windows 7 machines as the customer didn’t want to spend money on the Extended Support updates (ESU). The customer is obviously using Active Directory and Group Policy to centrally manage users and computer settings. One problem that the customer was having was related to the Login screen customization in Windows 10.
As we have recently published some posts about windows 10 customization, we have been asked to review their GPO settings and help them in resolving the login screen issues on Windows 10 machines. For more information about Windows 10 and customization of the login screen, you can read the following posts
- Windows 10 – Customize Login Screen Background image if Windows 10 is not Activated
- Windows 10 – Customize Login Screen Background using Provisioning Package…
So, let proceed…..
Problem Description
The customer was already customizing the login screen on Windows 7 using Group Policies and the implementation was working quite fine. When the Windows 10 started to be deployed, the Group policy that used to work for age didn’t seem to work. The default login screen used by Windows 10 (or the slide show) was used instead.
Windows 10 (and apparently Windows 8.1 as well) has introduced a new way of controlling the customization settings of the Login screen. To easily manage and control the login screen settings, Microsoft is now using the Configuration Service Provider (CSP) technology. To know more about the technology, please read (Windows 10 – Customize Login Screen Background image if Windows 10 is not Activated)
Since the customization login screen process is controlled by registry key, we can now create the appropriate Group policy that could be used to centrally deploy and manage these settings.
Possible Solution(s)
Actually, there are probably multiple ways to centrally deploy the login screen settings through the organization. We could use group policy preferences, startup script or scheduled tasks to deploy our settings.
Group Policy Preferences
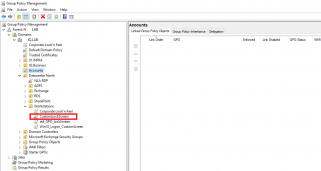
Most GPO administrators want to avoid scripting and want to use as much as possible the Group Policy management interface in order to deploy and review their settings. So, in this specific scenario, we have decided to use the Group Policy Preferences as this would offer an immediate overview of the settings that would be deployed. So we have created a new GPO targeting Windows 10 Computer Objects (see screenshot below)
Click on Picture for Better Resolution
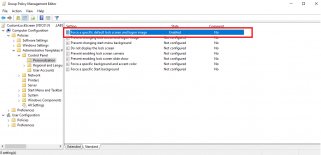
Right-Click the GPO and Edit it. In the GPO Editor, Expand the Computer Settings > Administrative Templates > Control Panel > Personalization and locate the option
- Force a specific default lock screen and logon image
Click on Picture for Better Resolution
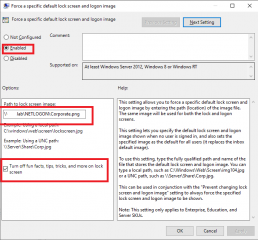
Double-click on it, select the Enable option and populate accordingly based on your settings
Click on Picture for Better Resolution
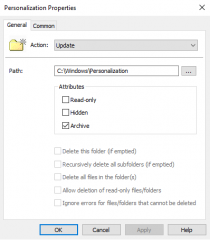
Then, we move to the Preferences node > Windows Settings and select the option Folder. With this GPO, we will create a folder on the Windows 10 machines that will store the image we want to use as login background.
So, Right-click on the right Pane and select New.. Populate the Dialog Box with the appropriate information (adapt the settings based on your organization settings)
Click on Picture for Better Resolution
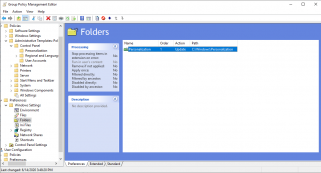
So, at the end, you should see something like this in the console
Click on Picture for Better Resolution
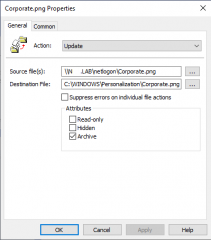
Then, we move to the Preferences node > Windows Settings and select the option File. This setting will basically ensure that the image to be used in the login screen is copied locally on the machine. We want to avoid network dependencies as some of the machines are laptops that can be used outside the office
Again, in the right pane, right-click and Select New…. Populate the dialog box accordingly and based on your own settings
Click on Picture for Better Resolution
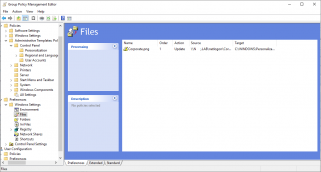
At the end of the operation, you should see something like this
Click on Picture for Better Resolution
Finally, we will create the necessary registry key used by the CSP technology. So, In the Preferences node > Windows Settings and select the option Registry. You have multiple ways to create the necessary registry entry. You could use the registry wizard to connect to a remote machine that contains already the necessary registry key. You can also decide to create these keys manually one by one
Click on Picture for Better Resolution
And voila ! You are done. The GPO will need to be deployed to your network and people should start seeing the new login screen displayed on their Windows 10 machines.
Click on Picture for Better Resolution
Using a mix of standard GPO and GP Preferences, we have been able to provide a controlled way to deploy custom Login screen to Windows 10 machines
Startup Script
As mentioned earlier, there are probably different ways to achieve the same result. Another classic way is to use startup script Group Policy. In the post “Windows 10 – Customize Login Screen Background image if Windows 10 is not Activated”, we have provided a Powershell script that is used to automate the creation of the needed registry key used by the CSP technology and populate them accordingly based on the settings you specify.
We could technically deploy this startup script through the GPO and have it running on the target machines.
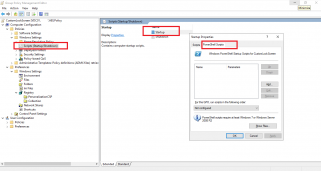
Again, we would open the GPMC console, create a GPO and edit this newly created GPO. In the GPO Editor, Go to Computer Settings > Windows Settings > Scripts (Startup/Shutdown) Node. In the Right Pane, select the Startup Script, double-click on it and the dialog box ensure that you select the PowerShell tab
Click on Picture for Better Resolution
Click on the Add Button and locate the script you want to use. Close and save your settings and you are ready to test that the script is running as expected.
Other Options
You can also create a task scheduler through the GP Preference technology. The Task would execute the PowerShell Script used in the above section. The advantage of the task scheduler is that even if the machine is not connected to the network the task scheduler would run and execute accordingly (as long as the script is available locally on the workstation).
For completeness, you could also use the provisioning package that you would create and use once again Startup script or Task scheduler settings to execute a PowerShell command that would install the provision package to the destination computers.
All these options are possible but again we want to keep the implementation simple enough and also manageable. Based on the customer processes and way of working, you might have to select between these methods and choose the most appropriate one
Final Notes
This is it !
This post is basically closing our investigations about the login screen customization on Windows 10 Operating System. Windows 10 has basically changed the way you can control the login screen settings and the customization capabilities. Windows 10 is now using the CSP Technology to control the login screen settings. Based on our experience on the field, it seems that this CSP technology is not widely known. We have been asked multiple times about this customization feature and how to implement it properly and make it work on Windows 10.
So, We are happy to share this information and we hope that this will be useful to a lot of people
Till next time
See ya

Great article!
We have done similar but one issue that did come up is around changing the font used in custom CP.
We have added an additional task to the default Windows CP that has a label with text. We wanted to
change the font label because on some backgrounds the font becomes difficult to read.
Do you have any idea how this could be achieved?
Regards
Paul
@Paul Foley,
I do not understand your question… not clear to us what you are trying to achieve… can you provide more explanation, some screenshots…
Till next time
See ya
Hi Griffon,
Thanks for responding.
How can I put screenshots in the comment section?
Regards
Paul
@Paul,
Sorry for the delay in the answer… we are really overloaded lately…. No screenshot can be uploaded in the comment section…Either, you upload it to a a storage services (dropbox,OneDrive,Google Drive,….) or we can send you an email where you could reply to it and attach your screenshots
Let’s us know what your preference
Till next time
See ya
Hi Griffon,
NP.
An email is good.
Thanks!
Paul
Hi Griffon,
how about a slide show, is that possible via GPO?
@Dan,
Good question ! We never tried this option…we might need to investigate a little bit further to see if this would be possible
Till next time
See ya
thanks
what is the resolution of background image? And what about different size of screens? I’ve users with 12″ laptops and also users with 27″ external screens (mostly 16:9 but also 16:10 and utrawide as well) – how to alling background dimensions according planty of screensize/resolution?
@Zdeněk,
Thanks for visiting our blog. In theory, you could be able to set specific image size to specific machines…
What you would need to do if you really want to have good quality image for your logon screen is to
1/ Create for each screen resolution screen, a specific background image (ex. Bground-800×600.png, bground-768×1044.jpg,…)
2/ get the user receiving the correct background image size using GPO or SCRIPT
Option 1 – GPO and GPP
If you can from Active directory, find which computer object would be using which screen resolution, you could create Active Directory Groups for each type of screen resolution (ex AD-Screen-800×600,AD-Screen-1024×768,…) and move the computer objects in the appropriate groups. Using GPP and GPO, you can use Targeting technic. In a few words, in the GPP when using targeting, you can say for this Group of computer, the image file that will be used is Bg-800×600, if you are part of group 2, you wil lbe using bg-1024×768,….
=> Depending on your infra, this could be a lot of work….
Option 2 – Powershell script (you can still deploy the script via GPO !!!)
A better option might be to use powershell script. In the powershell script, you can detect the screen resolution and assign the correct picture to be applied on the machine. You can detect the screen resolution using this powershell cmdlet Get-WmiObject -Class Win32_DesktopMonitor | Select-Object ScreenWidth,ScreenHeight. You can find in this post https://c-nergy.be/blog/?p=15168 sample script that you can customize in order to set the proper background image based on the screen resolution
Hope this help
Till next time
See ya
Is it work for windows 10 pro or only windows 10 workstation?
@Chumy,
Thank for visiting our blog and providing some feedbacks…
this trick should be working for all windows 10 editions
Till next time
See ya
thanks a lot,
one question i have applied change wallpaper via GPO, and the problem is laptop when out of office with black wallaper even they are back to office. i have script to clear cache transcode wallpaper but not works because i have rename the user login from AD and user profile on their laptop still use old profile
@Chumyzawa,
I hope I have understood your question….Our understanding is when you are not connected to your network, you get a black screen…. We would guess that the Wallpaper picture is located on a share on your network (on a file server). If your computers needs to be disconnected from the network and used offline, It would make sense to copy the wallpaper image locally on the laptop so the system always find the picture…
Hope this help
Till next time
See ya
Hi, how to create the last part using registry?
Thank you for this.
Its WORKING!! 😀
I have a question, is it possible to change the w10 logon picture using gpo?
@Mark;
Thank for visiting our blog and providing feedback….
To answer your question and to provide an easy to use method; please refer to the post https://c-nergy.be/blog/?p=15168.
The post contains a powershell scripts that will create the registry key for you
The script below will create the necessary registry key for the login screen
Hope this help
Till next time
See ya
#--------------------------------------------------------------------------------# Name : Set Login Screen using CSP Personalization feature
# Credits : https://www.thelazyadministrator.com
# ------------------------------------------------------------------------------------
$RegKeyPath = "HKLM:\SOFTWARE\Microsoft\Windows\CurrentVersion\PersonalizationCSP"
$LockScreenPath = "LockScreenImagePath"
$LockScreenStatus = "LockScreenImageStatus"
$LockScreenUrl = "LockScreenImageUrl"
$StatusValue = "1"
$LockScreenImageValue = "C:\Personalization\yourImage.jpg" #Change as per your needs
if (!(Test-Path $RegKeyPath))
{
Write-Host "Creating registry path $($RegKeyPath)."
New-Item -Path $RegKeyPath -Force | Out-Null
}
New-ItemProperty -Path $RegKeyPath -Name $LockScreenStatus -Value $StatusValue -PropertyType DWORD -Force | Out-Null
New-ItemProperty -Path $RegKeyPath -Name $LockScreenPath -Value $LockScreenImageValue -PropertyType STRING -Force | Out-Null
New-ItemProperty -Path $RegKeyPath -Name $LockScreenUrl -Value $LockScreenImageValue -PropertyType STRING -Force | Out-Null
RUNDLL32.EXE USER32.DLL, UpdatePerUserSystemParameters 1, True
@Mark,
There is not “direct” or single setting option that would configure the user picture on your device. However, you can always combine GPO with login script or create some Group preferences and try to get it work..
This is obviously a little bit more work.
Hope this help
Till next time
See ya
@Griffon
is this process still working? My OS is in 20h2. I’ve tested, but didn’t work for me…
@Rolds,
Thank you for visiting our blog and providing some feedback. as far as we know, this trick should still be working. We have quickly check the documentation of Windows 10 – 20 H2 and the CSP option still exists.. So this should be working accordingly…
We have not tested specifically on 20H2 but if you find out that this is not working, let us know and we will give a look
Hope this help
Till next time
See ya