|
|
The script hereafter is outdated and has been replaced by a newer version. Please Check the Download page for latest version. |
Hello World,
Since the release of Ubuntu 18.04 LTS, a certain number of posts related to xRDP and Ubuntu 18.04 have been released. These posts covered some of the minor but annoying problems/issues that was affecting xRDP when used in conjunction with Ubuntu operating system. The following issues have been covered already and explained in the following posts
- xRDP – The Infamous “Authentication Required to Create Managed Color Device” Explained
- xRDP – How to Fix the Infamous system crash popups in Ubuntu 18.04 (and previous versions)
- xRDP – How to Fix Theme issues in Ubuntu 18.04 remote session
In May 2018, the Std-Install-xRDP (Version 0.2) script has been released and has been improved in order to fix some of the issues mentioned above. The version 0.2. of script (see – Ubuntu 18.04 – Install xRDP the easy way (Scripted Installation)) has tackled the crash popup and the managed color device. The version 0.3 of the script integrate the fix for the Theme and extensions configuration in remote session for all users
This post is basically providing an updated version of our famous xRDP installation script that provide an even better user experience….
Let’s proceed….
The Standard Installation Script – Version 0.3
Overview
The version 0.3 of the script perform a standard installation of xRDP (i.e using the xRDP package available in the Official Ubuntu Repository) and perform also the additional configuration tasks needed to have a workable xRDP solution. The script version has been updated to version 0.3 and include the logic to configure the remote session to present the same look’n feel in the local session and the remote session.
The script will set the Ambiance Theme and Humanity Icon as default theme for any users performing their first remote connection. If a user decide to change theme and icons set, these changes will not be overwritten at the next login. The first time the user makes the remote connection, a hidden file will be created on the user profile. At next remote login, if this hidden file exists, no changes to Theme and icons set will be performed. This approach allow users to customize their session if they wish to.
Assumptions
Before running this script, be aware of the following assumptions
- We have tested the script on Ubuntu 17.10 and later
- No additional desktop interface has been installed.
- We have performed the test on a Virtual Machine running on Virtual box and Hyper-V Virtual machine (on Windows 2012 R2)
- The following procedure has been performed on Ubuntu 18.04 where xorg is the default Display manager
Prerequisites
We assume that you have internet connection on the Ubuntu machine. The internet connection is needed to download the necessary packages that will be installed on your system.
The script version 0.3
Important Note :
If you copy/paste the script, you might encounter some issues because font formatting might be not maintained during the copy/paste operation. Please ensure that format is accurate before launching the script. A downloadable version of the script is available at the bottom of the post
Disclaimer : As usual, use this at your own risk !!
#####################################################################################################
# Script_Name : Std-Xrdp-install-0.3.sh
# Description : Perform an automated standard installation of xrdp
# on ubuntu 17.10 and later
# Date : May 2018
# written by : Griffon
# Web Site :http://www.c-nergy.be - http://www.c-nergy.be/blog
# Version : 0.3
# History : 0.3 - Adding logic to fix theme and extensions for any users login through xrdp
# 0.2 - Added Logic for Ubuntu 17.10 and 18.04 detection
# - Updated the polkit section
# - New formatting and structure
# 0.1 - Initial Script
# Disclaimer : Script provided AS IS. Use it at your own risk....
####################################################################################################

echo
/bin/echo -e "\e[1;36m#-------------------------------------------------------------#\e[0m"
/bin/echo -e "\e[1;36m# Standard XRDP Installation Script - Ver 0.3 #\e[0m"
/bin/echo -e "\e[1;36m# Written by Griffon - May 2018 - www.c-nergy.be #\e[0m"
/bin/echo -e "\e[1;36m#-------------------------------------------------------------#\e[0m"
echo

#---------------------------------------------------#
# Step 0 - Try to Detect Ubuntu Version....
#---------------------------------------------------#

echo
/bin/echo -e "\e[1;33m#---------------------------------------------#\e[0m"
/bin/echo -e "\e[1;33m! Detecting Ubuntu version # \e[0m"
/bin/echo -e "\e[1;33m#---------------------------------------------#\e[0m"
echo

version=$(lsb_release -d | awk -F":" '/Description/ {print $2}')

if [[ "$version" = *"Ubuntu 17.10"* ]] || [[ "$version" = *"Ubuntu 18.04"* ]];
then
echo
/bin/echo -e "\e[1;32m.... Ubuntu Version :$version\e[0m"
/bin/echo -e "\e[1;32m.... Supported version detected....proceeding\e[0m"

else
/bin/echo -e "\e[1;31m!!!!!!!!!!!!!!!!!!!!!!!!!!!!!!!!!!!!!!!!!!!!!!!!!!!!!!!!\e[0m"
/bin/echo -e "\e[1;31mYour system is not running Ubuntu 17.10 Edition.\e[0m"
/bin/echo -e "\e[1;31mThe script has been tested only on Ubuntu 17.10...\e[0m"
/bin/echo -e "\e[1;31mThe script is exiting...\e[0m"
/bin/echo -e "\e[1;31m!!!!!!!!!!!!!!!!!!!!!!!!!!!!!!!!!!!!!!!!!!!!!!!!!!!!!!!!\e[0m"
echo
exit
fi

#---------------------------------------------------#
# Step 1 - Install xRDP Software....
#---------------------------------------------------#
echo
/bin/echo -e "\e[1;33m#---------------------------------------------#\e[0m"
/bin/echo -e "\e[1;33m! Installing XRDP Packages...Proceeding... # \e[0m"
/bin/echo -e "\e[1;33m#---------------------------------------------#\e[0m"
echo

sudo apt-get install xrdp -y

#---------------------------------------------------#
# Step 2 - Install Gnome Tweak Tool....
#---------------------------------------------------#
echo
/bin/echo -e "\e[1;33m#---------------------------------------------#\e[0m"
/bin/echo -e "\e[1;33m! Installing Gnome Tweak...Proceeding... # \e[0m"
/bin/echo -e "\e[1;33m#---------------------------------------------#\e[0m"
echo

sudo apt-get install gnome-tweak-tool -y

#---------------------------------------------------#
# Step 3 - Allow console Access ....
#---------------------------------------------------#
echo
/bin/echo -e "\e[1;33m#---------------------------------------------#\e[0m"
/bin/echo -e "\e[1;33m! Granting Console Access...Proceeding... # \e[0m"
/bin/echo -e "\e[1;33m#---------------------------------------------#\e[0m"
echo

sudo sed -i 's/allowed_users=console/allowed_users=anybody/' /etc/X11/Xwrapper.config

#---------------------------------------------------#
# Step 4 - create policies exceptions ....
#---------------------------------------------------#
echo
/bin/echo -e "\e[1;33m#---------------------------------------------#\e[0m"
/bin/echo -e "\e[1;33m! Creating Polkit File...Proceeding... # \e[0m"
/bin/echo -e "\e[1;33m#---------------------------------------------#\e[0m"
echo

sudo bash -c "cat >/etc/polkit-1/localauthority/50-local.d/45-allow.colord.pkla" <<EOF
[Allow Colord all Users]
Identity=unix-user:*
Action=org.freedesktop.color-manager.create-device;org.freedesktop.color-manager.create-profile;org.freedesktop.color-manager.delete-device;org.freedesktop.color-manager.delete-profile;org.freedesktop.color-manager.modify-device;org.freedesktop.color-manager.modify-profile
ResultAny=no
ResultInactive=no
ResultActive=yes
EOF

#---------------------------------------------------#
# Step 5 - Fixing Theme and Extensions ....
#---------------------------------------------------#
echo
/bin/echo -e "\e[1;33m#---------------------------------------------#\e[0m"
/bin/echo -e "\e[1;33m! Fix Theme and extensions...Proceeding... # \e[0m"
/bin/echo -e "\e[1;33m#---------------------------------------------#\e[0m"
echo
#Set xRDP session Theme to Ambiance and Icon to Humanity
sudo sed -i.bak "4 a gnome-shell-extension-tool -e ubuntu-appindicators@ubuntu.com\ngnome-shell-extension-tool -e ubuntu-dock@ubuntu.com\n\n\nif [ -f ~/.xrdp-fix-theme.txt ]; then\necho 'no action required'\nelse\ngsettings set org.gnome.desktop.interface gtk-theme 'Ambiance'\ngsettings set org.gnome.desktop.interface icon-theme 'Humanity'\necho 'check file for xrdp theme fix' >~/.xrdp-fix-theme.txt\nfi\n" /etc/xrdp/startwm.sh
echo

#---------------------------------------------------#
# Step 6 - Credits ....
#---------------------------------------------------#
echo
/bin/echo -e "\e[1;36m#-----------------------------------------------------------------------#\e[0m"
/bin/echo -e "\e[1;36m# Installation Completed\e[0m"
/bin/echo -e "\e[1;36m# Please test your xRDP configuration....\e[0m"
/bin/echo -e "\e[1;36m# Written by Griffon - May 2018 - Ver 0.3 - Std-Xrdp-Install-0.3.sh\e[0m"
/bin/echo -e "\e[1;36m#-----------------------------------------------------------------------#\e[0m"
echo
How to Use the Script
Set Execute Right on the script
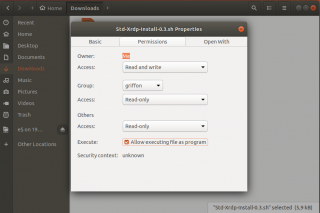
Download the Std-Xrdp-install-0.3.sh script to your system. To have it running, the script has to be marked as executable. To mark a script/file as executable, the following actions needs to be performed
Right-click on the file, go to properties, then select permissions and tick the box allow executable….
Click on picture for better resolution
or from the command line, issue the following command
chmod +x ~/Downloads/Std-Xrdp-Install-0.3.sh
Note : Adjust the path where the Std-Xrdp-Install-0.3.sh script to reflect your environment
Execute the script
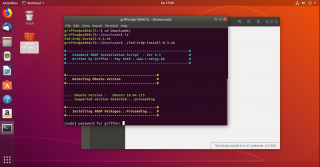
To execute the script, ensure that internet connection is available (so you can download the necessary packages needed for the installation) and simply open a Terminal console. In the Terminal console, Browse to the location where the script has been stored and then issue the following command
./Std-Xrdp-Install-0.3.sh
The script will start executing and when the xrdp installation package will start, you be requested to enter your password
Click on picture for better resolution
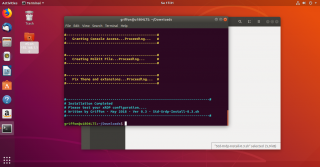
Provide the password and proceed with the installation. Wait for completion of the script. The machine will not reboot automatically when done so you can review the actions performed by the script….
Click on picture for better resolution
Test your configuration
To Test your configuration, you need to perform the following steps
- step 1 – Logout from the Ubuntu machine because you can only have a single connection to the machine for the same user (either local either remote)
- step 2 – Start your favorite remote desktop client and provide the ip address or hostname of your ubuntu machine
- step 3 – At this stage, you should see the xRDP login page. Provide your credentials
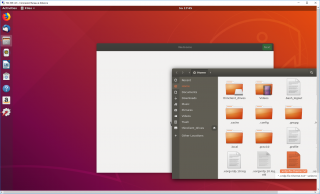
- step 4 – At this stage, you should see your standard Ubuntu Gnome Desktop with the Dock visible, the Ambiance theme displayed and the icons set are set correctly as well
Click on picture for better resolution
If you have a multi-users system, perform an additional test. Login with as another user and ensure that the same look’n feel is applied to this user as well. If this is the case, the script has performed the correct configuration.
Download the Script
Please download the script : Std-Xrdp-Install-0.3.zip
Final Notes
That’s it for today !
Using this version of the script, xRDP package will be installed accordingly and additional user configuration inside the remote desktop will be performed ensuring that the same look’n feel will be provided whatever session the user is connected to (local or remote session). The version 0.3 of the script provides only a small improvement that will hopefully give an even more user experience.
We still want to tackle another small visual issue when using xRDP. The lock screen background color is different when connected locally or remotely. We are trying to find a way to fix this as well and if a solution is found, this might be included in the next version of the script…
Stay tuned as we are preparing next posts about xRDP… Some of the coming posts might be covering custom installation…..
Keep in touch
Till next time
See ya


Hi, using your script and the latest 18.04 ubuntu I can login fine via xRDP but I don’t see any desktop items.
I tried it on two installations, however when I place example.desktop to ~/Desktop it is not shown on the desktop. You can see even in your screenshots that Trash icon is missing from desktop
I just found a solution to my problem:
https://askubuntu.com/questions/966765/desktop-icons-missing-in-unity-new-17-10-upgrade
And I used this for all users:
https://askubuntu.com/questions/647976/ubuntu-14-04-disable-password-lock-when-waking-from-screensaver-for-all-users
cat /usr/bin/lock_disable.sh
#! /bin/bash
/usr/bin/gsettings set org.gnome.desktop.screensaver lock-enabled false
gnome-shell-extension-tool -e ubuntu-dock@ubuntu.com
gnome-shell-extension-tool -e ubuntu-appindicators@ubuntu.com
gsettings set org.gnome.desktop.interface gtk-theme ‘Ambiance’
gsettings set org.gnome.desktop.interface icon-theme ‘Humanity’
gsettings set org.gnome.desktop.background show-desktop-icons true
cat /etc/xdg/autostart/lock_disable.desktop
[Desktop Entry]
Type=Application
Exec=/usr/bin/lock_disable.sh
Hidden=false
NoDisplay=false
X-GNOME-Autostart-enabled=true
Name=LockScreen Disabled
Comment=Disable the lock screen and other stuff
@Patrez,
You probably have to enable the option through the gnome Tweak tool.. The script will not active or de-activate this option
till next time
See ya
@Patrez,
Ah ok, I see you have found some info on the web… glad to see that you have find the solution to your problem
Thanks for sharing the info and for the visit
Till next time
See ya
worked like a charm on a new install of Ubuntu 18.0.4.1! Saved the last few hairs on my head….
@Franco,
nice to hear…please also note that a newer version exists as well (version 0.5)
Thank for the visit and the positive feedback
Till next time
See ya