Hello World,
In our previous post, we have seen how to perform and simple and standard installation of SQL 2016 Server instance. The previous post was describing a manual installation which is just fine for a single instance installation. However, when you have more instances to be installed, it might make sense to try to automate the installation process. Luckily, SQL Server Setup provides ways that can be used to automate the installation process.
To automate the installation of SQL, we can use the classical approach which can be either
- configuration file usage
- command line installation
Another approach could be to use the feature “Desired Configuration State Approach” that could be used to automate the SQL installation process. We never tried this approach but if time permits we will try to investigate this way and publish our findings as well……
This post will focus on the configuration file approach.
So, let’s start…..
Configuration ini file Approach
Overview
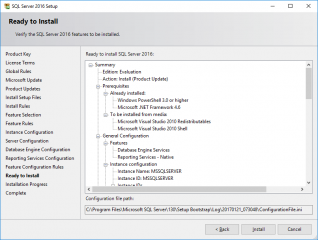
During the setup of SQL instance through the GUI, a configuration file is generated automatically that holds the different parameters that have been used during the manual installation process. In the ready page of SQL Setup wizard, you can see at the bottom of the screen that a configuration ini file has been generated and can be used to perform unattended installation.
Click on Picture for Better Resolution
By default, after a manual installation , you can find the configuration file under <%ProgramFiles%>\Microsoft SQL Server\130\Setup Bootstrap\Log\xxxx\ConfigurationFile.ini.
To start an automated installation process using the configuration file, you would simply open a command prompt, navigate to the location where SQL Setup.exe executable file and issue the following command :
setup.exe /configurationFile=<%Path_of_the_configurationFile.ini%>
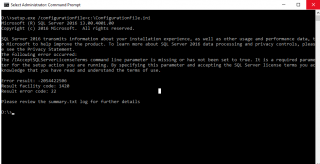
However, the configuration file generated during the manual setup is not useable as such without some modifications. If you try to run the command above with an untouched configuration file, you will end up with the following error.
Click on Picture for Better Resolution
In the next section, we will see which modifications are needed in order to have a successful unattended installation process…. We have put in bold the most important parameters that we need to look at. Because this is my own configuration file, you can see in the configuration file the service account that I have been using during the manual setup. So, hereafter, you can find a copy of the configuration file that has been configured when we have performed the manual installation process (see part I of this post).
;SQL Server 2016 Configuration File
[OPTIONS]
; Specifies a Setup work flow, like INSTALL, UNINSTALL, or UPGRADE. This is a required parameter.
ACTION="Install"
; Specifies that SQL Server Setup should not display the privacy statement when ran from the command line.
SUPPRESSPRIVACYSTATEMENTNOTICE="False"
; By specifying this parameter and accepting Microsoft R Open and Microsoft R Server terms, you acknowledge that you have read and understood the terms of use.
IACCEPTROPENLICENSETERMS="False"
; Use the /ENU parameter to install the English version of SQL Server on your localized Windows operating system.
ENU="True"
; Setup will not display any user interface.
QUIET="False"
; Setup will display progress only, without any user interaction.
QUIETSIMPLE="False"
; Parameter that controls the user interface behavior. Valid values are Normal for the full UI,AutoAdvance for a simplied UI, and EnableUIOnServerCore for bypassing Server Core setup GUI block.
UIMODE="Normal"
; Specify whether SQL Server Setup should discover and include product updates. The valid values are True and False or 1 and 0. By default SQL Server Setup will include updates that are found.
UpdateEnabled="True"
; If this parameter is provided, then this computer will use Microsoft Update to check for updates.
USEMICROSOFTUPDATE="False"
; Specifies features to install, uninstall, or upgrade. The list of top-level features include SQL, AS, RS, IS, MDS, and Tools. The SQL feature will install the Database Engine, Replication, Full-Text, and Data Quality Services (DQS) server. The Tools feature will install shared components.
FEATURES=SQLENGINE,RS
; Specify the location where SQL Server Setup will obtain product updates. The valid values are "MU" to search Microsoft Update, a valid folder path, a relative path such as .\MyUpdates or a UNC share. By default SQL Server Setup will search Microsoft Update or a Windows Update service through the Window Server Update Services.
UpdateSource="MU"
; Displays the command line parameters usage
HELP="False"
; Specifies that the detailed Setup log should be piped to the console.
INDICATEPROGRESS="False"
; Specifies that Setup should install into WOW64. This command line argument is not supported on an IA64 or a 32-bit system.
X86="False"
; Specify a default or named instance. MSSQLSERVER is the default instance for non-Express editions and SQLExpress for Express editions. This parameter is required when installing the SQL Server Database Engine (SQL), Analysis Services (AS), or Reporting Services (RS).
INSTANCENAME="MSSQLSERVER"
; Specify the root installation directory for shared components. This directory remains unchanged after shared components are already installed.
INSTALLSHAREDDIR="C:\Program Files\Microsoft SQL Server"
; Specify the root installation directory for the WOW64 shared components. This directory remains unchanged after WOW64 shared components are already installed.
INSTALLSHAREDWOWDIR="C:\Program Files (x86)\Microsoft SQL Server"
; Specify the Instance ID for the SQL Server features you have specified. SQL Server directory structure, registry structure, and service names will incorporate the instance ID of the SQL Server instance.
INSTANCEID="MSSQLSERVER"
; Specifies which mode report server is installed in.
; Default value: “FilesOnly”
RSINSTALLMODE="DefaultNativeMode"
; TelemetryUserNameConfigDescription
SQLTELSVCACCT="NT Service\SQLTELEMETRY"
; TelemetryStartupConfigDescription
SQLTELSVCSTARTUPTYPE="Automatic"
; Specify the installation directory.
INSTANCEDIR="C:\Program Files\Microsoft SQL Server"
; Agent account name
AGTSVCACCOUNT="DISASTER\SQLAgent"
; Auto-start service after installation.
AGTSVCSTARTUPTYPE="Manual"
; CM brick TCP communication port
COMMFABRICPORT="0"
; How matrix will use private networks
COMMFABRICNETWORKLEVEL="0"
; How inter brick communication will be protected
COMMFABRICENCRYPTION="0"
; TCP port used by the CM brick
MATRIXCMBRICKCOMMPORT="0"
; Startup type for the SQL Server service.
SQLSVCSTARTUPTYPE="Automatic"
; Level to enable FILESTREAM feature at (0, 1, 2 or 3).
FILESTREAMLEVEL="0"
; Set to "1" to enable RANU for SQL Server Express.
ENABLERANU="False"
; Specifies a Windows collation or an SQL collation to use for the Database Engine.
SQLCOLLATION="SQL_Latin1_General_CP1_CI_AS"
; Account for SQL Server service: Domain\User or system account.
SQLSVCACCOUNT="DISASTER\SQLSVC"
; Set to "True" to enable instant file initialization for SQL Server service. If enabled, Setup will grant Perform Volume Maintenance Task privilege to the Database Engine Service SID. This may lead to information disclosure as it could allow deleted content to be accessed by an unauthorized principal.
SQLSVCINSTANTFILEINIT="False"
; Windows account(s) to provision as SQL Server system administrators.
SQLSYSADMINACCOUNTS="BUILTIN\Administrators"
; The number of Database Engine TempDB files.
SQLTEMPDBFILECOUNT="1"
; Specifies the initial size of a Database Engine TempDB data file in MB.
SQLTEMPDBFILESIZE="8"
; Specifies the automatic growth increment of each Database Engine TempDB data file in MB.
SQLTEMPDBFILEGROWTH="64"
; Specifies the initial size of the Database Engine TempDB log file in MB.
SQLTEMPDBLOGFILESIZE="8"
; Specifies the automatic growth increment of the Database Engine TempDB log file in MB.
SQLTEMPDBLOGFILEGROWTH="64"
; Provision current user as a Database Engine system administrator for %SQL_PRODUCT_SHORT_NAME% Express.
ADDCURRENTUSERASSQLADMIN="False"
; Specify 0 to disable or 1 to enable the TCP/IP protocol.
TCPENABLED="1"
; Specify 0 to disable or 1 to enable the Named Pipes protocol.
NPENABLED="0"
; Startup type for Browser Service.
BROWSERSVCSTARTUPTYPE="Disabled"
; Specifies which account the report server NT service should execute under. When omitted or when the value is empty string, the default built-in account for the current operating system.
; The username part of RSSVCACCOUNT is a maximum of 20 characters long and
; The domain part of RSSVCACCOUNT is a maximum of 254 characters long.
RSSVCACCOUNT="DISASTER\SQLSVC"
; Specifies how the startup mode of the report server NT service. When
; Manual - Service startup is manual mode (default).
; Automatic - Service startup is automatic mode.
; Disabled - Service is disabled
RSSVCSTARTUPTYPE="Automatic"
Prepare & Adapt your configuration ini File
Generic Settings
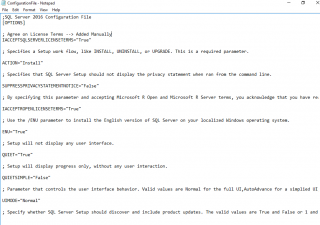
So, the first change to perform is to accept the license agreement by adding the following line at the top of the SQL Configuration file
IACCEPTSQLSERVERLICENSETERMS=”True”
Then, locate the line QUIET=”False”. This line should be set to
QUIET = “True”
Click on Picture for Better Resolution
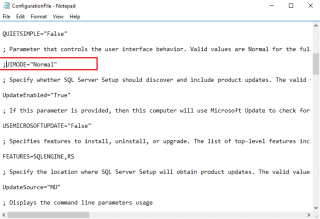
Finally, the UIMODE =”Normal” parameters can be deleted or commented. This parameter basically control the user interface behavior. you can adapt it to your needs
Click on Picture for Better Resolution
These changes are needed in order to have an unattended installation process but they might be a need to update some more settings in your file based in the configuration ini file that has been generated. We know need to tackle the service accounts aspect….
Service accounts Settings
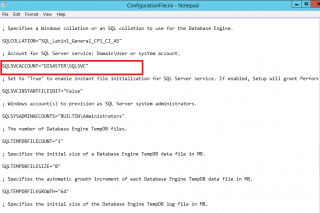
Based on how the configuration ini file has been generated (i.e. based on how you have performed the manual installation), you might still need to modify the configuration ini file. During our manual setup installation of SQL, we have used domain accounts instead of local service accounts. These domain accounts are referenced in the configuration file. However, for security reasons, no passwords have been recorded and saved in the configuration ini file.
Click on Picture for Better Resolution
If you are planning to use domain accounts, you will need to update the configuration ini file in order to reflect the correct user accounts to be used as shown in the extract below.
;Agent account nameAGTSVCACCOUNT=”YourDomain\sqlsvc” AGTSVCPASSWORD=”Password Here”;Account for SQL Server service: Domain\User or system account.SQLSVCACCOUNT=”YourDomain\sqlsvc” SQLSVCPASSWORD=”Password”;Specifies which account the report server NT service should execute under.RSSVCACCOUNT=”YourDomain\sqlsvc” RSSVCPASSWORD=”Password”
You can see also that in order to have a fully automated process, there is a need to pass credentials of the different service accounts to be used. So, one way is to store them in the configuration ini file. This method offers the advantage of automating the installation process but introduces a risk as the passwords are stored in the file and can be retrieved if the configuration file is not deleted after the installation process. So, to start and automate your installation, you can now use the following syntax
setup.exe /configurationFile=<%Path_of_the_configurationFile.ini%>
If you do not want to store the passwords in the configuration ini file, another option would be to pass the credentials in the command line as additional parameters. The following command could be used to automate the installation of SQL while not storing password in the configuration ini file and passing them through the command line.
Setup.exe /SQLSVCPASSWORD=”YourPassword” /AGTSVCPASSWORD=”YourPassword” /RSSVCPASSWORD=”YourPassword” /ConfigurationFile=c:\ConfigurationFile.ini
This is probably a better option even do somebody can still see the passwords used by the service account when executing the command. The passwords will be displayed in clear text. Again to mitigate this situation, we could try to rely on PowerShell and create a small script that would be asking for the credentials on the screen but the passwords would not be displayed in clear text. For illustration purposes, you could use something like this :
#Request Password for SQL Agent Service Account
$pwdSQLAgent = Read-Host -assecurestring "Please enter your password for SQLAgent”
#Request Password for SQL Service Account $pwdSQLSvc = Read-Host -assecurestring "Please enter your password for SQL Service"#Request Password for Reporting Service Account $pwdSQLRpt = Read-Host -assecurestring "Please enter your password for Reporting Service”#Execute the installation process Setup.exe /SQLSVCPASSWORD=$pwdSQLSvc /AGTSVCPASSWORD=$pwdSQLAgent /RSSVCPASSWORD=$pwdSQLRpt /ConfigurationFile=c:\ConfigurationFile.ini
When executing these commands in a PowerShell console, you will be prompted for the password and the unattended installation will start automatically. Nobody would see the passwords that you would have been using….
If your organization has real issues with passwords in configuration files or passed in the console, there is a good alternative. You can decide to use standard local service accounts instead of Domain accounts during the setup process. The advantage is that you do not need to provide any passwords for those accounts and no passwords are stored in clear on the system. You would be able to fully automate the installation process by issuing the following command
setup.exe /configurationFile=<%Path_of_the_configurationFile.ini%>
To achieve this result, you would need to either perform a manual installation and do not specify any domain account during the setup or by modifying the service accounts information in the configuration ini file by using the following syntax
;Agent account nameAGTSVCACCOUNT="NT Service\SQLSERVERAGENT";Account for SQL Server service: Domain\User or system account.SQLSVCACCOUNT="NT AUTHORITY\SYSTEM";Specifies which account the report server NT service should execute under.RSSVCACCOUNT="NT AUTHORITY\SYSTEM"
At the end of the installation process, you will need to perform a post setup action which consist of changing service accounts information for SQL service. This can be performed manually or through a nice PowerShell script from a central server….
Final Notes
I never had to perform an unattended installation of SQL so far. Things are changing and we need to deploy a large number of SQL in certain projects. Luckily, SQL setup provides an easy way to automate installation. The only challenge resides in the service accounts to be used. As we are using MDT to deploy some environments, the safest approach (security wise) is to use local service accounts to be sure that no passwords are advertised by mistake. For other scenarios/situations, the combination of the configuration ini file and the setup.exe command line seems to work quite well which can even be improved by using PowerShell scripting capabilities….
This is it for this post….
In the next part, we will check the command line option only..
Till next time
See ya
I assume it´s easier to deploy with MSA acct for service accounts (no password).
@Magnus,
This is indeed a valid option. In the past, Managed service accounts were not supported with SQL. This has changed since SQL 2014. Managed Service accounts are working for stand alone installation. If you have failover cluster or AlwaysOn implementation, you might need to use the Group Managed service option
Thank for the visit and the comments
Till next time
See ya