Hello World,
It’ has been a quite long time since I’ve been posting some news. Now, you probably know I’m kinda busy with IT projects and this does not let me enough time to blog over Proxmox VE. So far,I’ve been mainly discussing on how to install Proxmox VE software and get your infrastructure up and running. In a previous post, we quickly provide some basic information on how to create kvm virtual machines. Today we will go a step further and will see in more details which options are available to you when creating kvm guest machines.
Let’s start our journey !
Which settings when creating kvm Guest in ProxMox VE ?
Note : we assume that you are already familiar with the Proxmox VE product and you have already some working experience.
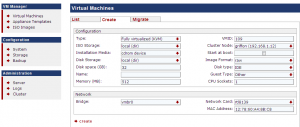
Let’ start from the beginning ! When you want to create a new virtual machine, you will within the Proxmox VE console use the left menu (in the VM Manager section) click on the virtual machine. In the Virtual machines screen, you will see 3 tabs : list, create, migrate. Because we want to create a new virtual machine, we will click on the Create tab and you will be presented with a web page similar to this one
Click to enlarge picture
In this web page, you can specify the characteristics of your virtual machine (name, memory, disk size, guest type…). You can accept the default settings and create right away your virtual machine if you want to. You can also have a look to some of the options that are presented to you and modify these settings to better fits your needs or to improve performance of your virtual machines. In this post, we will have a look to the following settings : the image format and the disk type
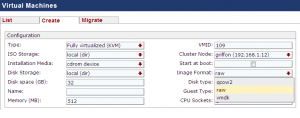
Image Format supported in ProxMox VE
The following screenshot shows that Proxmox VE support multiple image format.
Click to enlarge picture
If I remember correctly, when I started using proxmox ve (versio 0.9), only one image format was supported. that was the qcow2 format. Nowadays, Proxmox VE is basically offering 3 different type of image format :
- Raw
- vmdk
- qcow2
The choice will depends on your needs. I have not seen any detailed information about image format differences. However, looking around in proxmox forum and googling, I have found some useful tips about the different image format. This information is summarized hereafter :
- The raw format
- provide better performance than qcow2.
- When creating a raw disk, the full size will be provisioned on the proxmox host server (It’s similar to thick disk). If you specify a disk size of 10 GB, an 10 GB raw file will be created on the Proxmox Host.
- The qcow2 format
- offers snapshot possibility
- when creating a qcow2 disk, the full size will not be provisioned (similar to thin provisioning). If you create a disk sized of 10 GB, the qcow2 file on the host will be smaller than 10 GB and will increase with usage till it reaches the maximum disk size (here 10 GB)
- You can use copy on write technology (I think that something similar to differential disks concept)
- The VMDK format
- The VMDK format will be based on thin provisioning as well. In other words, if you create a 20 GB disk virtual disk in vmdk format, the size on the ProxMox Ve host will not be 20 GB but less. The size of the file will grow as needed until it reaches it maximum (here 20 GB)
- Using the vmware disk format makes the proxmox ve and vmware infrastructure compatible with each other. I’m assuming (I have not tested yet this) that you could create a virtual machine on vmware and move this virtual machine to a Proxmox VE infrastructure quite smoothly
‘Note: So far, I’ve been using only raw and qcow2 format. I’ve not test yet the vmdk format in ProxMox VE. This will probably the subject of another post… : -p
Disk Type supported in ProxMox VE
As with the Image format, if you look at disk type, you can select from 3 different types (see screenshot)
Click to enlarge picture
When creating a new virtual machine, you can select from the following disk type options :
- IDE Disks :
- This is the standard setting when creating a virtual machine. The IDE Disks is widely spread within Operating systems. If you choose this option, you will be quite sure that your OS installation will recognize the disk and perform the installation easily
- SCSI Disks
- I rarely used this type of disk. I’ve tested time to time with Windows Operating system and the setup routine was able to recognize the disk. In real world, SCSI disks would provide better performance than IDE disks. In a virtual world, I’m not sure. because both disks are “virtual”, I’m assuming that performance would be similar.
- Virtio Disks
- Based on the Proxmox VE documentation, you should use this type of disk to get better performance within your Virtual machine. In order to be able to use this disk type, you will need to download additional “paravirtualized” drivers. These drivers are specifically designed to improve performance of virtual machines. I would compare them to the vmware tools or Hyper-v integration services.
Important Note !
If you plan to use virtio disks, you will need to download these paravirtualized drivers. You can download these drivers here. The Fedora project has created and maintains iso images of the virtio drivers.
Click to enlarge picture
You need to download these drivers because windows operating system does not know this disk type. During the Setup of the Operating system, you will need to present these drivers in order to the setup routine to detect the disk and proceed with the installation.
Note : In a future post (coming soon), we will show you how to create a windows kvm guest using virtio drivers
Network Card Type supported in ProxMox VE
ProxMox ve offers also the possibility to customize the network type you want to use. If you need something that will always work, you should select the network card e1000. This setting ensure that your network card will be recognized and will be useable immediately. Again, if you want to improve the performance of your virtual machine, you can decide to select the virtio drivers. This is not a default driver available within Windows operating system. Again, you will need to get access to the virtio drivers(here) and perform the installation within the operating system.
In my case, I use mainly Virtio drivers when I create Virtual machines because this would be the better option performance wise
Click to enlarge picture
Additional Configuration Settings on Virtual machines
In the previous section, we have quickly seen the options available to you when creating a virtual machine. However, you have to know that some additional settings are available to you if you need to tweak your system a little bit more. I have to say that I rarely change some of these settings but I prefer to show you them so at least you know that they exists..
General Settings (that everybody knows)
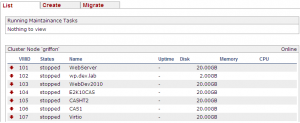
Assuming that you have created a windows virtual machine, you should see this virtual machine in your ProxMox Ve web interface. (On the left menu, click on Virtual machines). In this screenshot, you see that we have created some virtual machines. We now want to check the configuration and perform some additional configurations
Click to enlarge picture
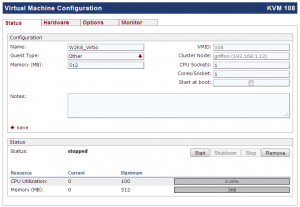
If you click on one of the virtual machine listed there, you will be able to more information about the selected virtual machine. The following screenshot show you the basic configuration settings of your virtual machine. You can see the Guest Type, the RAM size, the VMID (sort of guid identifying your virtual machine), CPU socket,….
Click to enlarge picture
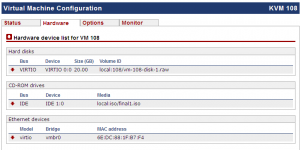
If you click on the Hardware tab, you will be able to see the information related to the disk type, network card, and cdrom. In the screenshot below, you can see that I’m using Virtio drivers for disk type and network card. For network card and Disk type, the only available options here are remove the device or add a new device. You cannot edit the settings through the web interface for these items. If you click the red arrow next to the cdrom device, you will see that you can here edit or delete the device. If you click edit, you will be able to choose which iso file needs to be mounted on the cdrom
Click to enlarge picture
Advanced Settings
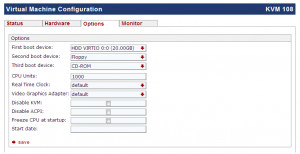
If you click on the Options tab, you will be presented with the following web page (see screenshot below).
Click to enlarge picture
This screen allow you to configure the boot order for the virtual machine. You can choose to boot from cdrom, network,hard disk and floppy. Note that you will need to perform some additional configuration before you will be able to boot from a floppy. The web interface does not provide a way to mount a floppy image. This operation needs to be performed manually. We will discuss this topic in another post…
I’m pretty sure that everybody knows about the boot order options. However, in the same screen, you can configure settings that nobody never look at. Default settings are sufficient most of the time. However, if you want to experiment or change some of these settings, you should know that they exists and what’s their purposes. These settings are not very well documented. I’ve found piece of information mainly in the ProxMox Ve Forum. Let’s have a look at this additional settings.
In the option tab, you will see the following options
- CPU units : You should not changed this value if you do not need to. Basically, this setting allow a vm to get more CPU time than another virtual machine if you increase the value. It’s not clear to me if this value is used by kvm and OpenVz container or only by OpenVz container.
- Real Time clock : This is used for time synchronization for the Virtual machines (I think). Changing this option will probably affect the time settings in your virtual machines. So far, I always used the default settings and didn’t notice time discrepancies.
- Video Graphic Adapter: I’ve never changed this setting. From the drop down menu, you can change the VGA Adpater.
- Disable KVM : You should not change the default settings. If you disable kvm “feature”, you virtual machine will be using only qemu emulation. If you use qemu emulation, this would mean that you cannot use hardware virtualization support. If you are using Virtio drivers for disk, and you disable kvm, I’m assuming that you will get a blue screen and the operating system will not boot.
- Disable ACPI : You should not change from default settings. Modern operating system have support for ACPI (Advanced configuration and Power Interace).
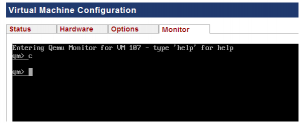
- Freeze CPU at Startup : With this option, when you start a virtual machine, the vm will freeze the boot process. To resume the boot process, you will need to go to the monitor tab of the virtual machine configuration and press c then enter (see screenshots). This can be useful for debugging or if you need to access some other settings (such as recovery console or F8 options)
Click to enlarge picture
Final words
As you can see, creating a kvm virtual machine is not really complex. If you stick with the default settings, you are good to go. However, if you want to tweak a little bit your system and get better performance from your virtual environment, you might considered deviating from defaults settings and adapt (based on your needs) your kvm configuration settings. If you are mainly working with Windows virtual machines, you should use the virtio drivers to improve the performance of your virtual machines. Regarding image format, I have to say that I’m using a mix of all format and cannot really choose between a preferred one.
This conclude this post. I’m already preparing the next one and will explain how to use paravirtualized drivers…
Till then
See ya


Hi,
is it possible to change the default settings? All my VMs use virtio as storage and network, and it is very tedious to change these settings each time.
Thanks in advance for the informations and for your great posts
Hello Paol,
Yes It would be probably possible to modify the default settings but this would involved modifications of some of the code of the proxmox ve web pages… (see below)
You could as an alternative create your virtual machine using a command line – check the qm manual for that
You could also create a virtual machine that you could use as a template and deploy it on your proxmox VE infrastructure.
Disclaimer – I have not tried this. be sure to make a backup of the file you are about to modify
You can try to modify the following file for the storage : /usr/share/pve-manager/vmlist/create.htm
and modify the following line
my $dtypes = [[‘ide’, ‘IDE’], [‘scsi’, ‘SCSI’], [‘virtio’, ‘VIRTIO’]];
into
my $dtypes = [[‘virtio’, ‘VIRTIO’], [‘scsi’, ‘SCSI’], [‘ide’, ‘IDE’]];
this will list the virtio as the fist choice…
for the networking, you have to dig a little bit more because I see that there are references to some perl scripts. You can find some of these scripts in the following directory /usr/share/perl5/PVE
If I have time, I can try to make it a post and give a more accurate approach.
Thank you for your visit… See you around
Hello Paolo, you can find a quick and dirty explanation on how to modify default settings in proxmox ve interface at this address http://c-nergy.be/blog/?p=1214
Hope this help
Hello Griffon,
First of all, thanks a lot for your website, it’s really brilliant and all seems so well explained. I found it while googling “proxmox create fixed size disks”. So I was given by google this article, but…
I also thought using the RAW disk format will create a virtual HDD file which will use immediately the full size of the disk.
On the Proxmox file system, the HDD files look like this: for a 100GB HDD, the file is also 100GB.
But actually, when I look at the “storage list”, only the space which is effectively used by files created on the virtual HDD is shown as used space (it means disks are behaving like auto-extended disks).
Worse: on a 800GB disk, I could create 1200GB of RAW virtual HDD and the used space shown by Proxmox is still 250GB…
Any idea?
Hello Fabien,
This is a really good catch from your side. You are correct. If you create a raw file of 100 GB, a similar file of 100 GB will be created on the file system. However, you have to know that the raw file format support spare file feature. This feature introduces the concept of maximum size vs used disk space size. The used disk space size will report data effectively written on the filesytem. The disk size report the maximum size of the disk you will be able to create. (To know more about spare files, have a look here )
You can see this information in multiple places (from a command line, if you type ls -lh or ls -lhs or if you use the qemu-img info option also, you will see the disk size information and the used disk space)
As explained in the wikipedia, you can create larger file than your file system will support (cool) but that might be a problem for you if the file grow too much and you will run out of space.
For linux, you can run the dd command to fill in the white spaces of the virtual disk and you should then see the “real real size” of the file. For Windows, I do not know if such tool is available. (I will need to check that)
As a workaround (quick and dirty fix), you could create the virtual disk on a vmware platform as thick disk. If you use this disk in PVE, you would see once again the “real real” size. (Use this really as a workaround :))
Hope this help
ps: this was a quick and dirty answer – I might come back to you with a more detailed explanation/workaround
see ya
Thanks a lot for your answer.
This behaviour is a bit tricky for somebody like me who was used to VMWare 🙂
To be honest, I don’t like the risks it brings for, EG, a file server where users can suddenly completely fill it. I also don’t know what the impact on performances is when, EG, 2 OS are installed simultaneously, or 2 databases are running simultaneously, because the disks must be fragmented a lot.
Creating the HDD in VMWare is not an option for me as final aim is to actually use Proxmox to replace an existing VMWare infrastructure 🙂
I think about another work around: writing data on the whole disk before installing the OS, but then, after the OS will format the disk, I don’t know if it will be reduced again.
At least I have part my answer: this is the “normal” behaviour of Proxmox.
I was also looking for some tricks or commands to have a “real” fixed sized HDD file but I was not successful with Proxmox. Maybe it will be better with Qemu commands.
Thanks again anyway, I will keep you in touch if I find something.
Hello Fabien,
I have done some quick tests.. and here are the results 🙂
Option 1 – Create the virtual disk using the dd command (through the Proxmox VE console)
(Best Option probably)
At the PVE console or using putty, you can type the following command to create a disk of 10 GB that will be seen by the system as full
dd if=/dev/zero of=vm-disk-id.raw bs=1024k count=20000 (or 20k) (this will create a disk of 20 GB)
Notes:
The disk creation process will be longer (given that you want to write data on the file system)
When you create your virtual machine, you will have to point to the correct disk (the disk you’ve just created 🙂 )
You could still create the disk in the PVE Web interface and then again through the console (or putty) using the dd and cat command, you could inflate the size of the virtual disk and thus your system will be reporting the full size of the Virtual disk you’ve created
Other options – (might take longer and needs additional steps after installation of the os)
The workaround i can imagine is to create your virtual disk, then install the OS ((I’m assuming you will be using mainly windows operating systems) and finally write “junk data” on the disk in order to remove the white spaces. To write junk data on a disk, you can use the built-in command fsutil
fsutil file createnew c:\Fill.txt
fsutil file setvaliddata c:\fill.txt Size in bytes
fsutil file setzerodata offset=100 length= length= c:\fill.txt
or you can use a third party tool (and free of course) such as disk filler or Philip. These utilities will also create a dummy file with “real” data inside. When you are done, you can simply delete the file and the virtual disk will inflate and thus all the disk space for this virtual machine will be allocated in your proxmox ve system.
I hope that this answer your question.
I’ll probably make a post of it. Your question was really a good one :-p
Till then see ya
Thanks a lot for your support, it is exactly what I was looking for!
As soon as possible, I will try the 1st solution.
See ya 🙂
Hi, thanks for your reply.
I successfully changed the defaults values for memory, network card, autoboot and disk type.
You don’t need to reboot proxmox VE host to see the changes applied, just restart apache2.
Cheers
Hi again Griffon,
I did not test yet the command because I am now fighting with my LVM group. I created it successfully and all works fine… but I am unable until now to somehow mount it so it is accessible to create my virtual HDD. I am surprised Proxmox doesn’t offer such possibility so we can easily access the disks files. I could see in another post you aren’t familiar with this stuff neither, so I will continue reading about it to find a solution.
It was just to inform you I really appreciated your help, but don’t be surprised if I don’t give feedback 🙂
By the way, I also discovered the way how the Proxmox wiki explains the LVM group creation is not advised by http://tldp.org/HOWTO/LVM-HOWTO/initdisks.html because the disk may be recognized as empty and erased by mistake. They propose to create them on partitions. Anyway, Proxmox is not the kind of distro you are playing often with… so maybe such risks aren’t important. Maybe this info will be interesting for you.
… very hard for a Windows / VMWare admin to jump into the Proxmox world 🙂
Hi Fabien,
Appreciate your feedback. Indeed, I’m not an expert when it comes to LVM but if I get some free time i would definitely have to look into it because PVE is using it. Maybe your are looking for this option. Within the Web Interface, you can add your lVM Group, goto storage and then select add LVM Group. Then you should be able to use it within PVE.
Anyway,Thanks for the tips and comments. and if you find something useful, do not hesitate to tell us 🙂
See ya around
No Problem,
thank to you for the tip about restarting apache2. make sense..
see ya around
Cheers
Hi again,
admin says:
August 19, 2011 at 11:32 am
“… Within the Web Interface, you can add your lVM Group, goto storage and then select add LVM Group. Then you should be able to use it within PVE…”
=> this was fine, I did not have any issue with it.
But I got my answeres:
– Inside a LVM group, disks files have fixed size like I wanted (means the RAW file for a 20GB disk will be 20GB immediately)
– Not possible to “mount” a LVM group to access contents
Cheers 🙂
Hi Fabien,
thank you for letting us know….. 🙂 Hope you got all your answers now. I’ll definitely have a look into LVM technology might be useful for the future 🙂 As soon as I have some time, I’ll start testing this.
You are right in the following points (I’ve checked quickly..) :
if you are using LVM as storage, you should have a real thick Disk provisionning (because the filesys).
You cannot mount LVM volume (and see what’s inside ) within Proxmox VE as is.
I’ll definitely make a post (or a series of posts) about this topic.
Thank you for your comments and sharing with us your discovery
Best Regards
Hi
that the Proxmox installation only allows me to create images in raw format
the drop is not formatted vmdk or qwcon2
Hello Josep,
Normally, you should see vmdk or qcow2 next to the raw format. Which version of Proxmox are you running ? You could check this post to see if your html files are configured correctly and see if the options are listed there….
I would suggest you to re-install the lastest version of Proxmox VE and see if this fix your problem
Best Regards
Hi,
Great website!
So, we’ve created a mirror raid on /md0 and vgcreated a LVM on it, and set it up on the Proxmox GUI but I’m dissapointed we couldn’t thin provision using VMDK (as I read elsewhere on your site). The only option was RAW. As I read, RAW is thick provisioning only….thin for us, in our situation would be much preferred.
Please advise why I could only see RAW and what I can do to thin provision instead.
Many thanks!
Hello Gavin,
If you use vmdk or qcow2 disk format for your virtual machines, you can do thin provisionning. However, if you plan to use LVM Group within the Proxmox VE Web Interface, you have a small limitation….The limitation is that Proxmox VE when using LVM group is configured to use only raw format and thus no thin provisionning…..
What you could do (It’s a suggestion I’ve never tried this…..), you could probably create your LVM group within the console (using pvcreate,lvcreate and so on). When this is done, you will need to mount your LVM group. Then, within the Proxmox VE interface, you could add your storage as Directory Type. If the Storage type is set to Directory, you should be able to select the disk format you want to use (vmdk,qcow2 or raw)
I do not know if this would fit your needs… you will need to perform additional tests to be sure. (And again, I’ve never tested this configuration)
Hope this help you
See Ya
how can i get the latest version?
@Aprilia,
If you want to get the latest version of PROXMOX VE software, please visit their website and you should see all the necessary info you would need to perform further investigations
Thanks for the visit and the feedback
Till next time
See ya