Recently, I had to install ESXi on unsupported hardware. The installation was intended to be used as test infrastructure and play ground for people with few Vmware knowledge. This was the first time for me that I had to perform the installation on unsupported hardware… I had to “Google” quite a bit in order to come up with a correct setup procedure for these machines.
The following links helped me a lot during my research.
- http://www.vm-help.com/esx40i/customize_oem_tgz.php
- http://www.vm-help.com/forum/viewtopic.php?f=12&t=4&sid=619ad02527a795ec1448aad9d44d6242
- http://www.jonathanmedd.net/2011/01/install-esxi-4-1-from-a-usb-stick.html
It might be worst checking the vm-help web site because if you are lucky you might find the ready to use drivers you need to perform your installation.
Let’s start this post !
ESXi installer and the “famous” vmkctl.hostCtlExecption error message
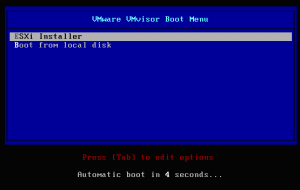
I had to install Esxi on 2 heavy workstations (not on the HCL). I decided to start the installation immediately and inserted the Esxi 4.1 cdrom. The machine booted from the cdrom and the setup process started normally as depicted in the following screenshots
Step 1 : The Boot menu was loaded and I selected the ESXi Installer option
Click to enlarge picture
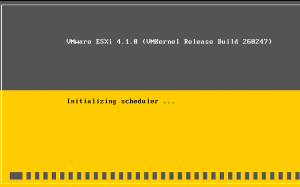
Step 2 : The installer was initializing normally
Click to enlarge picture
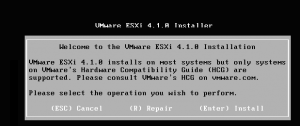
Step 3 : After initialization phase, you will be prompted with the following screen. I wanted to perform the installation so I press on “Enter”
Click to enlarge picture
Step 4 : Immediately after that, I’ve received the following error message : vmkctl.hostCtlExecption : Unable to load module /usr/lib/vmware/vmkmod/vmfs3 : Failure
Click to enlarge picture
The error message can be confusing because there is a reference to a module not able to load and related to vmfs3. So, people might think that the problem is related to the storage and the hard disks are not recognized on the system. This error message simply means that no recognized network card (or no network card) is present on the system. The problem is that the installer has no drivers for this “unsupported” network card.
As this stage, we need to find the drivers for this network card allowing the setup routine to proceed with the installation.
What you will need
To perform a successful installation (after identifying your hardware), you will simply need to put together some files,scripts and a bit of luck.
Let’ see what you need….
1.obtain the oem.tgz file with the correct drivers
We first need to find the appropriate oem.tgz file. This file is used by ESXi during the setup process. I was lucky enough to find a ready to use oem.tgz package containing the correct drivers (can be founded here). The 2 workstations are identical and are using a Intel gigabit network card 82578DC
On the vm-help web site (this link), you can see if a custom package exists for your hardware.
2 Download and run “the” script
To help people in creating their custom ESXi installation media, a smart guy has developed a small script that automate much of the procedure.
The script will run only from a Linux machine. (If you do not have one, you might need to install one as virtual machine or simply use a live distribution – I’ve used Ubuntu 10.10)
The script can be found here.
3 Download mod.tgz file
This file can be founded here. This file will be needed if you plan to perform (like me) an installation from the USB Stick.
4 Create a Kickstart file (ks.cfg)
If you are performing the installation from a usb stick, you will need to create a ks.cfg file that will indicate the esxi installer to look for installation files on the usb stick and not on the cdrom. The ks.cfg script is really simple. You simply open a text file, copy the text below and save it (as ks.cfg)
##### Content Ks.cfg ############
vmaccepteula
rootpw password
autopart –firstdisk –overwritevmfs
install usb
###### End Content #############
5 ESXi Installer ISO image
Just a reminder ! You need to have an iso image of the ESXi installer. This one will be used by the script that you have downloaded in point 2
The Way to Go (Installing from a Usb Stick)
In this section, we will briefly explains the steps that are needed in order to create a custom ESXi image. To create such custom install image, we will be using the script that we have downloaded. This will simplify the procedure. Let’s do this
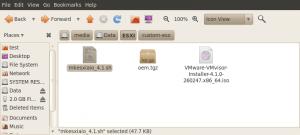
step 1 – From your Linux distribution, create a folder and copy the following files
- the mkesxiaio.sh script
- the oem.tgz drivers
- the esxi installer iso image
Click to enlarge picture
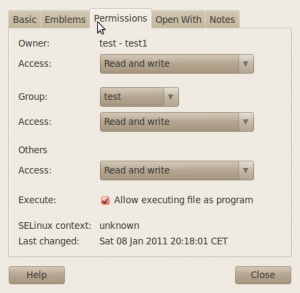
step 2 – Make the script executable
From the Gui, Simply right-click the file, go to the permissions tab and at the bottom tick the box “Allow executing file as program” or from the command line by typing the following
sudo chmod +x mkesxiaio_xxx.sh
step 3 – Modify the oem.tgz file
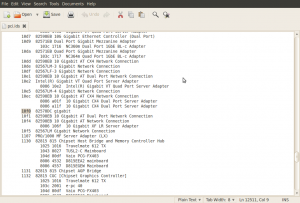
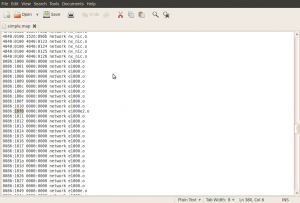
You can already modify the pci.ids file and the simple.map file. You need to add an additional line in those files in order to have a reference to the new driver that you will be using.
- In the pci.ids file, you need to add the following line : 10f0 82578DC gigabit
- In the simple.map file, you need to add the following line : 8086:10f0 0000:0000 network e100e2.0
Click to enlarge picture
Click to enlarge picture
step 4 – Run the script
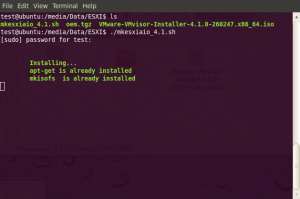
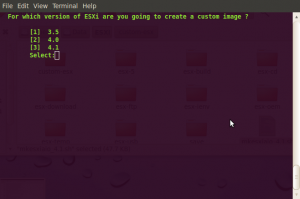
Open a console window and start the script by typing ./mkesxiaio.sh or simply by double-clicking the .sh file
The script is starting and installing required components. It’s recommended that your Linux machine has internet connectivity
Click to enlarge picture
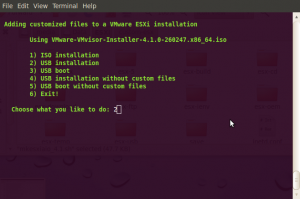
After the script has finished initializing, you will be presented with the following menu.
Choose the option that fit your needs. In my case, I’ve selected the option 3
Click to enlarge picture
You have to choose from which media you want to install the ESXi. In my example, I wanted to use a USB stick, so I had choosen the option 2
Click to enlarge picture
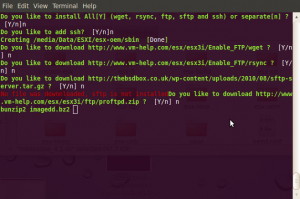
The script will then ask you if you want to add additional components. Again, this depends of your situation. I haven’t installed any additional components
Click to enlarge picture
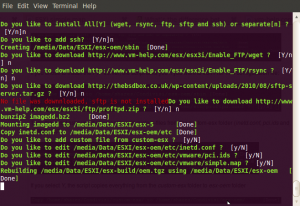
After answering to a few questions, you screen will not display much information for 5 to 10 minutes. Do not close the window. The script is working
You will then be prompted for some additional questions. Because we have prepared our files in advance, we do not need to customize anything else
Click to enlarge picture
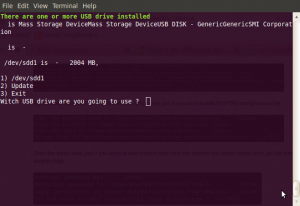
The script will then try to detect the usb stick you will be using. If the Usb stick was connected, the script will detect it. if you have multiple usb stick, you have to specify which one will be used
Click to enlarge picture
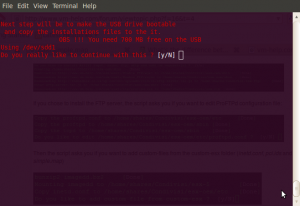
You get a warning that your USB Stick will be formated. Simply answer yes
Click to enlarge picture
At the end of this procedure, you will have a bootable usb stick that contains a customized esxi installer image.
The Other Problem and the solution
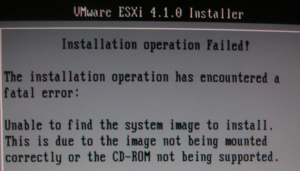
If you try to install ESXi from the usb stick you have just created, you might end up with another error message. The setup routine will go a step further but as soon as the installation files are needed, you might get this error message :
“The installation operation has encountered a fatal error: Unable to find the system image to instal. …”
Apparently, the esxi setup routine always look for a cdrom when performing the installation. If the installer has to look in another location, you will need to tell him. We have 2 ways to solve this problem.
Option 1 : Dirty way
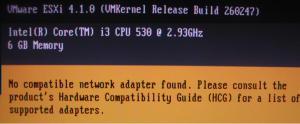
You can simply place a cdrom with the esxi installer on the computer and the setup will proceed. On the other hand, because you have used the non-customized installation image, when the esxi will boot, you will get another error message stating that no compatible network card has been founded on the system.
To fix this problem, you will need to boot from a linux live cd and access the Hypervisor1 partition. You will have to modify the oem.tgz (/usr/lib/vmware/vmkmod/) file and include the e100e2.0 driver file in the file sytem.
Reboot your computer and you should see your network card.
Option 2 : using the ks.cfg file
That’s why we have created the ks.cfg file. This file will notify the installer that the system image is not on the cdrom but on a another storage (the usb in this case). In this situation, the setup routine will continue and use the customized installation image. At the end of the process, you will have a functional ESXi host ready to be used.
Note : To use this method, ensure that the computer is connected to the network.
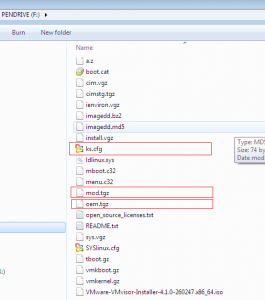
If you use this approach, you will need to copy the 2 following files at the root of the usb stick
- ks.cfg
- mod.tgz
At then end of the procedure, your usb stick should look like this
Final Customization
We still need to make a final modification to the syslinux.cfg file. Because we have added the ks.cfg file and the mod.tgz file, the syslinux.cfg file needs to be updated. Your syslinux.cfg should be similar to the following example :
(…..)
label ESXi Installer
menu label ^ESXi Installer
kernel mboot.c32
append vmkboot.gz ks=usb:/ks.cfg — vmkernel.gz — sys.vgz — cim.vgz — ienviron.vgz — install.vgz — mod.tgz — oem.tgz
(….)
This was the last change needed in order to be able to install ESXI in a smooth way on these workstations hosting Intel Network card 82578DC.
Plug you stick, boot the computer, and you will that after 5-10 minutes you will get a fully functional ESXi host installed.
Conclusions
As you can see, there are a lot of pitfalls when installing Esxi on unsupported hardware. It’s not easy but it’s not as difficult as you can imagine. The only thing that can block your installation is the non availability of a linux drivers for your hardware. I’ve been lucky because I have found a ready to use drivers but that might not be always the case. You can always check the manufacturer web site and see if they provide linux drivers. you might be able to create a rpm package of it and extract the correct drivers
Ouf ! That was a long post….
Till next time
See ya
Griffon

After of weeks of playing with VMWare ESXi with D-Link NIC finally I just did what Griffon suggests with the option to create iso image. I had already oem.tgz with required driver so using my linux host machine I was able at last create working image and finally make VMWare ESXi 4.1 run on my workstation.
Thanks a lot.
Cool…
Happy that this post helped you.
See ya
thanks. After some searching, I think the best and easiest way is get a new NIC card. But I like to try fixing it without buy a new NIC first.
I think I need to download this:http://downloads.vmware.com/d/details/esx41_broadcom_netextremeii_dt/ZCV0YnRlaHRiZHdldA==
Do you have any ideas how to start with this.
Thanks a lot.
Hello there,
Correct me if I’m wrong but you have a computer with the Broadcom netextreme network card and you do not succeed with the installation. Is this correct ? If you are installing ESXi, it might not be as easy as it seems. Have your performed the installation yet ? at which point do you get ? The setup is failing because no network card is detected or can you perform your installation so you might be able to inject your drivers using some command lines or by booting from a linux machine and then loading these drivers ? If you cannot see your network card, you will need to create a custom oem.tgz (like in the post) and perform the installation. The good thing is that the drivers are existing but you will need to search a bit to know which entries you will need to update to perform a correct installation. If I have some time, I’ll try to have a look on this particular issue and try to get a valid procedure
———- UPDATE 22/04/2011 – 12.03 ———-
This might help you. After a quick search, I found this post that might be what you are looking for http://www.ntpro.nl/blog/archives/1602-Injecting-drivers-into-the-ESXI-installer.html. I didn’t test it. you should give it a try
Another option to customize the ESXI Installer would be to use a tool called vibddi. This tool is available with a vmware appliance called VMWare auto-deploy
I haven’t tested either but this would be an excellent idea for a coming post….
Hope this help
Till then — see ya
The custom USB boot method using the script did not work at all for me. I am using the 4.3.1 version of the mke script and I am using the 4.1 update 1 iso (latest version supported by the script). The script runs through the options shown in the main post and reports that the usb device can now be used to install, but the script starts over instead of exiting. When you attempt to boot the USB stick, the install instantly dies with the message “menu.c32 not a COM32R image”.
Hi John,
sorry for the late answer, I probably missed your comment…. I’ve not tested the 4.3 version of the script. I have to say that I’m starting testing the ESXI 5 hypervisor….If i have some time; I’ll try to install it also on a unsupported box
see ya
hello~.. Nevertheless i follow your instruction, but it doesn’t work.
It passed NIC card, It doesn’t recognize Hard disk.
How do i???
which version of esxi are you using… You should use ESXi 5 (free download). The ESXi seems to support the network card model.
What’s the problem with your hard disk can you be a little bit more specific.
are you presented with a list of available disk space available and where to install the esxi or does it throw up an error. ?
I would like to install Esxi 5.0 on a small shuttle xs35, all goes well except for the NIC is not supported. It uses a jmicron NIC that is built onto the mb. There are no slots to add a card. The drivers are available from Jmicron for different os including Linux. How can I convert this driver to work on this installation?
Hello Michael,
You can try the esxi customizer utility. you can have a look here
you should find all the necessary info to integrate your drivers into esxi installer..
Check also the site for readu to use drivers for esxi
being quite busy with work, i can only give you some pointers..
Hope this help
Yo lo resolvi de la siguiente manera
1) Se crea la maquina virtual sin el parametro de la tarjeta de red (decir que no se usara card network, si esta creandose la maquina virtual en una workstation )
2) Buscar el archivo donde se configuro la maquina virtual. (archivo .vmx)
3) agregar los siguientes codigos.
monitor_control_restrict_backdoor=”TRUE”
monitor_control_vt32=”TRUE”
ethernet0.present=”TRUE”
ethernet0.virtualDev=”e1000″
ethernet0.connectType=”bridged”
ethernet0.addressType=”generated”
4) salvar el archivo, recuerde dejarla siemre con la extension .vmx
5) Power on nuevamente, listo problema resuelto
Resumen: no se habilita la tarjeta de red al crear la maquina, pero luego se agrega el codigo respectivo.
Mschlabach,
Were you able to install esxi on your xs35 shuttle in the end?
I am trying to do the same thing, and cannot find the OEM.tgz file for the JMC250 Ethernet controller. Nor are there any instructions on how to compile the drivers, so I have struck a dead end.
Allan
have you checked these 2 links, is this something that can help you….?
http://www.virtuallyghetto.com/2010/11/how-to-inject-custom-drivers-into-esxi.html
http://kb.vmware.com/selfservice/microsites/search.do?language=en_US&cmd=displayKC&externalId=2003316
this other link might help you as well
http://wwdj.wijndaele.com/create-a-custom-esxi-image-for-your-raid-driver-3ware-9750-sas-raid/
hope this help