Hello World,
In the previous post, we have seen how to take advantage of WDS component when using MDT 2013 deployment solution on a Windows 2008 R2 server.
In this post, we will show you how to perform the installation of MDT 2013 while using the WDS component of Windows 2012 R2. In Windows 2008 R2, you could already implement such configuration but you needed to perform some additional actions in order to configure the WDS Server to work in a standalone configuration. In Windows 2012 R2; WDS can be installed in a stand alone configuration or as part of an active Directory Domain. This change in the WDS Server component makes things simply easier.
Let’s see how you can combine, MDT 2013, WDS and Windows 2012 R2 to obtain a re-usable deployment solution.
Step 1 – Installing DNS,DHCP and WDS Roles on Windows 2012 R2
As a first step, we will install the components that you might be needed to perform a sucessful deployment operation. From the Server Manager console, click on the link Add Roles and Features

Click on Picture for better Resolution
The Wizard starts. In the Before you Begin Page, Press Next

Click on Picture for better Resolution
In the Installation Page, Select Role-based and Press Next

Click on Picture for better Resolution
In the Destination Server Page, select your server and Press Next

Click on Picture for better Resolution
In the Select Server Role page, Select DNS,DHCP and WDS Server Roles. Some dialog boxes will popup. Simply accept the default settings. When Ready, Press Next

Click on Picture for better Resolution
In the Select Feature Page, select the framework 3.5. Press Next

Click on Picture for better Resolution
In the DHCP Server page, Press Next

Click on Picture for better Resolution
In the DNS Server page, Press Next

Click on Picture for better Resolution
In the WDS page, Press Next

Click on Picture for better Resolution
In the Role services, ensure that both options are selected and Press Next

Click on Picture for better Resolution
In the confirmation page, if you have selected the feature framework 3.5 to be installed, click on the link specify an alternate source path.

Click on Picture for better Resolution
In the Alternate source path dialog box, specify the path where to find the files. Press OK

Click on Picture for better Resolution
Press Install and wait for completion of the Installation process

Click on Picture for better Resolution
In the Installation progress page, when all actions have been completed, click on the Complete DHCP configuration link

Click on Picture for better Resolution
Follow the instructions on the screen and press Close when operation are completed.

Click on Picture for better Resolution
Step 2 – Configuring WDS
In the past, WDS had strong dependencies on Active Directory. In Windows 2012 R2, these dependencies are gone. You can setup a standalone WDS Server through the GUI. This is a nice improvement from Microsoft. Basically, WDS is offering the TFTP functionality that MDT was missing (in standalone configuration). With Windows 2012 R2, using only built-in tools/software you can build your deployable MDT server. This is great, isn’t it.
Let’s configure the WDS component. From the Start menu, locate the WDS server console. In the Windows Deployment Server management console, expand the Servers Node and click on the Server that needs to be configured. Right-click on it and select Configure your Server

Click on Picture for better Resolution
The WDS Wizard starts. In the Before to begin page, Press Next

Click on Picture for better Resolution
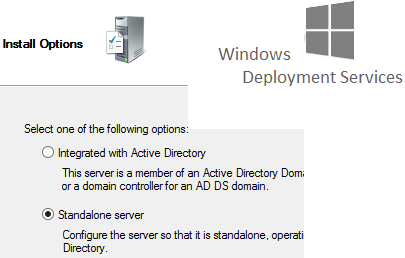
In the Install options, select the standalone configuration. Press Next

Click on Picture for better Resolution
In the folder location page, specify a location and Press Next

Click on Picture for better Resolution
In the Proxy DHCP server, read the information and accept default. Press Next

Click on Picture for better Resolution
In the PXE Initial Settings, choose your options and Press Next

Click on Picture for better Resolution
In the Task Progress page, wait for completion. You will probably see the message : service didn’t respond to the start. This is expected.

Click on Picture for better Resolution
In the WDS management console, right-click the server, select all tasks and select start.

Click on Picture for better Resolution
You WDS Server is almost ready to be used.
Step 3 – Configuring your DNS and your DHCP
Because we are in a standalone configuration, you might need to create the DNS namespace you want to use. For the DHCP, you will need to create your scope. You do not need to specify any special options (in this scenario). Complex network configuration might require you to use option 066 and option 067 to be able to locate your TFTP/PXE server.
Step 4 – Installing MDT 2013 on your computer.
In this post, we have already described how to perform the installation of the MDT 2013 software. The process is quite similar. You will first install the MDT 2013 package. After installing it; you will need to download and install the ADK package.
Step 5 – Perform the basic MDT 2013 Configuration
Because we simply want to demonstrate that MDT 2013 infrastructure is working, we will simply create a “empty” Deployment Share. We will not import drivers and operating system right now. We will simply create the deployment share structure and generate the LiteTouch_PE.wim files.
To create your deployment share, open the Deployment WorkBench, go the the deployment shares node. Right-click on it and select New Deployment Share

Click on Picture for better Resolution
In the Path Page, specify where you want to create your MDT folder. Keep track of this as it will be used for the WDS configuration tweaks. Press Next

Click on Picture for better Resolution
In the Share Page, provide a share name and Press Next

Click on Picture for better Resolution
In Description Page, accept default and Press Next
In Options Page, Select your options and Press Next

Click on Picture for better Resolution
In Summary Page, review your settings and Press Next

Click on Picture for better Resolution
In Progress Page, wait for the operation to complete and press Next
In Confirmation Page, Press Finish

Click on Picture for better Resolution
At this stage, we will also generate the iso and wim files needed to boot into WINPE mode. To create these files; you simply need to open the Deployment Workbench, go the the deployment shares node; right-click on it and select Update Deployment Share. The Wizard starts
In the Options page, accept default and Press Next

Click on Picture for better Resolution
In the Summary Page, Press Next

Click on Picture for better Resolution
In Progress Page, wait for the operation to complete and press Next
In Confirmation Page, Press Finish

Click on Picture for better Resolution
Step 6 – Configure Boot images in WDS Console
In Step 5, we have generated the bootable wim files used by MDT to automate the deployment. They are located in \\<%deploymentShare%>\Boot\LiteTouchPE_xx.wim.
Now, we need to tell the WDS where to find the bootable images. This is done through the WDS Console. Open the WDS Management Console, Expand the server and select the Boot images node. Right-click on it and select add boot images.

Click on Picture for better Resolution
In the Image File Page, Specify the location of the WIM File and Press Next

Click on Picture for better Resolution
In the Image Metadata Page, accept default and Press Next

Click on Picture for better Resolution
In the Summary Page, Review you settings and Press Next

Click on Picture for better Resolution
In Task Progress Bar, wait for action to complete

Click on Picture for better Resolution
In Task Progress Bar, When action is completed Press Finish

Click on Picture for better Resolution
In the WDS Console, you will see that the boot image has been added

Click on Picture for better Resolution
Note :
Each time you regenerate your wim images in MDT 2013, you will need to update the boot images in the WDS console in order to see the latest changes you have brought to your wim files
Step 7 – Test your Deployment
To test your configuration, simply boot a pxe enabled client and you should see that the client will request the dhcp address and connect to the WDS server. You will need to Press F12 in order to have the boot image downloaded to the client. At this stage, the client will boot in the WinPE environment and execute tasks defined through your MDT task sequences.

Click on Picture for better Resolution
Final Notes
I really like the new features and improvement available in Windows 2012 R2. As you have seen, the change in WDS role make it possible to have a standalone deployment solution. Out-of-the-box, you can quickly have a ready to go MDT 2013 infrastructure.
Using only Built-in components, we can successfully implement a deployment infrastructure with ease. The WDS component is offering TFTP capabilities that was missing in the past. WDS includes the latest additions in the TFTP protocol which makes it one of the best TFTP solution for the moment
Till next time
See ya
so good , so detail
Thank you for the visit and the positive feedback
As soon as we have more time, we will post even more new stuff on MDT technology
Till next time
See ya
Hello Griffon,
thank you so much for this good article.
I have one question, when I´m adding the generated Image to my Boot Images and I´m booting it, in a time the computer restarts and boots again(boot loop)
What I have to do, that this didn´t appears again!
I know that in WDS I have to set the pxe guideline, but I want that it´s set automaticaly.
How can I do this?
Hello there,
I’m not sure to understand your question.. What’s not working ? PXE or your boot image ???
Waiting for a more precise description of the problem
Till next time
see ya
Hello there,
the PXE and the boot image ist working! 🙂
My problem ist a boot loop, because of the WDS-Server.
When my boot Image is created, I´m importing it to my WDS-Server that I can start an Installation.
After, the OS had installed on the computer, the computer restarts and the installation process agains.
I´m speaking from this settings:
http://msayem.files.wordpress.com/2013/08/wds_p1_29.png%3Fw%3D698
My problem is, that we´re using this setting: “Always continue the PXE boot”.
We have 150 computers, and there are have to install automaticaly.
I want that this setting, is setting back to “Use PXE promt policy from server” or to “Never PXE boot”.
Sorry for my bad englisch 🙁
I hope that you are understanding me and that you can help me.
Hello there,
Ok, now I got the point 🙂
In Windows 2008, you could change a registry key to reset the boot order. This is an extract of a Technet Article. I’m assuming that registry should also work for Windows 2012 R2
Try this and let us know if this is working for you
Technet Extract……
If you combine these two configurations, the client will automatically boot from the network without requiring user intervention and the computer will end up in a circular loop (always booting from the network and never booting from the hard disk drive). The following registry key controls these settings:
HKEY_LOCAL_MACHINE\System\CurrentControlSet\Services\WDSServer\Providers\WDSPXE\Providers\BINLSVC
Name: ResetBootProgram
Type: REG_DWORD
Value: 0 or not set means no action.
1 means that during the imaging process, the value stored in the netbootMachineFilePath attribute in AD DS for the prestaged device will be cleared. The value for the referral server is also stored in the netbootMachineFilePath attribute. Therefore, when you specify 1 and this value is cleared, any server in the domain can answer the client the next time it reboots.
Using this option ensures that on the next boot, the computer will receive the default server NBP (commonly the .com version). Therefore, the computer will try to boot from the network (because the network is listed first in the BIOS boot order), but the computer will be sent the .com NBP. After allowing sufficient time for the user to press the F12 key, this option will time out and the device will boot from the hard disk drive. The value is cleared after the image is applied, as one of the final actions performed by Windows Deployment Services.
Hello Griffon,
thanks for your reply.
Technet Extract:
The value is cleared after the image is applied, as one of the final actions performed by Windows Deployment Services.
My problem is that exactly this didn´t work for me.
The value isn´t cleared after the image is applied.
Hello there,
the registry key will not be cleared…it’s the Active Directory attribute (netbootMachineFilePath attribute in AD DS) that will be cleared…..(technet extract again). Obviously to have this working, you would need to integrate WDS in your arcite Directory.
To achiveve what you are asking, you will need to be a little bit more creative….. There might be plenty of ways to achieve this.
My approach would be to use Manufacturer tool (such as Dell Client configuration toolkit) to change boot order in the bios through my task sequence. HP has also such a utility
Another option (if you have brand new pc would be to keep boot order hardisk, pxe, cd….). the first time it boots, it will boot to pxe the second time it will boot on disk. You could use the pxelinux.com and create a custom menu where the boot to disk is the first option…..
Reading a little bit about WDS, there might be additional optioins but I would need to check for this
Till next time
see ya
hi griffon,
really nice and detailed how-to!
I’ve build a test environment for a standalone WDS-Server, but I get a failure, when i want to start WDS-Service.
I get a runtime error, that the service doesn’t respond.
Do you know any solution for this issue?
greetz,
Chris
Hello Chris,
I remember that the first time I started the WDS I time to time got an error. Next one should be good. You could try to start the services (in the service manager) and check if you have an error there. Check also event logs (you do not provide me enough info)
check these links
http://support.microsoft.com/kb/954410/en-au
http://dipanmpatel.com/2012/08/21/unable-to-start-wds-error-code-2310/
collect more info in your event logs and maybe we can find out what the problem is
hope this help
Till next time
See ya
How did you get the image to show? Where did you put it?
Regards,
Hello there,
If you look at the post and on the screeenshots, you will see that there is a file called test.png located in the RemoteInstall\boot folder.
If the image is not displayed, maybe you have to change the size of the image….try a smaller size 640×480 and try again
Till next time
See ya
HI Griffon, Thank you for sharing your wealth of knowledge with the MDT community, its been very helpful to many of us who are new to MDT. In my case I am from the old Autounattend.xml and batch file automation era.
At present I have been using a simple standalone virtual FreeNAS VM which I have configured with a CIFS SMB share to host all my boot floppies, batch and OS/Applications distribution files etc. I also have TFTP configured on it for enabling Linux kickstart deployments that I do for VMware ESXi and Linux distros etc.
I would like to build a MDT server and port the above setup for using as my virtual training lab, but I am not quite sure how a standalone MDT server can be configured to deploy virtual machines into a LAB domain. I gather this should be possible by adding the below into the CS.ini file?
DomainAdmin=JoinAccount
DomainAdminDomain=LAB.LOCAL
DomainAdminPassword=P@ssw0rd
AdminPassword=P@ssw0rd
JoinDomain=LAB.LOCAL
And for the mapping to the standalone MDT share use something like the below in the BSini file:
[Default]
DeployRoot=\\MDT01\MDTLAB$
UserDomain=LAB
UserID=BuildAccount
UserPassword=P@ssw0rd
Would the above setup work for deploying machines into my LAB domain using a standalone MDT server? If not how can this be achieved.
Best
MP
Hello Manoj,
Yes this should do
If you check our MDT section, we always prefer to have a standalone MDT installation because it’s portable and can be used anywhere.
As long as you can reach the domain, you can use the Standalone MDT and join the machine to the domain
As I said, this should be working…..
Hope this help
till next time
See ya
Hey Griffon! Thanks for your quick reply. I will go ahead and try and build the standalone MDT2013 server and report back.
Best regards…
Hey I like you blog helped me a lot, I wanted to ask a question regarding the deployment of applications one the applications have been imported and the task sequences have been created does the application automatically deploy to the captured image ?
HEllo;
If your task sequence has been configured with a step that deploy applications; yes this will done automatically
Till next Time
See ya
Hi Griffon,
Many Thanks for wrote this article. This confirmed that I have done correct steps for getting PXE boot with WDS by generate MDT.
I am looking for instructions regarding to create ComputerSetting in MDT Database and then create DHCP Filter and Reservation IP as well. Do you have any idea?
Best Regards,
Jobbo
Hello Jobbo,
Your message was marked as spam….
If I have time, I will try to have a look to your question…sorry for the inconvenience
Till next time
See ya
I have problems with DHCP and DNS
I dont know how can I configured,
I cant boot any PC from PXE, Message I have is DHCP offers not received
Can you show me how to configured on the stand alone DHCP
Let me tell you this website is awesome
Hello George,
Simply perform a basic configuration. have a loot at http://www.wikihow.com/Create-a-New-Scope-in-DHCP
for creating your dhcp scope
For DNS, use this link https://support.microsoft.com/en-us/kb/323445
Hope this help
Till next time
See ya
Thank you for your reply, this websites is very Helpful
I did apply this basic settings,
But still having Problems
Do I have to set up a static IP for the server?
D you give private classes for this, I dont mind paying for a few classes for this teaching , thanks
I found that I need it to this to fixed
Create my Static IP same as the Scope in DHCP
I got this DNS error 407 and found the solution here
https://support.microsoft.com/en-us/kb/279678
Also this DHCP error and find the solution here( I have to set up my Static IP First)
https://support.microsoft.com/en-us/kb/298490
Thanks.
Hello George,
Sorry for the late answer I see you found your way. Yes, the DHCP/DNS needs to get a fixed ip address in order to have the mdt setup working
Hope you will move forward with your setup
Till next Time
See ya
Someone necessarily help to make seriously articles I’d state. This is the very first time I frequented your website page and up to now? I surprised with the research you made to create this particular publish extraordinary. Fantastic process! fgkeeededfdaedfd
@smithb764,
Thank you for the visit and the positive feedback.. we hope that our posts are indeed valuable to everyone
Till next time
See ya
As a Newbie, I am continuously searching online for articles that can aid me. Thank you cegffkcgceekdcda
@Smithd46,
Thank you for the visit and your interest in our blog 🙂 We like to see that info posted here can be useful
Till next time
See ya
Hello Griffon,
First of all, I want to thank you for the incredibly helpful explanation. I’ve been busy installing a deployment server at work, and thanks to your help in the blog, I’ve been able to install it. Now, however, I have a problem where I hope that you or others can help me with this.
I suddenly get the following error after the PXE Boot:
File: \Windows\System32\boot\winload.efi
Status: 0xc0000428
Info: The digital signature for this file couldn’t be verified
If I continue booting without checking the digital signature, I will only get a black screen and nothing will happen.
Do you perhaps know why this is happening? Shall I disable the drivers?
Thank you and regards
@JT,
have you try to recreate/update the wim file created by MDT or WDS that are loaded during the boot process…. Use one of the latest version of OS you have (including any service packs) and try to rebuild the litetouchePExx.wim file and try again
Hope this help
Till next time
See ya
Hi Griffon,
thanks for the suggestion. Indeed, there was something wrong with the wim file.
Thank you for the help
Regards
@JT,
Ah, I knew it.. Thank you for the feedback
Till next time
see ya
what is MDT 2013 deployment solution on a Windows 2008 R2 server.