Hello World,
Back home after 3 weeks abroad working on a Active Directory/Exchange 2007 based Project, I have some time left to post some information. Today, we will speak about service accounts.
The Problem
Nowadays, when you need to create a service account for an application like SQL, a sysadmin would simply create a domain user account and grant this account necessary rights on the computer to run the software accordingly. Most of sysadmins would also configure this account with the option “password never expires” in order to ease the maintenance of such service accounts. If you are working in a secure environment, this might be problematic. Having a service account which has privileges on a server can be seen as a security breach. First, you couldn’t identify which user has made changes on your system if he logs using the service account (auditing process). Because the password never changes, someone could try to break it or an formal employee would use the information to break into the system and bring your system down or steal information. Some sysadmins would try configure the service account to expire based on their password policy. With this approach, the sysadmin would need to reset password also on the services using the account in order to avoid service disruption. This can become difficult to handle if you have to manage hundreds of servers. You might need to come with a custom solution (such as a script).
Windows 2008 R2 solution
Windows 2008 R2 tries to solve this kind of problems by providing 2 new features : Managed Service accounts and virtual accounts. (You can find detailed information and a step-by-step guide here). Using these type of accounts, you do not have to worry anymore about password. The computer will automatically generate and update (every 30 days) the passwords in used. The managed service account also ease the maintenance of the SPN (Service principal name) within an Active Directory Domain.
In order to be able to use these features, you need to take into account the following elements :
- the application must be installed on a supported operating system. Managed service accounts and virtual accounts can be used only on Windows 7 and Windows 2008 R2 operating system
- Domain level must be at minimum Windows 2003 or later
- In Windows 2003 domains, you need to extend the schema (using the adprep /forestprep and adprep /domainprep) in order to be able to use Managed Service Accounts.
- In Windows 2003 domains, you also need to install one of the following
- Windows 2008 R2 Domain controller or,
- Windows 2008 Domain controller with the Active Directory Management Gateway
- Windows 2003 Domain controller with Active Directory Management Gateway
Note : Active Directory Management gateway is an add-on component that can be installed on windows 2003/Windows 2008 that allows an administrator to use powershell cmdlets against Windows 2003 servers.
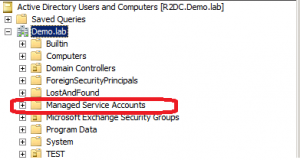
By default, Windows 2008 R2 support Managed Service accounts feature and allows you to fully take advantage of the SPN Delegation administration model. If you open the Active Directory Users and computers, you can see that an additional OU named Managed Service Accounts at the root of the tree structure exists (see figure below)
How To Deploy Managed Service Accounts
In order t successfully implement managed service account, you need to perform the following actions
- Create the Managed Service account. You need to use powershell cmdlet to manage these service accounts. There is no GUI available at this time
- When you managed service account is created, you can associated to a computer and install the service account on the computer that will be using that service account
- Final step will consist in changing the account information used by the service
This is probably not easy to visualize. So, let demonstrate how to use such managed service accounts
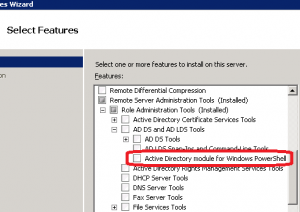
Note : On the machine hosting the application, you need to install the RSAT or at least the Active Directory Module for powershell
Step 1 : Open your powershell command line
Step 2 : Import the Active Directory module.
Within your PowerShell box, type the following command : Import-Module ActiveDirectory
Step 3 : Create the service account.
By default, it will be located in the built-in Managed Service Accounts. In this example, we are creating a service account called SQLSVC. This service account will be enabled
Type in your Powershell Window the following command New-ADServiceAccount -name SQLSVC -Enabled $True
Note: If you want to create the service account in another OU, you would type something like New-AdServiceAccount -name serviceAccount -Path OU=Test,DC=Demo,DC=Lab
You can see your service account information by typing the following command : Get-ADServiceAccount -id SQLSVC
Note that the “HostComputers” field is blank. This is because the service account has not been associated to a computer account
Step 4 : Install the Managed Account on the target computer (the one hosting the application).
You need to run this command on the server that will be hosting the application and where the service account will be used. Type the following command : Install-ADServiceAccount -id SQLSVC
Note : In some web sites, i have seen that an additional step between 3 and 4 can occur. You can use the Add-ADComputerServiceAccount cmdlet. It’s seems to me that Install-ADService account and Add-ADComputerServiceAccount achieve the same goals. I didn’t use the Add-ADComputerServiceAccount cmdlet and it’s seems to work as expected
Step 5 : Set the service to use the Managed service account
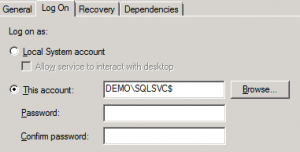
In the MMC Console, select the service that needs to use the Managed service account. Go to properties and select the Log On tab. Select the Managed Service Account and leave the password fields blank
Restart the service and you are done !! You are using the Managed Service Account and you do not need to worry about passwords in the future.
There is one limitation with these feature. A Managed service account can be used only by one computer. However, you can create multiple Managed service accounts and associate them to the same computer account
Virtual Accounts
Managed Service Accounts are stored in the Active Directory. On local computers, you can use the Virtual accounts. Virtual accounts resolve the same issue as the Managed Service Account. They allow an administrator not to worry about passwords of service accounts. These accounts also offer the option to access network resource using the computer identity in a domain environment (something similar to Network service account)
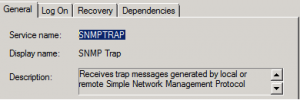
To use them, you do not need to create them nor you need to setup a password for these accounts. You just need to fill in the Log on tab with the appropriate information. Assuming that you want to use virtual accounts for the SNMP TRAP service, you will first need to find the servicename value. This value can be found in the General Tab of the service properties (see screenshot below).
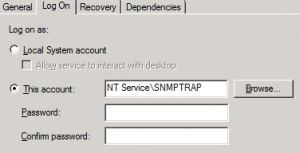
We will use this information in order to create our virtual Account. In the Log On Tab, in the This Account field, you provide the following information NT service\%servicename%
In our example, we would type NT Service\SNMPTRAP. Again, the password fields must be left blank.
After restarting the service, the virtual account will be used and you can forget about the management of these service accounts.
Note : You must be a member of the Administrators group on the local computer to managed virtual accounts.
Final Notes
Managed service accounts can be useful in secure environment where security is critical. At first, implementing managed service account looks daunting but at the end, it’s not too difficult to manage and implement and if this can help security, why not using them
Till next time
See ya

I never, ever would have believed I would need to be familiar with this thank goodness for google, right?