Hello World,
So far, we have seen a different methods on how to install easily xRDP on your system. You have the option to use the standard xrdp package available in the Ubuntu repository (see here and here for automation) or you can decide to perform a custom installation and you will need to compile xRDP package from the source (see here). Following these instructions and being a little bit lucky, xRDP package will be installed and configured on your system and you will be able to perform remote desktop session on your Ubuntu machine…which is really cool !
In this post, we have provided a script that allow to automate the installation process of xRDP. The script has been developped based on the instruction available on the xrdp github web site. The normal way to compile from source is basically to call ./bootstrap, ./configure, ./make and ./make install command. Next to the make install, there is another command that can be used to perform compilation. This command is the checkinstall. (for more info, see this link). Basically, the check install will keep track of modified files and offer an easy way to remove the compiled software installed on your machine.
Some people have been asking to update the install-xrdp.sh script to replace the make install command with the Checkinstall command. This post demonstrate how to use the check install command but the “official” install-xrdp.sh script will not be modified because it provide a little bit less automation…..
Let’s see how to use check install…. !
xRDP Custom install on Ubuntu 17.10
Assumptions
The script has been developed and updated based on the following assumptions
- The Ubuntu 17.10 final release will be used
- At time of writing, all available updates were installed on the Ubuntu machine
- No alternative Desktop will be used. Default Ubuntu Gnome desktop will be the default desktop accessible via the xrdp session
- Ubuntu machine has been installed as virtual machine using Virtualbox software
- Default session used is Wayland (it’s supported in Virtualbox)
- Internet connection is available so latest xrdp packages can be downloaded
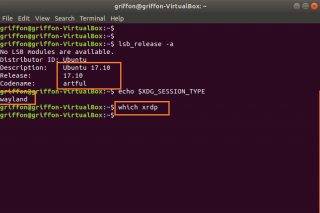
The following screenshot shows the current version of Ubuntu we are using and shows that we are indeed running a Wayland session…The screenshot also shows you that no xRDP software is installed yet.
Click on picture for better resolution
Step by Step Instructions
Step 1 – Download xrdp binaries
First step consist of downloading the xrdp binaries…To perform this step, you have to execute the following command in a Terminal console
sudo apt-get -y install git
cd ~/Downloads
git clone https://github.com/neutrinolabs/xrdp.git
git clone https://github.com/neutrinolabs/xorgxrdp.git
These command will download the binaries into your system. However, before compiling the sources, you will need to install a bunch of pre-requisites software
Step 2 – Download and install prereqs
Execute the following command in a terminal console and wait for completion
sudo apt-get -y install libx11-dev libxfixes-dev libssl-dev libpam0g-dev libtool libjpeg-dev flex bison gettext autoconf libxml-parser-perl libfuse-dev xsltproc libxrandr-dev python-libxml2 nasm xserver-xorg-dev fuse pkg-config
Wait for the process to complete. When done, move to the next step
Step 3 – install checkinstall package
By default, the checkinstall package is not available on Ubuntu 17.10. Before compiling from source, we will first need to download and install the checkinstall program. The installation is quite straight forward and you simply need to execute the following command in a Terminal Console
sudo apt-get install checkinstall
Step 4 – Compile xrdp using checkinstall command
At this stage, we are ready to compile the xrdp software and as specified instead of using the standard make install command, the checkinstall command will be issued… To start the process, execute the following command in a Terminal console
cd ~/Downloads/xrdp
sudo ./bootstrap
sudo ./configure --enable-fuse --enable-jpeg
sudo make
At this stage, you have everything ready to perform the installation using the checkinstall command. So, in your terminal console, you will issue the following command
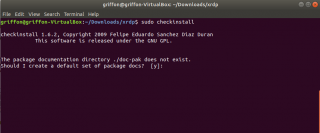
sudo checkinstall
Click on picture for better resolution
You will be asked if you want to create a package doc. Accept default and follow instructions on the screen
Click on picture for better resolution
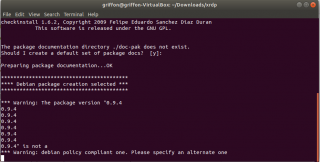
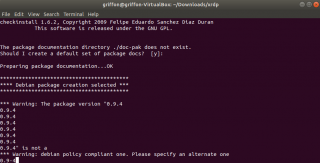
In the next set of instructions, you will see that the package naming conventions does not fit the one defined by debian.
Click on picture for better resolution
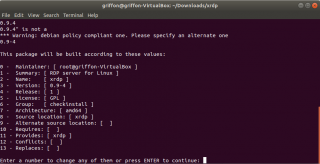
You are asked to provide a new naming convention format. To pass this step, we have specified a format like this 0.9-x and it then went through
Click on picture for better resolution
Then, the checkinstall propose some values that will be used when creating the debian package. Simply accept these values by pressing Enter
Click on picture for better resolution
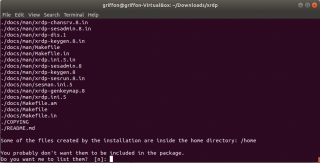
The checkinstall then ask you if you want to include some files in your package. Again, accept default and select the no option
Click on picture for better resolution
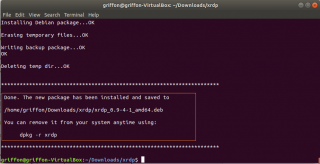
Finally the checkinstall will process all these information and at the end, it will display a message similar to the following.
Click on picture for better resolution
On the screenshot, you can see that the checkinstall has installed the software but has also created a deb package. This package creation make it easy to remove the software on your system by issuing dpkg command.
Step 5 – Compile xorgxrdp using checkinstall command
At this stage, we are ready to compile the xorgxrdp software and as specified instead of using the standard make install command, the checkinstall command will be issued… To start the process, execute the following command in a Terminal console
cd ~/Downloads/xorgxrdp
sudo ./bootstrap
sudo ./configure
sudo make
At this stage, you have everything ready to perform the installation using the checkinstall command. So, in your terminal console, you will issue the following command
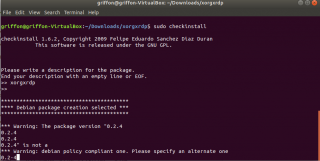
sudo checkinstall
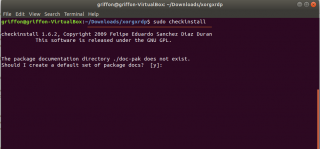
At the screen, the checkinstall program ask you if you want to create the docs packages. Press Yes (which is the default answer)
Click on picture for better resolution
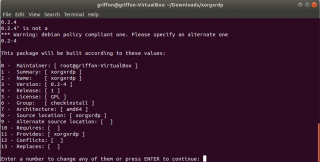
For the xorgxrdp package, you will be asked to provide a description and press enter to move forward…Then again, you will see the checkinstall complaining about the naming convention. And again, we have used the following naming conventions 0.2-4 in order to pass that screen
Click on picture for better resolution
Again, you will see the same screen as before where a bunch of values are presented to you which will be used to create the package. Accept default by pressing Enter
Click on picture for better resolution
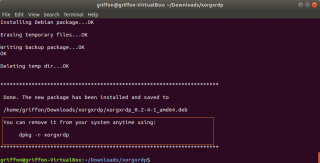
Like previously, Checkinstall program will inform you that the program has been installed and that a deb package has been created and saved in the specified location. Because the deb package has been created, it would become really easy to remove it from your system in case of issues or if you do not want to use xrdp solution anymore
Click on picture for better resolution
Step 6 – enable and start the xrdp services
So far, we have installed all the xrdp components but we are not done yet. We still need to configure our system. First thing to do would be to enable the xrdp service through the systemd solution. Simply execute the following command from a terminal console
sudo systemctl daemon-reload
sudo systemctl enable xrdp.service
sudo systemctl enable xrdp-sesman.service
sudo systemctl start xrdp
Step 7 – Install Gnome Tweak and enable necessary features
Because we are using Ubuntu 17.10 with Gnome Desktop and a custom dock solution, we will need to install the gnome Tweak tool on the system and enable some extensions in order to see the Dock in the remote sessions. To perform this task, simply execute the following command in a terminal console
sudo apt-get install gnome-tweak-tool -y
When the Gnome Tweak tool is installed, it’s time to enable the required extensions to have the Dock visible in the remote session. Again, from your Terminal console, issue the following command
gnome-shell-extension-tool -e ubuntu-dock@ubuntu.com
gnome-shell-extension-tool -e ubuntu-appindicators@ubuntu.com
Step 8 – Configure console Access
Almost done ! We need to update the Xwrapper.config file so remote session are allowed on the Ubuntu system. To do that, simply execute the following command in the Terminal console
sudo sed -i 's/allowed_users=console/allowed_users=anybody/' /etc/X11/Xwrapper.config
Step 9 – create the polkit file
A final action in order to have a smooth user experience when connecting through remote desktop client would be to create a specific polkit file. This file would prevent warning popups about managed color devices in remote session. If you do not execute this command, you will have multiple popups which are really annoying…
sudo bash -c 'cat >/etc/polkit-1/localauthority.conf.d/02-allow-colord.conf <<EOF
polkit.addRule(function(action, subject) {
if ((action.id == “org.freedesktop.color-manager.create-device” ||
action.id == “org.freedesktop.color-manager.create-profile” ||
action.id == “org.freedesktop.color-manager.delete-device” ||
action.id == “org.freedesktop.color-manager.delete-profile” ||
action.id == “org.freedesktop.color-manager.modify-device” ||
action.id == “org.freedesktop.color-manager.modify-profile”) &&
subject.isInGroup(“{group}”)) {
return polkit.Result.YES; } });
EOF'
Test your configuration
To Test your configuration, you need to perform the following steps
- step 1 – Logout from the Ubuntu machine
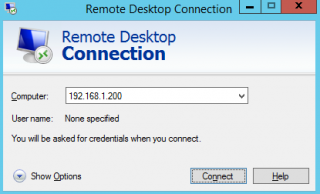
- step 2 – Start your favorite remote desktop client and provide the ip address or hostname of your ubuntu machine
Click on Picture for Better Resolution
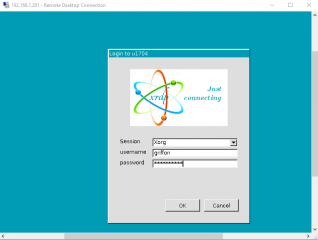
- step 3 – At this stage, you should see the xRDP login page. Provide your credentials
Click on picture for better resolution
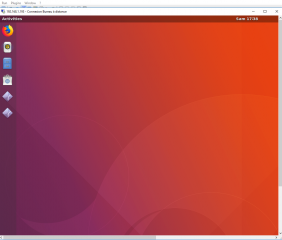
- step 4 – At this stage, you should see your standard Ubuntu Gnome Desktop with the Dock visible….
Click on picture for better resolution
Removal and Re-install
The checkinstall method installation process has some advantages. You can remove the xrdp components quite easily if needed. The other advantage is the fact that the checkinstall create a deb package that make the re-installation process even easier. To remove the software, you can simply issue the following commands
sudo dpkg -r xrdp
sudo dpkg -r xorgxrdp
To re-install the software (on the machine where you have it compiled), you can issue the following command
sudo dpkg -i xrdp-xxx.deb
sudo dpkg -i xorgxrdp-xxx.deb
You have to adjust these commands based on the location of the generated deb file obviously….
Click on picture for better resolution
Final Notes
Voila ! I think we have shown a lot of different options on how to install succesfully xRDP on Ubuntu 17.10 lately. Because Canonical has made dramatic changes in the desktop area, there was a need to update the information about xRDP and installation process in Ubuntu 17.10. This post really cover a topic that only a few users might be interested in. The checkinstall can be used to compile xrdp from the source. it offers an additional advantage which is the deb package creation. Because this package is created, it’s easy to remove and re-install the xRDP software components in case of issues.
We have decided not to modify the install-xrdp-2.0.sh script and the checkinstall approach will not be used. The reason behind this choice is easily understandable. We have created the install-xrdp.sh script to provide automation. If we include the checkinstall command in the script, the script will ask for user inputs which defeat the orginal idea of the script. In 2018, I’m not sure if I will be covering a lot xRDP and Ubuntu as we have covered a lot this year 🙂 and we are not expecting big changes in Ubuntu 18.04 release
I hope you enjoyed this post as well and till next time
See ya


Hello,
Thanks for the great post, I tried to implement the same on ubuntu 18.04 LTS which is on google cloud instance.
everything went well of course few packages were not listed default hence i downloaded and installed the same
But i was unable to see the standard ubuntu desktop as mentioned in step 4.
after giving credentials post 5 mins all i am getting is
“connecting to sesman ip 127.0.0.1 port 3350
sesman connect ok
sending login info to session manager , please wait…….
login successful for display 10
started connecting
connection problem , giving up
some problem”
I got this issue resolved by installing desktop package, since the images available in gcp are of server versions, i manually installed the desktop package
sudo apt-get install ubuntu-desktop
but i feel working in remote environment is slow (ex: opening firfox), is this the expected behaviour.
@Phanidhar,
To access a desktop interface on an Ubuntu Server edition, you need indeed to install a desktop interface. I will agree with you that xRDP can be sluggish..However, we have been testing with UBuntu 18.04 and we have the feeling the experience is a little bit better
Thank for the visit and the comments
Till next time
See ya