Hello World,
I recently received a interesting question about how to create a virtual machine on an Hyper-V server and install the ProxMox VE software. In this post, I’ve been writing that this was a option to perform some basic testing with the PROXMOX VE software.
Today, I’ll briefly explain how to install ProxMox VE software as a Virtual Machine in Hyper-V
Limitations
Even if it’s possible to run ProxMox VE as a virtual machine, you have to be aware that will be facing some limitations and won’t be able to benefit from all the features of the software.
In order to take full advantage of the software, your hardware should be using a 64-bit processor that supports Hardware-assisted virtualization (Intel VT or AMD-V Capable).
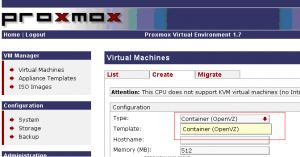
Again, you can virtualize your ProxMox VE in order for you to become familiar with the installation procedure and get some hands-on experience with the Web Interface. Note, however, that you won’t be able to create virtual machines using the KVM technology. Only OpenVZ container will be available.
Creating your Hyper-V Virtual machine
I won’t go through the installation process of the Hyper-V host server. You can find some basic information here. We will focus on how to create a virtual machine where the ProxMox VE can be installed and will be reachable through the network.
Note: We assume that you have already installed Hyper-V role on your computer
Perform the following steps :
- Step 1 : Open The Server Manager Console and locate the Hyper-V Manager Node
click to enlarge image
- Step 2 : On the right pane, in Actions, Select the option , New ->Virtual Machine
click to enlarge image
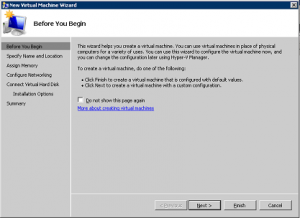
- Step 3 : The New Virtual Machine Wizard will start. In the Before to begin page, click on Next
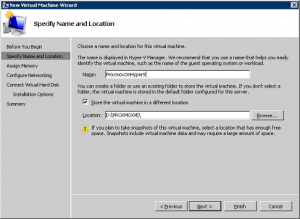
- Step 4 : In the Name and location page, provide the name of the virtual machine and select where to store the files and Press Next
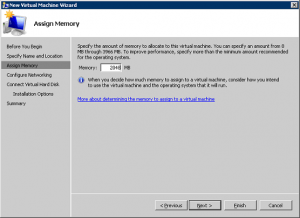
- Step 5 : In the assign Memory page, select the amount of RAM you want to assign to your Virtual ProxMox VE server and Press Next
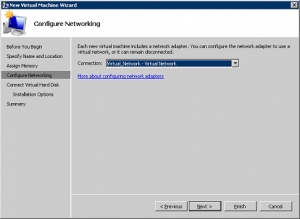
- Step 6 : In the Configuring network page, you can accept the default presented (given that we will change that at the end of the Wizard) and Press Next
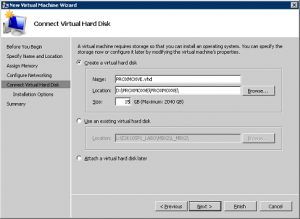
- Step 7 : In the Connect Virtual Disk Page, create a new virtual hard disk, and specify the size that you want to use. Then press Next or Finish
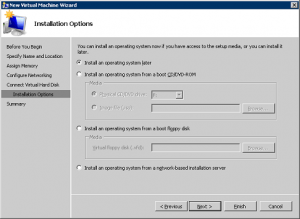
- Step 8 : In the Installation Options, Select the Install Operating System later and Press Next
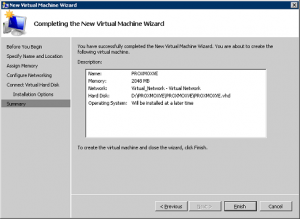
- Step 9 : In the Completing the Wizard page, Review your settings and Press Finish
If you look in the Hyper-V Manager Console, you should see your ProxMox VE Virtual machine. Do not boot it yet ! We haven’t finished configuring the virtual machine. We will need to change the type of network Card that currently used by the Virtual Machine. To do this, perform the following actions :
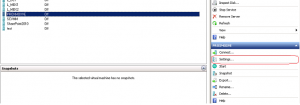
- In the Hyper-V Manager Console, Select the ProxMox VE newly created virtual machine and in the right pane select the option Settings (for the Virtual machine)
Click to enlarge image
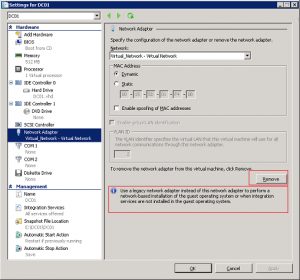
- The Settings windows page is displayed. Go to the network Card node and Press the Remove Button
If you look carefully, you will see a small information text about when to use legacy network card. Because we are installing a linux Operating system and because there will be no Integration services installed, we need to use the Legacy Network Interface Type in order to have network connectivity to our virtual ProxMox VE Server
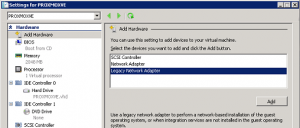
- In the settings Window Page, click on Add Hardware and select in the right pane, legacy network Adapter and Press Add
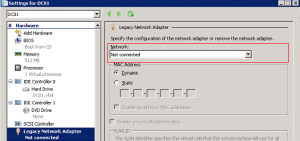
- After pressing Add, you will be presented with the following screen allowing you to configure the settings for your network card. By default, the network card will be set to Not Connected. Select the network card that needs to be used in order to have network connectivity with the external world. Press OK or Apply when done
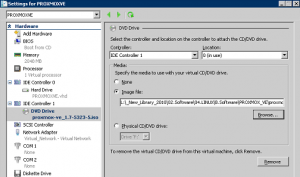
- The final step before performing your installation is to connect the iso image (or the CD containing the ProxMox VE software) to the virtual machine and perform the installation
Installing ProxMox VE as an Hyper-V Virtual machine
Almost there ! Now, you just need to boot the virtual machine and proceed with the ProxMox Ve Installer. Hereafter, I’ve posted some of the installation screenshots inside the virtual machine
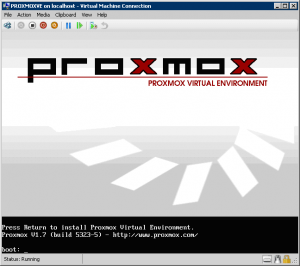
- The installer is starting
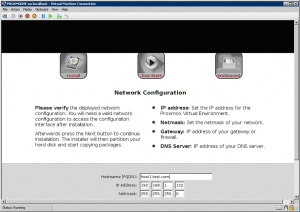
- During the installation, I’ve specified the ip address 192.168.1.132
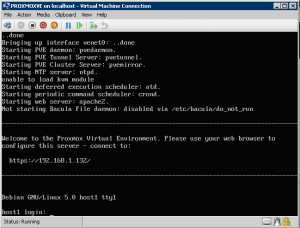
- At the end of the installation, I receive the following screen providing the url where I need to point my browser in order to access the ProxMox VE web Interface
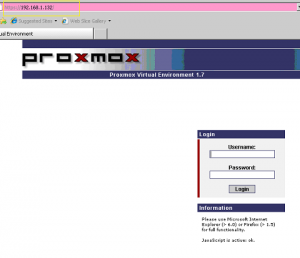
- When I connect to the url from another machine on my test network, the login page is displayed. The ProxMox Ve is accessible through the network and I can ping the virtual machine
- Now, you can try to create virtual machines (inside your virtual machine :-)) ) but as explained earlier you will only be able to create OpenVz Container.
Final Notes
With this post, we have seen that was possible to virtualize the ProxMox VE host server. This can be useful if you want to try the software and see some of the features without having a physical machine ready to be used. Don’t expect to have great performance. You can download some of the ProxMox VE appliance (OpenVz container) and start playing with the software. If you think the software might be worthy, the next step would be to install it on a physical machine and give it a try.
You can always have a look here to start your journey with installing and Configuring your ProxMox VE Infrastructure
That’s it for this post
Till next time
See ya (and euh Happy New Year !)


Genuinely educational bless you, It looks like the audience will probably want a whole lot more items such as this. Please continue the great effort.
The interesting thing you didnt test. Creating the VM inside the VM and bringing it ONLINE.
Its quite tricky to get the routing working … depending on how Hyper-V adresses the additional IPs you assign to the proxmox environment.
So nice posting, but without any value since you just did a install of Debian with the Promox Webinterface..
Hello there,
This was not the purpose of the article. This was to demonstrate how to virtualize PVE on hyper-v because some people were having difficulties (they were not using legacy network card option)
If you have read the article; I mention indeed that you can have virtual machines running (OpenVz) and no KVM VM machines. When I wrote the article, nested virtual machines was not really possible and few documentation was available. Nowadasy, there might be some ways to have nested vm and kvm technology working with proxmox ve. But I’m still not sure that you can run nested kvm virtual machines on hyper-v.
See ya
The instruction is pretty simple, it’s just a union of instructions of deploying a VM on Hyper-V and installing proxmox from the installation media (iso).
I’ve faced a big problem, that containers didn’t worked on proxmox VE 4.0.
The problem was not in proxmox, but in the VM settings in Hyper-V. You should enable MAC-spoofing to allow CT to go to Internet/outside and say Hyper-V: “Hey Hyper-V, I will send from this virtual network interface packets with src-mac you don’t know about. Don’t worry, just let them go, it’s alright.”
Thanks Artem! I had an issue with the kvm not able to reach outside. Once I enabled Mac Spoofing on the Hyper-V settings. I was able to ping out.
Thanks Griffon. Wanted to test Proxmox, but didn’t have any hardware for that.
Happy to see it’s possible on HyperV, and I confirm it works!
@Sara,
No Problem… Always happy to help
Till next time
See you
The comment about turning on MAC spoofing saved my bacon. Now I’ve got Proxmox running in Hyper-V and all the LXC goodness I wanted. Thanks all!
@Sarkomoth,
That’s really cool… Thank you for your comments and visiting our blog
Till next time
See ya
what is Proxmox VE and what for it is?
This doesn’t work anymore. When proxmon ve installer start, I get “No support for KVM virtualization detected”. I’ve created a generation 2 VM. There’s also the problem with secure boot that need to be disabled. The guide is quite old, if you got a new one, would be great.
@Nodiaque,
Thank you for visiting our blog and sharing your findings. We assume that you are using Hyper-v version 2016 or later… if this is the case, you will need to expose the cpu to you Proxmox ve virtual machine in order to have a working nested configuration…. (read this info https://c-nergy.be/blog/?p=9109) .
We have quickly test the process on Windows 2019, we have installed hyper-v, created a vm generation 1 and exposed the hardware to that specific vm and we have been able to get proxmox ve up and running as a virtual machine
We have also created a dummy vm which started with not problem at all
Hope this help
Till next time
See ya