Hello World ,
If you remember, we have described the slightly changes that have been introduced in the Promotion/demotion of a Domain controller within a Domain. You can find more information in the following posts :
- Promoting a Domain Controller
- Demoting a Domain Controller
- Demote;Promote Domain controller & Ds Role Server Services relationship
If you went through these posts, you know that the process is not difficult at all. The only thing that somebody could argue is that you have to go through a lot of pages within the Add feature roles and then in the Active Directory Domain Services Configuration Wizard. You can go a little bit faster in providing the required information using the powershell cmdlet available in Windows 2012 Server. In Windows 2012 release, you can really do a lot more using only powershell. This is the ideal situation if you want to automate (via script) your processes.
Prepare the Future Domain controller
The main focus on this point would be the addition/removal of domain controller into an Existing Active Directory Domain. In this post, I wanted to explore some of the new powershell capabilities and perform some actions such as setting up an ip address, dns settings and rename a computer using exclusively powershell. I’m pretty sure that most of you are using GUI interface in order to rename computer, set ip settings and join the domain. We wanted to see if these operations could be performed via powershell. Let’s see what you can do !
Rename the Computer
To rename my computer to the naming convention in used (in my test lab), you would use the following cmdlet
- Rename-computer -NewName DEMODC3 -Restart.
- When the computer is booted again, you can move to the next step
Click the picture for better resolution
Configure ip settings
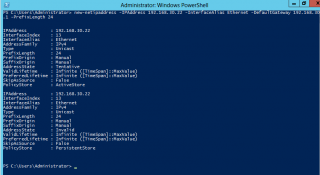
In this step, we wanted to use a powershell cmdlet to set ip addresses but also dns information. You will have to use 2 differents cmdlet to perform this operation. To set the ip address, you will need to enter the following command : new-netipaddress -IpAddress x.x.x.x -IntefaceAlias “Name of ethernet Card” -prefixlength 24 -defaultgateway x.x.x.x
Click the picture for better resolution
To Configure the DNS settings, you will use the following command : set-DnsClientAddressServer -InterfaceAlias “Name of ethernet Card” -ServerAddresses “x.x.x.x,y.y.y.y”
Click the picture for better resolution
Add the computer into the domains
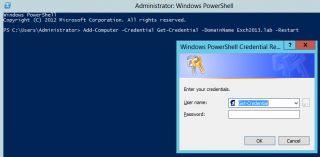
The following step is not mandatory. You can promote a machine even if not joined into the domain. The Promotion process will join the machine into the domain for you. If you want to join a computer into the domain using powershell, you would issue the command : Add-computer -Domain <%Name of Domain%> -credential Get-Credential -restart
Click the picture for better resolution
A popup will be displayed. Enter the user name and password with administrative privileges to join the machine into the domain and you are done. The command above will restart the server automatically. The computer account will be placed automatically in the computers container within Active Directory.
Promote a domain controller using Powershell
Now we will about the real thing ! In our scenario, we need to add a domain controller into an existing domain called exch2013.Lab. As described in this post, you will need to go through 2 step process :
- Fist, install the Active Directory Domain Service Roles
- After the role addition, you will be able to perform the “real” promotion operation.
Again, because we might want to automate the process, we will see how this can be achieved using powershell exclusevely.
Install the Role
To install the role via Powershell, you will need first to know which role to install. Because the name might change between versions, I always check the role to be installed by issuing the following command : get-WindowsFeature | where {$_.name -like “*domain*”} or get-WindowsFeature | where {$_.name -like “*AD*”}
Click the picture for better resolution
When I have identified the role name, I can then proceed with the installation of the role by issuing the following command: Add-WindowsFeature AD-Domain-Services – includeManagementTools
Click the picture for better resolution
You should something like that on your screen (see screenshot above). As you can see, no reboot is required. we can then proceed with the promotion process.
To make this server a domain controller, you will need to issue the following command
- import-module ADDSDeployment
- Install-ADDSDomainController -DomainName <%Your Domain Name%>
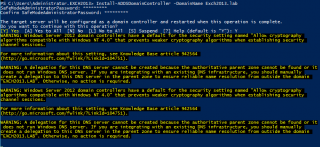
You will be prompted to provide the DSRM password to be used. You will need to confirm the password and the installation will proceed
Click the picture for better resolution
Note :
If you do not want to get promted twice, you can issue the following command Install-ADDSDomainController -DomainName <%Your Domain Name%> -Confirm:$False
The first command is the most basic command you can issue. At the end of the process, the domain controller will be a Global Catalog and DNS role will be installed on the server. If you
Click the picture for better resolution
Obsviously, if you need more control on the installation parameters, you can use additional switches available to you. For example, if you need to place database files and logs files in separate partition, you could use the following command line.
Install-ADDSDomainController –Credential (get-credential DomainName\UserName) –DomainName <%YourDomainName%> –DatabasePath “d:\NTDS” –SYSVOLPath “d:\SYSVOL” –LogPath “e:\Logs”
Demoting a domain controller using Powershell
Demoting a domain controller using powershell is again easy as well. The process would still be the same. You first demote the domain controller and after a reboot, you can uninstall the AD role from the computer.
To demote your domain controller, you would simply issue the following command :
- Import-module ADDSDeployment
- Uninstall-ADDDSDomainController
You will be prompted to provide the password for the localAdministrator.
You can sightly change the behavior by issuing the following command
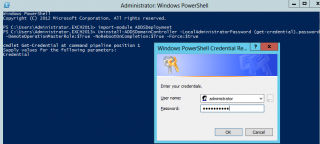
Uninstall-ADDDSDomainController -LocalAdministratorPassword (Get-Credential).password (a popup will be displayed instead of a input prompt )
Click the picture for better resolution
Click the picture for better resolution
Click the picture for better resolution
Again, if you want to better control the demotion process, you will be able to use the additional switches provided with the command
Uninstall-ADDDSDomainController -LocalAdministratorPassword (Get-Credential).password -DemoteOperationMaster:$False -Force:$True -NoRebootafterCompletion
Note : the -force switch will ensure that the operation will complete even if errors are detected.
In order to complete the removal process, you will first need to reboot the server in order to be able to uninstall the server role. When the computer has rebooted, you can get rid of the AD Role by issuing the following command : Remove-WindowsFeature AD-Domain-services
Click the picture for better resolution
Final Notes
Again, we have only scratched the surface of what can be done with Powershell. In this post, we have seen that Microsoft is now offering powerfull cmdlet to perform the most basic (and most important operation) within a domain. In this post, we have focused only on the addition/removal of a domain controller in a domain. Obviously, you can perform more operations using Powershell. You can create the forest or you can add a domain into an existing forest,…. By issuing the following command (after importing the ADDSDeployment module), you will see the command available to you. Using the famous get-help, you see how you could use these cmdlet.
In the future, we might come up with a nice script that would automate (in a flexible way) the promotion/demotion of the domain controllers… I really do not when given that for the moment I’m really overloaded by work….
Till then
See ya
References and more info
http://technet.microsoft.com/en-us/library/hh472162.aspx
http://technet.microsoft.com/en-us/library/hh472163.aspx
